Complete SWTOR Scrapper Scoundrel 6.0+ Smuggler Guide (Damage, PvP only), suitable for both beginner players and more advanced and experienced veterans, who seek to improve their performance! Written for VULKK.com by Alim.
UP TO DATE FOR PATCH 6.3.2
Table of contents
- Introduction
- Gearing and Stats Priorities
- Abilities and Passives
- Utilities
- User Interface
- Focus Target
- Arena Playstyle
- Cleansing
- Start of a Ranked Match
- Breaker Usage
- How to Survive Focus
- Electro Net
- Maximising your use of Exfiltrate
- Miscellaneous Tips
- About the Author
- How is the Class and Spec changing with SWTOR 7.0
Introduction
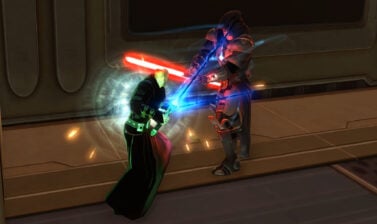
Scoundrel Scrapper is a melee tech damage dealer with high single target burst, great utility (healing over time and crowd control), powerful short cooldown defensives, and access to stealth. The combination of these traits makes Scrapper the duelling king and a strong class for Ranked. If you’re looking to improve your 1v1 game or climb out of “ELO hell” then this guide is for you.
Gearing and Stats Priorities
- Set Bonus: Debilitator (6), Amplified Champion (1)
- Tactical: Volatile Strike
- Combat Amplifiers: Tech Wizardry
- Bonus Amplifiers: Featherweight
- Alacrity Rating: 1213 – 7.15% or 3208 – 15.39% (Minimum Threshold)
- Critical Rating: Minimum of 40% (Around 2600 rating), up to a maximum of 4040.
- Mastery: Any remaining stats can be placed in mastery
- Ear: Sha’Tek Adept Device MK-19
- Implant: Sha’Tek Adept Package MK-19 x 2
- Relics: Sha’Tek Relic of Serendipitous Assault MK-19, Sha’Tek Relic of Focussed Retribution MK-19
Set Bonus
Debilitator vs Tactician:
The only two real options for this spec are either Debilitator or Tactician. Let’s first explain what each set does before I go into detail on which set you should pick depending on the situation.
 Debilitator Debilitator |
|---|
| Effect (2) +2% Master (4) Scamper’s recharge time is reduced by 2 seconds. (6) Dirty Kick gets two ability charges |
 Tactician Tactician |
|---|
| Effect (2) +2% Master (4) Gaining an Upper Hand increases your critical hit chance by 10% for 10 seconds. This effect can only occur once every 18 seconds. In addition, Hot Streak resets the cooldown of Tendon Blast and Triage (6) Upper Hand gives an additional stack. Having an Upper Hand increases your damage and healing by 5% |
Debilitator reducing Scamper’s recharge time and Tactician giving you a flat damage increase (roughly 10% in a dummy parse) has resulted in people referring to Debilitator as the defensive set. While this is a fair assessment at first glance, an offensive consideration that is over-looked in PVP is the ability to stick to a target (Uptime). Although Scoundrels are very mobile, most of your abilities have a maximum range of 4 metres. In this meta of high mobility, with an excessive amount of slows mixed in, it’s very plausible you’ll end up doing less damage with Tactician equipped due to not having the shorter Scamper time Debilitator provides.
Another offensive consideration is how well the extra Dirty Kick charge from Debilitator synergises with Scrapper’s burst. Despite having slightly less overall damage, the ability to stun-lock enemies combined with the high single target burst inherent to the spec may very well help secure a kill you otherwise wouldn’t.
Defensively speaking, Debilitator is the far superior survival set. Although Tactician does increase healing by 5%, the damage you can potentially mitigate via the shorter recharge time on Scamper will far outweigh the extra healing you receive via Tactician. Though a 2-second reduction may sound trivial, the difference in recharge time of Scamper in Debilitator compared with Tactician is significant.
Since Tactician has been nerfed and no longer resets your Back Blast cooldown, I consider Debilitator to be the better overall set and one I would recommend. However, if you won’t have trouble sticking to a target or your defensive capabilities aren’t as important, Tactician can be a viable choice.
An example scenario where you should pick Debilitator: All DPS Solo Ranked match.
An example scenario where you could pick Tactician: Tank/Healer Team Ranked match.
It only requires six pieces to complete the set bonus. Therefore, as your seventh piece of armour, you can use Amplified Champion: This equipment shell is enhanced with additional powerful amplifier opportunities up to the first prototype quality. Amplified Champion will provide you up to an extra 0.4% of Tech Wizardry.
Tactical
There are three tactical options for Scrapper PvP: Volatile Strike, Acid Lash and Explosive Cells. As with the Set Bonus options, let’s first explain what they do before I go into detail on what to pick.
 Volatile Strike Volatile Strike |
|---|
| Effect Bludgeon automatically critically hits targets affected by your unexploded Blood Boiler and triggers it immediately. Dealing damage this way causes your next Back Blast to critically hit. |
First up is Volatile Strike, the far superior choice of the three. Guaranteed high burst on a reasonably short cool down. What can I say about this tactical that does it justice? Not only is it extremely effective, but it is also without a doubt the single most enjoyable update to Scrapper BioWare have done in the 5 years I have been playing this game. You should be using this tactical almost always in PvP. A few limitations of using this tactical to note are:
- Once you’ve triggered the Blood Boiler with your Bludgeon, you’ll be given a buff called Prepared Strike. You’ll have 6 seconds to perform the auto-crit Back Blast before the buff expires.
- Оnly triggering Blood Boiler with Bludgeon will grant the Bludgeon auto-crit and Prepared Strike buff. You need to be careful with your Back Blast, Vital Shot, and Bushwhack usage as these also trigger Blood Boiler.
- You can’t apply more than 1 Blood Boiler on a single target.
Verdict: Must Use
 Acid Lash Acid Lash |
|---|
| Effect Sucker Punch damage triggers Flechette Round and refreshes its duration. Flechette Round does 60% more damage. |
Secondly, we have Acid Lash. Using Back Blast on a target applies a damage over time (DOT, Flechette Round), which lasts six seconds. With Acid Lash equipped, using Sucker Punch will refresh the duration of Flechette Round. While Acid Lash does provide Scapper with its greatest damage per second (DPS) and may leave you feeling inclined to use it in PvP, let me explain why that’s a bad idea. Firstly, the extra DPS (somewhere in the range of 5-10% on a target dummy) will feel insignificant relative to the extra burst Volatile Strike provides. Burst essential for securing kills during stun-locks and times when you’ve mezzed the enemy healer or tank, and the enemy target is without heals or guard.
Another downside, like the Prepared Strike buff from Volatile Strike, Acid Lash requires you to have Sucker Punch uptime within six seconds of using Back Blast on that target to refresh the Flechette Round DOT and prevent it from falling off. An advantage Acid Lash has over Volatile Strike in this regard is that the cooldown of Back Blast is only 12 seconds long in comparison to Blood Boiler’s 18. However, you can benefit from Prepared Strike on any enemy target since it’s a personal buff, in contrast to Flechette Round, which is a debuff to an enemy. Therefore, the Acid Lash tactical is wasted if you need to swap between multiple targets.
Verdict: Leave Acid Lash for the target dummy.
 Explosive Cells Explosive Cells |
|---|
| Effect When Blood Boiler triggers, it deals damage to all enemies around the primary target and spreads its effects. |
And lastly, we have Explosive Cells. Using this tactical will provide a significant boost to your cleave damage. A limitation of this tactical is that it requires all enemies to be within a 4-metre radius of the primary target you Blood Boiler on. Therefore, it is not suitable for games where you’re facing multiple ranged classes who are not stacking. Like Acid Lash, using this tactical instead of Volatile Strike will leave you with a lacklustre burst preventing you from securing kills. Another limitation of this tactical is that the fewer enemies you face, the less benefit you gain. The tactical would become useless if an arena came down to a 1v1 between you and an enemy. Thus, Explosive cells would be more suitable for Tank/Healer or Tank/3 DPS games.
Verdict: Only use it for number farming in regular warzones at mid.
 Augmented Holocomm Augmented Holocomm |
|---|
| Effect Trick Move gains an additional charge |
The only time I can see this tactical potentially be worth taking in PvP is huttball. With how often it puts you further away from your target than the position in which you originally used it, or just straight up kills you, it’s probably still not worth taking.
Verdict: Take at your own risk
Amplifiers
(only applies to armoring’s and hilts/barrels)
- Tech Wizardry: Increases the damage dealt by tech attacks (up to 1%).
- Armor Penetration: Kinetic and energy damage attacks ignore a portion of the target’s armor (up to 2.5%).
- Alpha Strike: Increases damage done after entering combat for 10 seconds (up to 2%).
- En Garde: Reduces damage taken after entering combat for 10 seconds (up to 2%).
For competitive PvP Tech wizardry amplifiers provide the highest boost to overall DPS of all the potential amplifiers and should be your only choice. With how little you are entering and re-entering combat in the average PvP match or duel, you can’t justify taking either Alpha Strike or En Garde. If you’re looking to have fun in regular warzones by getting the biggest hits possible, feel free to use Alpha Strike.
Alacrity Rating
For PvP I recommend using 1213 (7.15%) alacrity or 3208 (15.39%) alacrity. The first option reduces your global cooldown (GCD) to 1.4 seconds and significantly reduces the cooldown of your offensive abilities and crowd control. The second reduces your GCD to 1.3 seconds and the cooldown of offensive abilities and CC even further. Regardless of which option you pick, you need to stay above the recommended numbers to reduce the GCD length and treat them as a minimum since the effect alacrity has on your GCD has threshold limits. I would recommend staying between 100-150 alacrity points higher than these threshold minimums as they will provide you with more consistent GCD lengths. Which option you pick will depend on what you consider to be the greater opportunity cost.
The benefits the higher alacrity option provides are plentiful:
With a 1.3 GCD, you can fit 3 GCDs in a single Dirty Kick (3 x 1.3 = 3.9), which is particularly effective when combined with Debilitator’s two charges of Dirty Kick, allowing you to deal a lot more damage in a stun-lock. With a 1.4 GCD, you’ll only be able to fit two GCDs in a hard stun (1.4 x 3 = 4.2) and may lack the damage needed to secure a kill. However, if you combine a 1.4 GCD (7.15% alacrity) with Pugnacity (+10% alacrity for 15 seconds), you’ll reach 17.15% alacrity giving you a 1.3 GCD for that period. Therefore, an argument can be made that timing your use of Pugnacity during these crucial stun-locks will negate this particular benefit to a degree (especially with the ability to reset Pugnacity’s cooldown via Hot Streak granting even more uptime). Although, it’s not uncommon for you to be able to land a third GCD before the opponent can react with a 1.4 GCD due to latency and delay that seems to occur after a stun expires, preventing an opponent from activating specific DCDs in the 0.2-second window of GCD downtime after the stun ends. Another benefit a 1.3 GCD provides is that it enhances your ability to reactively roll (Scamper). 0.1 seconds isn’t a great deal of time, but it could be the difference between you managing to roll an enemy CC or high damage ability and not. Additionally, a shorter GCD can also give you initiative over an opponent dictating momentum in your favour. Higher alacrity will also reduce the cooldown of offensive abilities and CC even further, which is advantageous.
The higher alacrity option reducing your GCD to 1.3 seconds will increase your DPS on a target dummy by at least 10%. Since this has limited application in PvP (particularly for Scrapper), this brings us to the opportunity cost of placing more stats in alacrity: lower critical rating and consequently lower burst. With the diminishing returns of applying more and more stats into critical rating, you can expect your Back Blast auto-crit to be roughly 6% – 8% lower with a higher alacrity build compared with a higher critical.
Overall, when you consider the somewhat insignificant % of burst lost and factor in the benefits of high alacrity, going for the 1.3 GCD can be a viable choice, especially with the recent introduction of higher tier augments.
Critical Rating
If you’re running a 1.4 GCD alacrity build, your critical rating should be in the range of 3200 to 4070. For better sustained, stay on the lower end of this range. For higher critical hits, stay on the higher end. Higher burst suits the Scrapper playstyle better, so I would lean toward the higher.
If you’re running a 1.3 GCD alacrity build, you should place any remaining stats in critical rating and reach 2600 (roughly). If you manage to get your hands on the new tier of augments, your critical rating can reach as high as 2900 (roughly).
Mastery
At this point, any remaining stats can be placed in mastery.
Accuracy
Since most of Concealment’s damage abilities are tech (yellow), no accuracy is needed.
Abilities and Passives
Primary Abilities
 Blood Boiler
Summons a probe that boils the blood of the target for a few seconds, after which, damage dealt by one of your bleeds will trigger an explosion, dealing X internal damage and making the target assailable for 45 seconds. Assailable targets take 7% more damage from elemental and internal attacks.
 Back Blast
Fires the scattergun point-blank into the target’s backside, dealing X kinetic damage. Only usable while behind the target. If used from stealth, Back Blast deals Y kinetic damage and grants an Upper Hand.
 Bludgeon
Bashes the target with the scattergun’s butt for <<1>> kinetic damage, granting an Upper Hand.
 Sucker Punch
Exploits Upper Hand to sucker punch the target for X kinetic damage. Requires and consumes Upper Hand.
 Bushwhack
Exploits Upper Hand to call in droids that fill the vicinity with spinning blades, dealing X internal bleed damage to up to 8 enemy targets within 8 meters over 6 seconds. Requires and consumes Upper Hand.
 Shank Shot
Fires a close-up scattergun shot at the target’s shank, dealing X kinetic damage and immobilizing the target, preventing it from moving or turning for 4 seconds.
 Tendon Blast
Blasts the target’s legs with your scattergun, dealing X kinetic damage and slowing the target’s movement speed by 50% for 12 seconds.
 Pugnacity
Psych yourself up, immediately gaining Upper Hand and boosting alacrity by 10% for 15. Does not break stealth.
 Hot Streak
Resets the cooldown of Pugnacity, Kolto Cloud, Blood Boiler, Point Blank Shot, and Defense Screen and increases your Mastery by 20% for 15 seconds.
 Dirty Kick
Stuns the target for 4 seconds and deals X kinetic damage.
 Flash Grenade
Lobs a flash grenade that blinds the target for 8 seconds. Damage causes this effect to end prematurely.
 Tranquilizer
Puts the target to sleep for 60 seconds. Damage will break the effect prematurely. Only usable from stealth and only usable on targets not in combat. Only one target can be incapacitated at a time.
 Seismic Grenade
Disrupts the earth beneath all targets within 6 meters of the selected area, dealing X kinetic damage and knocking them unconscious for 5 seconds. Damage causes this effect to end prematurely.
 Defense Screen
Projects a defense field around yourself for up to 10 seconds, which absorbs X damage. Does not break stealth.
 Dodge
Dodge
Increases your chance to dodge melee and ranged attacks by 200% for 3 seconds. Does not break Stealth
 Stealth
Activates your stealth generator, increasing your stealth level by 15 and making you and your companion difficult to detect. Movement speed is reduced to 85% of normal while in stealth.
 Disappearing Act
Overloads your stealth generator, immediately exiting combat and entering stealth mode. For 10 seconds, you become virtually undetectable.
 Escape
Purges incapacitating and movement-impairing effects.
 Scamper
Roll forward 12 meters. While rolling, your chance to dodge melee and ranged attacks is increased by 30%. Does not break stealth. Cannot be used while immobilized or hindered. Scamper has 2 ability charges and recharges one charge every 8 seconds.
 Surrender
Puts up the front of surrender, instantly lowering your threat by a moderate amount.
 Trick Move
Override your stealth generator to quickly move to a friendly or enemy target and increase your movement speed by 75% for 3 seconds. Does not break stealth. Cannot be used against enemy targets in cover.
 Slow-release Medpac
Injects the target with slow-release medicine that heals for X over 18 seconds. Stacks up to 2 times.
 Kolto Pack
Exploits your Upper Hand to heal the target immediately for X. Requires and consumes Upper Hand.
 Diagnostic Scan
Heals a friendly target for X over 3 seconds.
 Triage
Cleanses a friendly target of up to 2 negative tech or physical effects.
 Smuggle
Cloaks all group members within 10 meters of you in a temporary stealth field that lasts 15 seconds. Cannot be used in combat. Only usable while in stealth mode.
 Cool Head
Keeps a cool head, recovering 50 energy over 3 seconds.
 Distraction
Interrupts the target’s current action and prevents that ability from being used for 4 seconds.
Important Passives
 Flying Fist
Sucker Punch triggers Flying Fists, dealing x additional kinetic damage.
 Round Two
Flying Fists immediately regrants Upper Hand when hitting a bleeding target. This effect cannot occur more than once every 10 seconds.
 Fight or Flight
Surrender increases your movement speed by 50% for 6 seconds.
 Flechette Round
Loads your shotgun with flechettes, causing Back Blast to deal an additional X internal bleed damage over Y seconds and increase armor penetration by 30% for 15 seconds.
Pierce and Batter
Sucker Punch deals 10% more damage to targets affected by your Flechette Round.
 Slippery Devil
Increases your effective stealth level by 2. In addition, when you activate Scamper, you dodge or resist all incoming attacks for 1.5 seconds.
 Rolling Punches
Back Blast grants Calculated Frenzy, which increases ranged and tech critical chance by 10% for 15 seconds. In addition, damage dealt by Bludgeon causes the target to become susceptible for 45 seconds. Susceptible targets take 5% more damage from tech attacks.
Hot and Ready
Damage dealt by Blood Boiler marks the target with Hot and Ready, allowing your next Back Black against the target to be useable while face-to-face with the target and treated as though you attacked from stealth.
 Upper Hand
Defeating an opponent or activating Blaster Whip gives you the Upper Hand, enabling the use of exploits for 24 seconds. Up to 2 charges of Upper Hand can exist at once.
Generating TAs:
- Dealing damage with
 Back Blast initiated from stealth or with Hot and Ready passive.
 - Bludgeon
- Pugnacity
 Round Two (passive)
What consumes TAs:
- Sucker Punch
- Bushwhack
- Kolto Pack
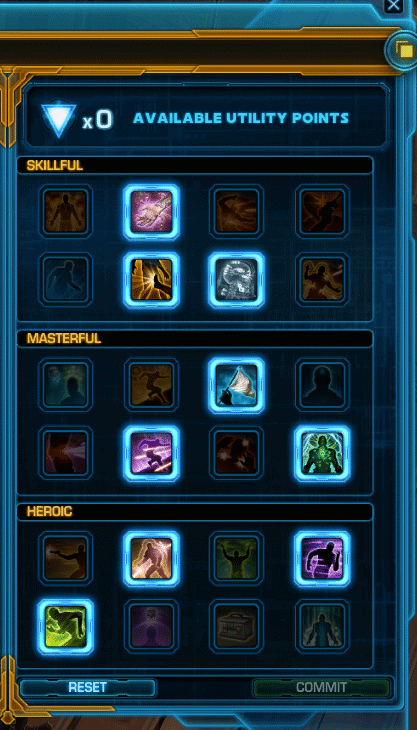
Utilities
(from left to right)
Skillful
| Smuggled Get-Up |
| Effect: Reduces all area of effect damage taken by 30%. |
| Comments: Can be a good choice if you’re facing lots of area of effect damage e.g. Engineering Snipers |
| Verdict: Useful against AoE |
| Scar Tissue |
| Effect: Increases damage reduction by 5%. |
| Comments: It doesn’t get much better than passive damage reduction. Don’t underestimate the benefit 5% extra damage reduction provides. |
| Verdict: Must Have |
| Let Loose |
| Effect: Lacerating Blast deals 25% more damage. |
| Comments: Since Lacerating Blast is never used for damage, sometimes for revealing a player after they vanish, the extra damage is irrelevant. |
| Verdict: Useless |
| Holdout Defense |
| Effect: Slapping a target with Blaster Whip or Bludgeon grants Holdout Defense, increasing your movement speed by 50% for 3 seconds. |
| Comments: With Bludgeon having a 6-second cooldown, this Utility can potentially increase your movement speed by 50% for an uptime of 50%, which is substantial. The limitation of this utility is that it requires you to already be in range of the target to gain the speed increase (since Bludgeon has a 4-metre range). Therefore, you could argue that you’re gaining a speed increase at a point when it’s not needed. However, this utility can be useful for swapping between and keeping up with targets that have recently used speed increases e.g., Hydraulic Overrides. Another limitation of this utility is that to gain the movement speed increase you may be forced to deviate from an optimal rotation. Although Bludgeon has a high priority, so this will most likely be insignificant. |
| Verdict: Okay |
| Dirty Escape |
| Effect: Reduces the cooldown of Dirty Kick by 15 seconds. |
| Comments: The importance of hard stuns in PvP can’t be overstated. This utility combined with the Debilitator set bonus will give you two hard stuns on a 30 second cooldown which is ridiculously strong. |
| Verdict: Must Have |
| Sneaky |
| Effect: Increases movement speed by 15% and effective stealth level by 3. |
| Comments: Sneaky is another utility that improves Scrapper’s movement speed. The difference between Sneaky and Holdout Defense is that Sneaky has 100% uptime, doesn’t require a global cooldown, or you to already be in range of the target to gain a benefit. These benefits come at a cost of a smaller increase in movement speed. In theory, this will mean it will be the superior choice of the two in chasing down targets e.g., Marauders in Solo Ranked who kite away to regenerate. |
| Verdict: Okay |
| Curbing Strategies |
| Effect: Quick Shot and Lacerating Blast reduce the movement speed of targets they damage by 40% for 6 seconds. In addition, when Flash Grenade ends it leaves behind Flash Powder that reduces the target’s accuracy by 20% for 8 seconds. |
| Comments: The major limitation of this utility is its low % RNG nature. It could be very effective, causing an enemy to miss a CC/ high damaging ability or be completely useless. Since Flash Grenade is an AoE ability, you can spread this debuff to multiple targets if you manage to catch more than one person with your Flash. Having an accuracy debuff of 20% for 8 seconds means a single enemy target (on average) will miss 1 GCD while accuracy debuffed. However, PvP fights are constantly moving; In the 8 seconds where the enemy target was flashed the fight may have moved far enough away that he may spend a large portion of the 8 seconds transitioning back into the fight. Another potential limitation to this utility is that an enemy could easily “outplay” the accuracy debuff by not using any important abilities for the 8-second duration. Although, this will still provide a benefit, and in reality most players are either oblivious to the debuff or don’t consider the accuracy reduction % high enough to warrant altering their gameplay. As I will explain later in more detail, in a 1v1 scenario, a Scoundrel will often follow his Flash Grenade with a hard stun, potentially wasting 4 seconds of the 8 seconds. In arenas, you will typically have an enemy target who your team prioritizes their CC on. If you were to CC the enemy target first and a teammate then followed with their CC, the accuracy debuff would be wasted. You could decide to only Flash Grenade when the enemy target will be white barred by it. However, there is a couple of issue with that approach: 1. In 1v1s, prioritizing Flash Grenade usage to ensure the accuracy debuff isn’t wasted could result in a sub-optimal Flash Grenade from an overall perspective. 2. In arenas, it would be harder to execute since it requires higher co-ordination. It may result in the enemy target being left to free-cast if you’re waiting for a teammate to CC before using yours |
| Verdict: Okay |
| Anatomy Lessons |
| Effect: Reduces the energy cost of Dirty Kick and Tendon Blast by 5 and makes Tendon Blast immobilize the target for 2 seconds. |
| Comments: A different method of ensuring uptime is to root the enemy target. Precision instruments give Scrapper a ranged root (10 metres), allowing you to close the gap between you and an opponent by pinning them down. Therefore, Anatomy Lessons is the superior utility choice over Sneaky and Holdout Defense. However, there are niche scenarios where you shouldn’t pick Anatomy Lessons e.g., Duels against a sniper since they have immunity to movement impairing effects via Entrench. |
| Verdict: Must Have |
Masterful
| Flee the Scene |
| Effect: Reduces the cooldown of Disappearing Act by 30 seconds and activating Disappearing Act increases movement speed by 50% for 6 seconds. |
| Comments: Disappearing Act is an essential ability that allows Scoundrels to vanish out, drop combat, and heal to full. Therefore, a reduction in its cooldown may seem like a viable choice. Since Scoundrels typically use Disappearing Act as their last major defensive, even with the shorter cooldown, it’s unlikely you’ll get multiple uses out of your Disappearing Act in arenas or duels with its cooldown still being 1 minute 30 seconds long. |
| Verdict: Okay |
| Med Screen |
| Effect: Your Defense Screen heals you for 5% of your maximum health when it collapses. |
| Comments: Combining your health pool at end game with the cooldown of Defense Screen, this utility provides you with 14k health every 30 seconds, which is less than the average damage ability does. As with most healing based DCDs, they are generally more effective against fewer opponents, so this utility could be an okay choice in 1v1 scenarios if there’s nothing better to pick. |
| Verdict: Okay |
| Keep Cool |
| Effect: Cool Head now immediately restores 15 additional energy. |
| Comments: You’ll rarely run into energy problems whilst playing Scrapper in PvP. |
| Verdict: Useless |
| Supplemented Medpac |
| Effect: While your Slow-release Medpac is active on yourself, your damage reduction is increased by 3% per stack (2). |
| Comments: Improving Scrapper’s ability to absorb damage without having to use a GCD (Scamper). This combined with Scar Tissue will give you 11% Damage Reduction which is very strong. |
| Verdict: Must Have |
| Get the Bulge |
| Effect: Tendon Blast will now grant a Tactical Advantage. |
| Comments: You’ll rarely have an issue with generating enough Upper Hands. |
| Verdict: Useless |
| Skedaddle |
| Effect: When activated, Disappearing Act grants 2 seconds of Dodge. |
| Comments: Cloaking out, dropping combat, and regenerating can be the difference between winning and losing a match. The benefit of this utility is that it helps ensure a successful Disappearing Act by cleansing any DOTs and movement impairing effects that are on you. The Scramble utility in the Heroic tier giving Dodge a cooldown of only 20 seconds if you’re consistently attacked led to Skedaddle being historically regarded as a useless utility. Common arguments against choosing this utility are as follows: 1. With Scramble giving Dodge a cooldown as short as 20 seconds, Skedaddle is not necessary. When being focused by several targets, 20 seconds can still be a long time to survive without a healer or tank, depending on what DCDs you have available. 2. If you’re being focused and know you’ll need to stealth out soon; you can hold on to Dodge and save it for your stealth out. There will often be times when you must stay in combat till the very last second to secure a kill you may otherwise lose. Holding onto your Dodge to use it in conjunction with Disappearing Act may force you to vanish out sooner than you would otherwise have to by not having the freedom to use Dodge to cleanse DOTs or deflect high white damage abilities when needed. You may also miss out on opportunities to reflect high yellow damage if you are running Back at Ya. Even the most advanced players will end up mistiming situations leaving them without Dodge available for their Disappearing Act resulting in them being revealed. In duels, you will usually CC an opponent using Tranquilizer after using Disappearing Act, so being brought out by DOTs is less likely to be an issue. Therefore, Skedaddle is generally not needed in duels. |
| Verdict: Very Useful |
| Dirty Trickster |
| Effect: Surrender purges all movement-impairing effects when activated. Additionally, when Tranquilizer wears off, the target is struck by Sedatives, reducing all damage dealt by 50% for the next 10 seconds. |
| Comments: With the number of abilities that can slow and root you in SWTOR combined with the specializations 4-metre range, an extra movement-impairing purge is vital. Reducing an enemy target’s damage by 50% after using Tranquilizer on them is also useful. |
| Verdict: Must Have |
| K.O. |
| Effect: When used from stealth, Back Blast and Point Blank Shot interrupt and knock down the target for 3 seconds. Player targets are immobilized for 3 seconds, rather than knocked down. |
| Comments: This utility is an example of the issues that can arise when tying multiple effects into one ability. Back Blast is Scrapper’s highest hitting ability and should be used exclusively in a manner that inflicts the most damage. Therefore, the root effect may often be irrelevant e.g. When an opponent has full resolve. Considering Scrapper already has access to Shank Shot and Anatomy Lessons (the superior utility choice), K.O. is not worth choosing. |
| Verdict: Okay |
Heroic
| Scramble |
| Effect: Every time you get attacked, the active cooldown of your Dodge is reduced by 3 seconds. This effect cannot occur more than once every 1.5 seconds. |
| Comments: As mentioned earlier, with this utility Dodge can theoretically have a cooldown as short as 20 seconds. Having 3 seconds of 100% deflection chance to white damage and a DOT cleanse that frequently is extremely strong. |
| Verdict: Must Have |
| Smuggled Defenses |
| Effect: Reduces the cooldown of Escape by 30 seconds, Defense Screen by 5 seconds, and Smuggle by 60 seconds. |
| Comments: As I explain later in more detail, Scrapper without a CC breaker is extremely vulnerable. Therefore, a shorter CC break can be a good choice for PvP. With this utility Scrapper’s breaker will be reduced from 2 minutes to 1 minute 30. With the cooldown still being long and Scoundrels often saving their breaker for when it’s needed, it’s hard to justify taking this utility over others in this tier. The shorter Defense Screen cooldown is a nice bonus, and the shorter Smuggle cooldown is generally irrelevant. |
| Verdict: Good |
| Sleight of Foot |
| Effect: Reduces the cooldown of Trick Move by 10 seconds and allows it to be used while immobilized. When activated it purges movement-impairing effects and grants an Upper Hand. |
| Comments: Reducing Trick Move’s cooldown by 10 seconds is insignificant, considering it will still have a long cooldown of 35 seconds. When you factor in how frequently Trick Move either doesn’t work or straight up kills you, this utility is not worth choosing. Trick Move purging movement-impairing effects is also not necessary since Scoundrel already has access to enough purges, especially with Dirty Trickster. As mentioned earlier, Scrapper doesn’t have any issues generating enough Upper Hands, so this aspect is also useless. |
| Verdict: Useless |
| Slippery Shooter |
| Effect: Scamper grants a charge of Slippery Shooter, reducing the energy cost of your next Quick Shot by 100%, increasing its maximum range by 20 meters, and making it knock the target back. Each use of Quick Shot consumes a charge of Mobile Strategies and grants 10 energy. |
| Comments: This Utility has no place in competitive PvP. If you’re looking to mess around, feel free to take it. |
| Verdict: Meme |
| Surprise Comeback |
| Effect: Pugnacity now additionally grants Surprise Comeback, restoring 5% of total health every 3 seconds and reducing damage received by 20% for 15 seconds. |
| Comments: Not only is your damage reduction increased by 20% for 15 seconds, but Surprise Comeback will also heal you for a total of 25% of your health, making this utility extremely strong. The introduction of Hot Streak, which resets the cooldown of Pugnacity, bolsters this utility even further. |
| Verdict: Must Have |
| Sly Surrender |
| Effect: Surrender grants Sly Surrender, causing your next Slow-release Medpac to immediately grant two stacks. Additionally, Surrender heals you for 1% of your maximum health every second for 10 seconds and Kolto Pack now initially restores X health and then additionally restores Y health over 9 seconds. |
| Comments: Surrender immediately granting you two stacks when you use Slow-release Medpac will save you one GCD (assuming you don’t already have two stacks of Slow-release Medpac running). Surrender will heal you for a total of 10% over 10 seconds and will further increase the healing received by your next Kolto Pack by under 10%. This utility is another example of the issues that arise with tying too many effects into one ability. Surrender is most useful as a movement speed increase and movement-impairing purge and should be used primarily in that manner. Therefore, the healing benefits this utility provides may be wasted. However, in specific duels where uptime isn’t an issue, this utility can be taken if nothing better is available. |
| Verdict: Okay |
| Hotwired Defenses |
| Effect: Increase the amount of damage absorbed by Defense Screen by 30%. |
| Comments: Deense Screen absorbs roughly 23k damage. A 30% increase results in Defense Screen absorbing an extra 7k damage, which is insignificant. Med Screen in Masterful tier is the superior choice of the two. |
| Verdict: Poor |
| Back at Ya |
| Effect: Activating Dodge grants Back at Ya, returning 150% of direct single target Tech and Force damage taken back to the attacker while Dodge is active. |
| Comments: A notorious argument for why you shouldn’t take this Utility roughly goes as follows: “Yes, you reflect damage to the enemy, but you still receive the original damage. Good players will ‘outplay’ the reflect by not hitting into it, so it’s only good against bad players”. Firstly, even if your enemies stop hitting you during reflect, it’s still benefiting you since it’s now a target drop. Secondly, considering that people spam their abilities, play with ability queue windows, have abilities with delayed burst such as Thermal Detonator, and travel time such as Heatseeker Missile, you’ll inevitably end up reflecting a large amount of damage. |
| Verdict: Recommend |
Recommended Utilities Build
Overall, this is the most versatile utility set-up and one I would recommend for most situations:
Rotation
- Blood Boiler
- Bludgeon
- Back Blast
Priority System
1. Blood Boiler – Blood Boiler is your highest priority and should be used on cooldown.
- Triggering Blood Boiler makes the target assailable for 45 seconds, assailable targets take 7% more damage from elemental and internal attacks.
- Hot and Ready: Damage dealt by Blood Boiler marks the target with Hot and Ready, allowing your next Back Black against the target to be useable while face-to-face with the target and treated as though you attacked from stealth.
- With the Volatile Strike tactical Bludgeon automatically critically hits targets affected by your unexploded Blood Boiler and triggers it immediately. Dealing damage this way causes your next Back Blast to critically hit.
2. Bludgeon
(Only If you want to trigger your Blood Boiler)
- One thing to be careful of when triggering Blood Boiler with Bludgeon is to ensure that Back Blast will be off cooldown within 6 seconds, as a minimum, to make sure you don’t lose the automatic critical Back Blast.
3. Back Blast
If Blood Boiler is already on cooldown, or has just been triggered by Bludgeon, Back Blast will be your highest priority since it’s your highest damage ability.
- Back Blast grants Rolling Punches, which increases ranged and tech critical chance by 10% for 15 seconds.
- Flechette Round: Loads your shotgun with flechettes, causing Back Blast to deal an additional X internal bleed damage over Y seconds and increase armor penetration by 30% for 15 seconds.
- If you’ve recently placed Blood Boiler on a target but your Bludgeon is not yet available, it can be worth delaying your Back Blast until you can trigger the Blood Boiler with Bludgeon and subsequently benefit from the Prepared Strike buff.
4. Sucker Punch
If you already have 2 Upper Hands or are 1 GCD away from killing an enemy target and want a bigger hit to secure a kill, Sucker Punch is your next highest priority.
5. Bludgeon
If you don’t have 2 Upper Hands.
- Grants upper Hand.
- Damage dealt by Bludgeon causes the target to become susceptible for 45 seconds. Susceptible targets take 5% more damage from Tech attacks.
6. Sucker Punch
Even if you’re at 1 Upper Hand, if all the previous abilities are on cooldown Sucker Punch is your next priority.
7. Shank Shot
Bushwhack
If you’re looking to deal Area of Effect damage and are confident you can hit at least two enemies for the full duration, Bushwhack can replace Sucker Punch.
Openers
Arenas
Initiating with Blood Boiler or Dirty Kick:
As soon as an enemy target sees you apply Blood Boiler, they will typically react by popping a defensive cooldown or using CC on you. Therefore, opening with Dirty Kick from stealth or when swapping to a target prevents any chance to respond. However, opening on an enemy with Blood Boiler before Dirty Kick allows you to fit more burst in the stun-lock, giving you a better chance of either killing the enemy or forcing a panic break. At the start of an arena, you’ll have the benefit of starting from stealth, and the enemy target will have defensive cooldowns/ CC breaker available, so I would recommend opening with Dirty Kick. If you’re confident you can get off the Blood Boiler and Dirty Kick before the opponent can respond, feel free to Blood Boiler first.
Double Dirty Kick opener:
Opening with Blood Boiler
- Stealth
- Pugnacity + Defense Screen
- Blood Boiler
- Dirty Kick
 Hot Streak
- Bludgeon
- Back Blast
- Dirty Kick
- Blood Boiler
- Bludgeon
- Sucker Punch
Opening with Dirty Kick
- Stealth
- Pugnacity + Defense Screen
- Dirty Kick
- Blood Boiler
- Hot Streak
- Bludgeon
- Dirty Kick
- Back Blast
- Blood Boiler
- Bludgeon
The downside to both these openers is that your Prepared Strike buff from the second Blood Boiler will expire before your Back Blast becomes available. In both these openers, you could use Sucker Punch before the second Bludgeon to prevent this. However, this opener is about prioritising as much burst as possible in the stun-lock window. Therefore, I wouldn’t recommend doing so for the Dirty Kick opener as your second stun will have worn off before you trigger the second Blood Boiler.
As I mentioned above, at the start of a duel or arena, players will have all their DCDs, including CC breaker. You’ll also have no resolve, so it’s unlikely you’ll get off two unmitigated Dirty Kicks. Therefore, you’ll probably be better off saving Hot Streak for a better opportunity later in the fight. The subsequent openers may be the better choice:
Opening with Blood Boiler
- Stealth
- Pugnacity + Defense Screen
- Blood Boiler
- Dirty Kick
- Bludgeon
- Back Blast
- Dirty Kick
- Sucker Punch
- Sucker Punch
- Bludgeon
Opening with Dirty Kick
- Stealth
- Pugnacity + Defense Screen
- Dirty Kick
- Blood Boiler
- Bludgeon
- Dirty Kick
- Back Blast
- Sucker Punch
- Sucker Punch
Duel
- Stealth
- Tranquilizer
- Blood Boiler
- Slow-release Medpac
- Slow-release Medpac
- Dirty Kick
- Bludgeon
- Back Blast
- Sucker Punch
For duels, you’ll want to open with Tranquilizer from stealth for two reasons:
- It allows you to apply your Blood Boiler and Slow-release Medpac without resistance. Slow-release Medpac will be important since you will be taking damage.
- The Tranquilizer enables you to apply the Sedatives debuff, giving your enemy 50% damage reduction for 10 seconds. You may argue that stunning a target that is debuffed by sedatives is a waste but getting an unmitigated burst during the stun or forcing a CC break is more valuable.
If you’re mid-fight and need to regenerate some health and/or wait out a DCD, the following combination can be used (only if the opponent has less than 200 resolve):
- Disappearing Act + Tranquilizer
- Blood Boiler
- Slow-release Medpac
- Slow-release Medpac
- Dirty Kick
- Kolto Pack
- Bludgeon
- Back Blast
- Sucker Punch
 Kolto Pack
- Flash Grenade
- Blood Boiler
- Slow-release Medpac
- Slow-release Medpac
- Kolto Pack
- Dirty Kick
- Bludgeon
- Back Blast
- Sucker Punch
Make sure to not have any DOTs on the enemy target before attempting the previous two combinations.
User Interface
To help improve your awareness in PvP you should have a clear User Interface which maximises the information you’re able to absorb. To ensure this you should enable or tweak the following settings:
Auto Target Closest Enemy: Auto Target Closest Enemy: You don’t want this turned on. I often see people wasting abilities on random targets after their primary target vanishes, and the game automatically targets the person nearest to you.
Focus Target: You want this toggled on. I’ll later explain the importance of Focus Target in PvP.
Smart Camera: I prefer to have this off. Smart camera auto-adjusts the camera to the position your character is facing when you move. With this off, you can kite in the opposite direction of the enemies with your camera positioned towards them, allowing you to be aware of anyone chasing you. However, this isn’t much of an issue if you hold the camera position with your left click.
Camera Max Distance: You want to set your camera max distance to 100% to ensure you’re able to see everything that is going on around you. I would even recommend going into your folder settings to increase this distance further. I have mine to set to 30.
Ability Queue Window: While having a queue window can maximise uptime by reducing any delay between abilities, the ability to reactively roll is hindered. A lower queue time also reduces your chances of getting a roll bug from accidentally double rolling. I wouldn’t go higher than 0.5 for your ability queue window and recommend most people to use 0.25 or even 0.
Show Next Target in Cycle: You want this toggled on. It will help with your ability to swap to targets by indicating who will be targeted next.
Show Cooldown Text: You want this toggled on. After using an ability with a cooldown, cooldown text will tell you how many seconds there are remaining before the ability becomes available again.
You can also change the cooldown style. Cooldown style 2 is the clearest for me, so that’s what I use, though this will be personal preference to a degree.
In Interface Editor you should enable or tweak the following settings:
Target of Target and Cast bar: You want this enabled. This will show you who the person you have targeted is targeting and will track any abilities they use with a cast time.
Operation Frames: To help track your teammate’s health and make cleansing easier, I recommend making the following changes to your ops frame:
- Show Health Text Enabled
- Show Only Removable Debuffs Enabled
- Increase health height and width
- Increase debuff scale
Player Frames: Show information text Enabled
Player Buff and Debuff tray:
- Separate the two trays enough to ensure buffs and debuffs don’t overlap.
- Increase the scale of Buffs and Debuffs
- Reduce effects per row to 4 (personal preference).
- Highlight Effects Enabled – Highlights any personally applied buffs or debuffs, helps to distinguish your HOTs or DOTs from your teammates.
- Sort by time remaining – Organises buffs and debuffs by the length of time they have remaining before expiring, improving your ability to track them.
Target Frames:
- Show information text.
- Highlight Buffs and Debuffs enabled – Highlights any personally applied buffs or debuffs, helps to distinguish your HOTs or DOTs from your teammates.
- Buff and Debuff sort type: Time remaining – Organises buffs and debuffs by the length of time they have remaining before expiring, improving your ability to track them.
Focus Target:
- Enable
- Increase Buff and Debuff scale
- Show Information Text
- Highlight Buffs and Debuffs Enabled – Highlights any personally applied buffs or debuffs, helps to distinguish your HOTs or DOTs from your teammates.
- Buff and Debuff Sort type: Time remaining – Organises buffs and debuffs by the length of time they have remaining before expiring, improving your ability to track them.
Here is an example of a good User Interface:

Focus Target
Focus Target is something you’ll rarely see people use, yet it can significantly improve your effectiveness in PvP. Focus Target enables you to apply abilities to an enemy without having to specifically target them, reducing downtime that typically occurs when swapping between targets. Using Focus Target also allows you to track another enemy’s defensive cooldowns and casts, allowing you to react faster and interrupt them in time.
Who should you put on Focus Target?
For Heal + 3 DPS and Tank + Healer games, you should put the enemy healer on your focus target to prioritise using your CC and interrupts to reduce their healing output. The highest priority heals with a cast you want to be interrupting are as follows:
- Mercenary Bodyguard: Progressive Scan
- Operative Medicine: Kolto Waves
- Sorcerer Corruption: Innervate (Single Target), Revivification (AoE)
 Progressive Scan
 Kolto Waves
 Innervate (Single Target),
  Revivification (AoE)
An important thing to note is that all the abilities above (excluding Revivification) are a channel. This means they tick 4 times throughout the entirety of the cast. It’s important to react quickly and interrupt as soon as possible, reducing the number of healing ticks the enemy target receives. Because the cooldown of Scoundrel’s interrupt is longer than these abilities, if the channel has already reached over halfway through, it may be worth saving your interrupt to catch the next ability instead. However, since the healing output of Progressive Scan increases with each tick (if multiple targets are taking damage), it can be worth interrupting even just the latter ticks in this instance.
For Tank + 3DPS and 4 DPS games, you’ll typically want to put an enemy Operative, Mercenary, or Sorcerer on focus target because of their ability to heal. Mercenary and Sorcerer are great classes to place on your Focus Target because of their access to spammable heal and DPS abilities with a cast. They are also both ranged classes; therefore, it’s unlikely for your CC to be broken by AoE or DoTs. Even more so than Sorcs, Mercs are a great Focus Target because they only have one CC breaker and can cleanse Flash Grenade. If you were to CC an enemy Merc’s teammate, you then give him the possibility of cleansing, countering your Flash.
The highest priority heals and DPS abilities with a cast you should be interrupting are:
- Operative: Kolto Infusion
- Mercenary: Rapid Scan, Blazing Bolts, Tracer Missile, Unload, Serrated Shot
- Sorcerer: Dark Infusion, Thundering Blast, Crushing Darkness, Force Leech
 Kolto Infusion
 Rapid Scan,
  Blazing Bolts,
  Tracer Missile,
  Unload,
  Serrated Shot
 Dark Infusion,
  Thundering Blast,
  Crushing Darkness,
  Force Leech
Sorcerer’s  Polarity Shift, Mercenary’s
  Energy shield and
  Supercharged Gas can provide immunity to interrupts for the duration, so that’s something to pay attention to by checking buffs on the Focus Target Frame. CCing the Focus Target during these periods is particularly effective.
To use Focus Target, you’ll need to set a keybind for “Set Focus Target / Swap Focus Target” and “Focus Target Modifier”. Focus Target Modifier is the key you will press and hold for an ability to go on the Focus Target. You will know when your Focus Target Modifier is active because your mouse arrow will turn purple. Do note that it’s not possible to queue abilities on your Focus Target. If you’re playing with an ability queue window, you’ll need to wait for your GCD to be available before using an ability via the Focus Target Modifier. If you have the majority of your class’s abilities key bound on your keyboard, I recommend keybinding Focus Target Modifier to a mouse side button for ease of use.
Arena Playstyle
Concealment’s versatility enables a few different playstyles:
1. Damage – The Damage playstyle is one in which a player will prioritise DPS over everything. The primary goal is to kill enemy targets as quickly as possible by forcing enemy DCDs, pinning down opponents to maximise your up-time, and using your burst + stuns to get the killing blow.
Verdict: For Tank/Heal games
2. Support – The support playstyle is one in which a player will prioritise keeping himself or teammates alive via off heals, cleansing, and crowd control. You will use your burst via the Volatile Strike combination, but beyond that DPS is secondary.
Verdict: Suitable for when multiple teammates are taking damage e.g., Tank/ 3 DPS games, or you are focused.
3. Hybrid – The Hybrid playstyle is a playstyle where a person’s emphasis on DPS or support will shift depending on the situation.
Verdict: For 4 DPS games
A lot of Scrapper players struggle to find the right balance between off-healing too much or too little. You’ll often see Scoundrels begin to off-heal when it’s already too late. With any heal comes the opportunity cost of doing damage. You don’t want to miss out on opportunities to kill an enemy because you’ve switched to support.
How and when should I Support/off-heal?
One easy way to structure your off-healing is to base it around the enemy target’s strong DCDs e.g., you’re focusing on a marauder who uses Undying. It makes no sense to continue DPSing him, and you should switch to off-healing a teammate. You can apply this method to all strong enemy DCDs, in which your team is unlikely to kill a target through. To aid your efficiency in this method, I would recommend keybinding “acquire target’s target” allowing you to swap between DPSing the enemy target and healing your teammate with minimal downtime.
Another way to structure your support is to base it around the downtime of your Volatile Strike combination.
With Scoundrel’s best healing ability (Slow-release Medpac) being a heal over time (HOT) you want to be pre-emptive with your usage of Slow-release Medpac by applying them early and maintaining them throughout a fight. Let’s continue with the marauder example above where you switch from DPSing an enemy to Off-healing a teammate after the marauder uses Undying. If your teammate has no HOTs and you decide you want to both apply Kolto Pack and 2x Slow-release Medpac, your priority will be to Kolto Pack before using Slow-release Medpac for two reasons:
- Kolto Pack has a cast and therefore requires you to stand still. Using Kolto Pack first allows you to use the subsequent period of applying Slow-release Medpac to transition back to the enemy target, minimising downtime.
- Slow-release Medpac are a heal over time. Using Kolto Pack first increases the chance your teammate survives long enough for the Slow-release Medpac to have their effect.
In general, there are a few situations where your emphasis should switch to support:
- Maintaining a player advantage – In arenas, each team will have an enemy target they will try to kill as quickly as possible. If your team manages to land the first kill, you should then prioritise supporting your teammate who is focused. Doing so will extend the duration of your team’s player advantage, improving your chances of winning the match. A disadvantage Scoundrels have relative to Sorcerer and Mercenary is that it has no strong spammable heal; beyond maintaining your Slow-release Medpac and using Kolto Pack whenever available, you should either be CCing or DPSing your team’s next target. A nice trick to help support a teammate trying to kite away is to Tendon Blast an enemy and follow it with a Shank Shot. The two 2 second root from the Tendon Blast “baits” the enemy’s root cleanse, leaving him susceptible to the full 4-second duration of Shank Shot.
- Teammate caught in a stun-lock – It’s not atypical for players in arenas to use their breaker offensively or waste it. Therefore, supporting a teammate with off-heals or CC during the period where they are stunned and focused can be greatly beneficial. Though Kolto Pack can only heal so much, it may be enough to ensure the teammate survives the stun allowing him to use his DCDS. Thus, significantly increase how long he lives.
- Multiple teammates are taking damage – If you have a melee dominant team facing an AOE team or are in a Tank/ 3DPS game where typically 3 targets are taking damage, you should be maintaining Slow-release Medpac on multiple teammates. These situations are where Scoundrel’s off-healing shines via Slow-release Medpac, and consequently, you should shift your emphasis to support.
- Heal/ 3 DPS games when your healer is CCed – In Heal/3 DPS games, each team will typically focus all their CC on the enemy healer reducing their healing output as much as possible. Therefore, using Kolto Pack and maintaining HOTs can help ensure your teammate being focused survives the period of time where your healer is CCed.
Cleansing
Triage – Cleanses a friendly target of up to 2 negative tech or physical effects.
Triage is an ability rarely used to its full potential that gives Scoundrels another method of supporting themselves or teammates by cleansing up to 2 negative Tech or Physical effects. Any time you are either rooted or slowed by an Operative, Sniper, Mercenary, or Powertech, there’s a good chance Triage can purge the effect. Triage also works against Marauder’s and Juggernaut’s ravage root utility. The area in which Triage is especially effective is cleansing CC, including Mezzes and Hard Stuns. Cleansing your teammates when they are CCed will greatly improve your success in ranked arenas. Because cleansing CC requires high awareness, to aid you, I’ll provide you with the following tips:
Flash Grenade is the only mezz Scoundrels can cleanse. Therefore, you can cleanse Mezzes from Snipers and other Operatives. Cleansing Flash Grenade is especially useful in Tank/Heal or Heal/3 DPS games when your team’s healer is being CCed by enemy Operatives or Snipers. Cleansing him of CC enables him to increase his healing output, keeping your team alive significantly longer. To make cleansing Flash Grenades easier, I recommend centralising your Operation Frames slightly and enlarging the enemy debuffs scale (make sure to enable “show only removable debuffs”). The following icon appears on a teammate’s debuffs on the operation frames when flashed: ![]() . Do note that the Flash Grenade debuff icon is shared with Tranquilizer, Concussion Missile, and Awe. Flash Grenade has a very pronounced audio cue; hearing it can prompt you to check your ops frame and look to cleanse. You can then click on your teammate’s name and use Triage.
. Do note that the Flash Grenade debuff icon is shared with Tranquilizer, Concussion Missile, and Awe. Flash Grenade has a very pronounced audio cue; hearing it can prompt you to check your ops frame and look to cleanse. You can then click on your teammate’s name and use Triage.
Triage also cleanses Hard Stuns from Operative, Sniper, Mercenary, and Powertech. You may think that because Hard Stuns only last 4 seconds, it’s not worth the hassle of trying to cleanse them. Let me explain why you are mistaken. Firstly, by cleansing a Hard Stun, you’re trading 1 GCD from yourself for potentially 3 GCDs from a teammate. Also, since Hard Stuns keep you stationary, you’re enabling your teammate to keep up with an enemy target preventing any downtime he may have experienced, which may benefit your uptime, especially if your teammate has a CC available. Secondly, cleansing your teammates of Hard Stuns is crucial for when they are focused. Allowing a teammate to either save their breaker or, if they’ve already used it, prevent them from dying in a stun is extremely powerful.
Cleansing Tech or Physical roots and slows with Triage is also beneficial if you can afford to spend the GCD that comes with it. This will allow you to save Surrender and Dodge for other purposes.
Start of a Ranked Match
After loading into a ranked match, the first thing you want to take note of is your and the enemy team’s composition. You’ll need to decide which enemy target will be first on your kill order and which enemy target you will place on your Focus Target for CC and interrupts. It’s worth reminding yourself which of the enemy’s CC you’re able to cleanse. You’ll also want to mentally note which of your teammates is most likely to be focused so you can keep an eye on them for support play.
The next thing you’ll want to do is begin placing 2x Slow-release Medpac on yourself and each of your teammates. The benefits of this are that the person taking focus on your team will have HOTs on him from the moment they start taking damage, and it requires one less GCD to maintain them. Slow-release Medpac lasts 18 seconds, so there’s a good chance that the HOTs expire before your team enters combat, especially if they spawn camp. However, there’s no real downside to HOTing your team, other than exposing yourself to being marked, so it’s worth doing so, particularly in games with Predations where either team will typically rush. Make sure to refresh Slow-release Medpac last on the target most likely to be focused first, so the HOTs expire latest on that teammate.
The next decision you’ll have to make is on how to open. How you open will largely be dictated by whether you expect focus. You can determine the likelihood of being focused by a combination of your previous game’s history and the enemy team’s composition; If the enemy team has a comp with high burst, lots of CC, and Electro Net, the chances of you being focused increase. The good news is that Scoundrels have an advantage in this regard with their access to Stealth. Stealth allows Scoundrels to dictate the timing and positioning of when they open. If you expect focus, you can delay opening by staying in stealth and letting the enemy team momentarily invest their burst and CC on a teammate. When you decide it’s time to open, the enemy team will be unsure whether to swap to you or continue with the target they’ve invested in. It’s important not to delay your opener too long because you’re giving the enemy team a player advantage. You can use the period in which you’re waiting to open to back-to-back Tranquilizer your team’s CC target. When you’ve decided it’s time to enter combat, you can pre-emptively use Defense Screen and Pugnacity/ Surprise Comeback.
If you’ve determined there’s a low chance of you being focused either due to developing a reputation for being difficult to kill or because of the enemy team’s composition; there’s a couple of different ways you can open:
- Aggressive Opener: In this opener, you will close the distance between yourself and the enemy team as quickly as possible. You’ll 2x Scamper out of spawn, Trick Move to the Enemy CC target, following it with Tranquilizer, and begin using the opener rotation on your team’s first target. Opening quickly can generate early momentum and dictate positioning in your team’s favour. This is particularly effective against Snipers, for example, as you can catch them off-guard without their Entrench, preventing them from reaching the high ground for knockbacks and force them to fight near their Phasewalk. The risk of opening rapidly is you isolating yourself in a 1v4 if your teammates are too far behind. Therefore, I recommend pre-emptively using Defense Screen and Pugnacity/ Surprise Comeback as you open.
- AoE Stealth (Smuggle) Opener: Smuggling your team at the start of a round allows you to stealth to an advantageous position without being obstructed e.g., Smuggling Gunslingers and Commandos to a high ground position so they can utilise their knockbacks. Another way to use Smuggle to your advantage is to stealth only the teammate who is focused first; this will force the enemies to focus on a sub-optimal target. Lastly, Smuggle can be used when your team’s first enemy target decides to sit in spawn and wait out the deserter timer. You can stealth your whole team to the enemy team’s spawn and ambush the player as soon as he drops down. However, this can be difficult to time correctly since the deserter timer significantly exceeds the length of Infiltrator.
Executing Smuggle can be difficult. When you factor in desync and the difficultly some players have of following you in the AoE, Smuggle can often result in you being revealed, especially since your team doesn’t have the same stealth level. Not only will you lose out on any benefit Smuggling was providing, but it will also cost you your Tranquilizer and Dirty Kick Opener. Therefore, if you decide to Smuggle, it’s wise to take an unconventional route to reduce your chance of being revealed.
Breaker Usage
Escape – Purges incapacitating and movement-impairing effects.
Scoundrel is one of the few classes left without a defensive cooldown usable while stunned. Therefore, using your CC breaker intelligently is critical. Consequently, the following general rules are often advised: “Only break when you’re about to die” and “Never break before you have full resolve (White bar).” Unfortunately, you won’t always have the luxury of “Only breaking when you’re about to die.” Your team may be lacking some much-needed pressure, so sitting through the entirety of every CC you receive because you’re saving your breaker for when you’re focused can cause you to miss out on kills you otherwise may have secured. In particular, ‘Never break before white bar’ can be very misleading as it gives players a false sense of correctly breaking whenever they have full resolve. Full resolve can last between as little as 10-15 seconds, with the quantity of CC in SWTOR breaking the first white bar you receive can leave you susceptible to being killed once this short period is over. Additionally, using your CC break as soon your resolve is full to continue DPSing on a target who has strong DCDs running is mostly pointless.
How to use CC breaker correctly?
With the cooldown length of your CC breaker combined with the importance of its usage, both offensively and defensively, the approach you should take is to maximise the value you get out of your breaker. If you are focused first or are a high priority in the kill order, following the two general rules mentioned previously can be a good idea. However, as you become more advanced or are a lower priority target, strictly following these rules is very limiting and far from optimal. In the situation where you aren’t focused, using your breaker to cleanse a teammate who is mezzed or cleanse and heal a teammate stunned while being focused who otherwise might die can be very beneficial. Breaking offensively to kill a vulnerable opponent or chase an enemy target who otherwise might escape, drop combat, and regenerate is also crucial.
Since Scoundrel is very vulnerable without their CC breaker, if forced to use your breaker early, you’ll need to adjust your gameplay accordingly. Using DCDs pre-emptively and placing a higher priority on maintaining HOTs on yourself will be necessary. Using Disappearing Act sooner than usual may be needed, especially if you’re caught isolated surrounded by multiple enemy targets.
Take extra caution with your CC breaker when facing Commandos because Electro Net prevents the use of high mobility actions and escapes such as charges, vanishes, and speed boosts.
How to Survive Focus
The ability to handle focus on Scrapper will largely be determined by your understanding of the class’s defensive cooldowns:
Slow-release Medpac – The healing and damage reduction provided by Slow-release Medpac are essential to Scoundrel’s survival and should always be maintained.
Defense Screen – Defense Screen absorbs a small amount of damage and can be used on cooldown.
Dodge – With the multiple defensive benefits Dodge provides, its usage is very situational.
- Dodge increases your chance to dodge melee and ranged attacks by 200% for 3 seconds. Therefore, you can use Dodge to deflect any white damage that is about to come your way. An example of this would-be using Dodge when a Marksmanship Sniper casts an Ambush on you. An important aspect to contemplate is that when stunned, your defence chance is 0. Hence, if you are stunned with Dodge active, you will not be able to deflect white damage. Thus, I would generally recommend only using Dodge when you’re full resolve if your purpose is to deflect white damage unless certain you won’t be stunned during it.
- Dodge purges all DOTs that are currently on you. Therefore, Dodge can be used to cleanse any high damage dealing DOTs such as Demolish.
- With the Back at Ya utility, Dodge can reflect 150% of the yellow damage you receive back to the target for the duration. This effect works even while stunned. Therefore, if a Powertech or Operative focuses you, you can use Dodge to force them to swap to a different target or delay using their high damage abilities. Timing your Dodge in-between your Scamper recharge time or when you expect a hard stun is immensely powerful.
Pugnacity / Surprise Comeback – Pugnacity/ Surprise Comeback increases damage reduction by 20% for 15 seconds and will heal you for a total of 25% of your health. Pugnacity enables Scoundrel to dish out damage while receiving it. Pre-emptively using Pugnacity when expecting a high amount of damage or a stun-lock will significantly improve your ability to survive.
Scamper – While rolling, your chance to dodge melee and ranged attacks is increased by 30%. In the following section, I’ll explain the role Scamper plays in Scrapper’s ability to resist damage and survive.
Disappearing Act – In general, Disappearing Act should be used when you’re on low health to leave combat and regenerate to full. As mentioned prior, the importance of successfully vanishing can be the difference between winning and losing a round. Therefore, having at least one Scamper charge available when using Disappearing Act can be necessary to safely stealth out and avoid any AoE or Stealth Scans. To successfully regenerate, it’s essential to create enough distance between you and the enemy players to avoid being interrupted. However, traveling as far away as possible from the enemy team is not required as it will only extend your time out of the fight. If the enemy team has Operatives or Assassins who are also in stealth, it’s worth taking extra caution as they may be waiting for the moment you leave stealth to ambush you. Another factor to consider is how you open after you’ve regenerated; it’s not always necessary to open immediately. Waiting for a beneficial time to re-enter combat may be warranted, especially since you may be low on DCDs.
The best way to increase your survival is to avoid taking damage altogether. An integral aspect of Scrapper’s survival is the ability to kite via the following abilities:
Scamper – Scamper allows Scrapper to frequently create distance between you and your enemies by rolling forward 12 meters. Scamper cannot be used while rooted and slows will reduce the distance you travel. Therefore, if you are rooted or under the effects of a significant slow, you’ll want to purge it before using Scamper. A particular slow you’ll want to be aware of is Fury Marauder and Rage Juggernaut’s  Force Crush, which can slow you up to 95% the moment before it expires.
Trick Move – Trick Move quickly moves you to a friendly or enemy target up to 30 metres away and increases your movement speed by 75% for 3 seconds. Thus, Trick Move can allow you to escape when surrounded by multiple enemies. Keep an eye on your and the enemy team’s positioning, ranged classes in particular, as they could be an opportunity to Trick Move toward and getaway.
Another method of avoiding damage is utilising Line of Sight. Being focused allows you to dictate positioning. Therefore, positioning yourself near line-of-sight objects makes it difficult for enemy players to target you. This tactic is particularly effective against ranged classes with abilities requiring a cast. If you are being focused in a Heal + 3 DPS game, ensuring that you’re able to simultaneously LOS enemy players without LOSing your healer is crucial. If your team have knock backs, you can instruct them to use them and utilise the power of dictating positioning to force the enemies to move toward a ledge with you and your teammate to knock them off.
Additionally, to aid your survivability, Scrapper has access to CC in Shank Shot, Tendon Blast, Dirty Kick, and Flash Grenade. Using the LOS tactic just mentioned, you can force the enemy team to stack up, allowing you to catch multiple enemies in your Flash Grenade. With the length of immunity Scamper provides (greater than 1.5 seconds), you can roll into the LOS object, granting you immunity to CC and giving you the GCD advantage to subsequently Flash the enemies stacked around you.
Lastly, if you’re able to create breathing room between you and your opponent’s either by kiting or CC, you want to use this opportunity to Kolto Pack yourself and gain some health back. You must ensure you have an Upper Hand.
Electro Net
 Electro Net – While affected, a target that moves takes 20% more damage from electro net, this effect can stack up to 10 times. Additionally, the electro net hinders the target, preventing the use of high mobility actions and escapes such as charges, vanishes, and speed boosts.
Since Electro Net deals more damage to you when you move, you want to stand still to reduce your damage received. However, if you are close to any LOS objects, moving toward them to avoid enemy ranged targets can be beneficial. Fortunately, you’re able to use Surrender while netted, so the speed increased can help you transition to LOS.
With Electro Net preventing high mobility escapes and vanishes, you won’t be able to Scamper or Disappearing Act while netted, which are Scrapper’s two most important defensive cooldowns. Therefore, you want to get as much damage reduction as possible running via, Slow-release Medpac, Surprise Comeback, Warzone Adrenal, Defense Screen, and Dodge. If Pugnacity is not available, it may be wise to use Hot Streak to reset its and Defense Screen’s cooldown. You can also attempt to Kolto Pack yourself. However, you may need to first ‘bait’ the enemies’ interrupt by fake casting or using Diagnostic Scan.
CCing the Enemy targets while Netted with either Flash Grenade or Seismic Grenade can also help you survive.
Even if you use all the damage reduction Scrapper has access to, depending on how many people are focusing you and high health you are when netted, it still may not be enough to survive the full 9-second duration of Net. If there is a high chance of you dying during Net, you can use Scrapper’s Escape to break it, which will then allow you to use Scamper and Disappearing Act, etc. However, the 9 second DOT from Electro Net can’t be cleansed and will continue to tick for its duration. Therefore, if you were to Vanish directly after breaking Net, the DOT would damage and reveal you. Using both Scamper charges after breaking Net and vanishing may be enough to resist the Net damage completely, preventing the DOT from exposing you, or buy enough time and distance that the enemies can’t reach or aren’t aware of your position, allowing you to re-stealth.
Maximising your use of Exfiltrate
Scamper – Roll forward 12 meters. While rolling, your chance to dodge melee and ranged attacks is increased by 30%.
Scamper gives Scrapper a powerful tool to avoid an enemy’s highest DPS abilities and CC. Abilities and CC with a sound cue, travel time, delayed activation, or cast, can be reactively rolled. Understanding the enemy class’s rotation and personal buffs can also help you predict a high damage ability and consequently resist it. For example, Powertech’s Thermal Detonator has a delayed activation time with a noticeable audio cue making it extremely easy to detect and avoid with your Scamper.
After a stun expires on an enemy, it’s very typical of them to try and return with their CC, so this is an opportunity to Scamper to resist the CC. CC such as Backlash on Sorcerer’s Static Barrier will CC you after you’ve broken it with damage. Because Scamper grants immunity (longer than the tooltip suggests), using it immediately before breaking the Static Barrier allows you to resist the following CC.
At the start of an arena, all players will have access to their CC. Therefore, you can expect to receive a CC within the first moments after opening, mainly because you’ll often be the player opening first. In particular, the enemy target who you’ve opened on will usually try to CC you immediately. By paying close attention to “Target of Target,” you can Scamper moments after you see the enemy player target you to resist any CC he uses.
A mistake I often see a lot of Scrapper players make is poorly timing their Scamper. You should make sure to catch an enemy’s GCD rather than rolling right after they’ve used it.
Miscellaneous Tips
The short cooldown of Dirt Kick combined with the 2 charges from the Debilitator set bonus can give the feeling that you almost always have a hard stun available and consequently leads to players just using Dirty Kick without rhyme or reason. However, you want to make sure you use your hard stuns with purpose by synchronising them with your Volatile Strike burst, ideally when the enemy target has no strong DCD active.
If you receive any weak DOT damage in PvP, you may instinctively want to cleanse them with your Dodge. However, if you are susceptible to CC (no white bar), it may be worth leaving the DOTs on you so that an enemy can’t CC you without the DOTs breaking it.
Pugnacity granting you 10% alacrity for 15 seconds reduces the cooldown of specific abilities. Therefore, using your CC, such as Flash Grenade while the alacrity boost is active, will significantly reduce the cooldown.
Shank Shot not only prevents a target from moving but also from turning. Therefore, you want to make sure you are standing directly behind a target when using this ability, preventing them from being able to hit you.
A common mistake Scoundrels make is overlapping their Dodge with Scamper, negating the benefits Dodge provides.
Duels
Scrapper is the best duelling Specialization in the game. Therefore, you should be winning 1v1s against other classes in most circumstances. However, specific matchups can be difficult to win and will require practice. To improve your success in duels, you should abide by the following principles:
1. Maximise uptime when you have defensive cooldowns up, and the enemy player does not. Minimise uptime when you do not have your defensive cooldowns up, and the enemy player does.
Simply put, when an enemy target uses a strong defensive cooldown, you’ll want to disengage either by kiting or CCing the opponent. It’s also crucial to mitigate the enemy’s powerful abilities via your defensive cooldowns and interrupts. Thus, understanding the enemy class is the key to reliably winning duels.
2. Maintain 2x Slow-release Medpac at all times.
With the healing and damage reduction Slow-release Medpac provide, ensuring they have 100% uptime can be the difference between winning or losing duels. Since Slow-release Medpac lasts 18 seconds, it’s not uncommon to see Scoundrels only refresh them at the very last second. However, by doing so, you’ll risk your Slow-release Medpacs expiring if you were to sit through a CC combination. Therefore, unless you’re not susceptible to CC (full resolve), you’ll typically want to refresh your Slow-release Medpacs sooner than every 18 seconds.
Regular Warzones
Regular Warzones are where you can put all the information you’ve read in this guide into practice. You can experiment with the different Scrapper playstyles:
You can fight at the middle to practice maximising your DPS output by sticking on targets and swapping between them when they use a strong DCD.
You can try defending a node by duelling any attacking player, or if there are multiple enemies, you can stall them for as long as possible and practice your ability to survive and kite. Just make sure to call for back up if things start to go south. If DPS farming in mid doesn’t help your team take control of the node, you can attack an enemy node. You can attempt to capture the enemy node using Tranquilizer on the defender and clicking the turret in quick succession. If the defender then CC breaks, you can apply another Mezz via Flash Grenade or Disappearing Act + Tranquilizer and attempt to capture the node again. If the enemy has access to two CC breakers or you timed the CC poorly, you can try duelling the defender when all else fails.
About the Author
I began playing SWTOR in 4.0 and have had a passion for PvP ever since. The specializations I most commonly play are Concealment, Deception, and Arsenal. I hope that you enjoyed my guide and found it helpful in some way. If you have any questions, don’t hesitate to ask. You can contact me directly via discord at Alim#6852.
Related content:
- SWTOR 6.0 Concealment Operative PvP Guide by Alim
- SWTOR 6.0 Concealment Operative PvE Guide by Endonae
- Regarding the SWTOR Class Guides Written by Guest-Authors
- SWTOR Classes: Beginners guide to all Roles and Disciplines
- Ultimate SWTOR 6.0 Beginners Guide for new players
- SWTOR EndGame Gearing Guide for lvl 75
- You can find a lot more here on VULKK.com. Browse the SWTOR Guides Category!!
How is the Class and Spec changing with SWTOR 7.0
In Update 7.0 BioWare is introducing a new term “Combat Styles”, which will replace the traditional class-specific disciplines. If you are curious and want to get a head-start, check out the SWTOR 7.0 Class Changes Previews available on the Public Test Server.
And if you are behind on the news, find out what the SWTOR Legacy of the Sith Expansion will have to offer.