This is a Complete SWTOR Sawbones Scoundrel 6.0+ Guide for PvP. It’s suitable for both beginner players and more advanced and experienced veterans, who seek to improve their performance! Written for VULKK.com by Xelthìa (previously known as Kamiala)
UPDATED FOR PATCH 6.3.1
Table of contents
Introduction to Sawbones
Sawbones is a relatively easy to use but hard to master healer specialization, possibly the hardest of the three choices available in the game. It relies heavily on abilities that do heal over time (HoTs) and Area of Effects (AoE), given that it is its strongest in comparison to Sage and Commando, although it lacks in the capability to heal on demand, being inferior to the other two in that regard.
On this guide I am going to show what kind of stats, gearing to take it, how to make use of and maintaining the heals as efficiently as possible during fights, and other tips that will help learning most of the bits of this specialization. Enjoy!
Gearing and Stats
I am going to give a brief explanation on how Stats/Amplifiers/Bonus Sets/Tacticals generally work, along with brief description how to reach the Best In Slot on the gearing, in terms of mods and the like.
Caution regarding gear:
- All End-Game gear, Armorings, Mods and Enhancements are Legacy bound now, meaning that its not restricted to one character alone, unlike previous expansions.
- When buying gear, you have to be careful, since it cannot be refunded at the vendors once bought. The grinding to obtain the gear is easy but doesn’t mean that it can be just shrugged off. Other things, as for example, amplifiers are a massive a credit sink.
Stats
Earpiece and Implants will be considered as Enhancement, as they generally have the same tertiary stats (Critical/Alacrity).
I am currently using 286 but I will provide the closest I can to BiS as much as I can, including the new 300 and the old 228 augment versions.
Relics will usually be the ones that give Mastery (Focused Retribution) and Power (Serendipitous Assault) buffs, although the Critical (Devastating Vengeance) can still be picked, but it is not exactly recommended.
Crystals will be the +41 critical stat (Eviscerating)
Builds in this guide will not include Enhancements that are not Adept (Critical) or Nimble (Alacrity) although if someone wants with other type and is requested, please ask in the comments of this guide. – Must have the companion bonuses. It is highly recommended to have them otherwise some stats won’t be correct. Screenshot below to check what I mean. It can be found in the legacy window on the Global Unlocks Tab, following with Imperial Classes/Republic Classes

The example in the screenshot, Imperial Agent players (Sniper/Operative) need to finish Scorpio story companion and/or max affection to have access to the bonus from her. It gives exactly 1% extra on accuracy, and other companions give other buffs, like +1% critical rating and so on. It is not accumulative with other companions from other classes.
Gearing in PvP comes in tastes, although when it comes to Sawbones Scoundrel, its extremely recommended to run a high alacrity build.
- +3208 for 2nd Alacrity threshold (1,3 seconds global cooldown);
- Everything else goes for Critical Rating;
Below it will be displayed how the stats can be achieved, in different stats.
- The best Mods on 6.0, at the moment, are the unlettered R-2, unlettered R-3 and unlettered R-5 but other versions work just fine, and thus, they won’t be mentioned below;
- The best Armorings, Barrels and Hilts are the unlettered and either unnumbered or R-1 versions.
Gear in 306 rating + Advanced Augments 74 (Rating 286):
Alacrity – 3208+:
Build 1
- 6 Enhancements (+431 each – Can poke with other versions R-X to make it closer to 3208)
- 6 Augments (+108 each)
Build 2
- 7 Enhancements (+431 each – Can tinker with other versions R-X to make it closer to 3208)
- 2 Augments (+108 each)
Build 3
- 5 Enhancements (+431 each – Can tinker with other versions R-X to make it to 3208)
- 10 Augments (+108 each)
Critical ( This is already the BiS ) – Rest of the stats :
- Any Enhancement slots left (+431 – Unlettered and Unnumbered version / Implants and Earpiece are best recommended)
- Any Augment slots left (+108 each)
- Crystals (+41 each)
- Advanced Kyrprax Proficient Stim (+109) (Only use this if one wants to stack full crit)
Gear in 306 rating + Advanced Augments 77 (Rating 300):
Alacrity – 3208+:
Build 1
- 6 Enhancements (+431 each – Can poke with other versions R-X to make it closer to 3208)
- 5 Augments (+130 each)
Build 2
- 7 Enhancements (+431 each – Can tinker with other versions R-X to make it closer to 3208)
- 2 Augments (+130 each)
Build 3
- 5 Enhancements (+431 each – Can tinker with other versions R-X to make it closer to 3208)
- 9 Augments (+130 each)
Critical ( This is already the BiS ) – Rest of the stats :
- Any Enhancement slots left (+431 – Unlettered and Unnumbered version)
- Any Augment slots (+130 each)
- Crystals (+41 each)
- Advanced Kyrprax Proficient Stim (+109) (Only use this if one wants to stack full crit)
Gear in 306 rating + Advanced Augments 45 (Rating 228):
Alacrity – 3208+:
Build 1
- 6 Enhancements (+431 each – Can poke with other versions R-X to make it closer to 3208)
- 7 Augments (+96 each)
Build 2
- 7 Enhancements (+431 each – Can tinker with other versions R-X to make it closer to 3208 but not recommended here)
- 2 Augments (+96 each)
Build 3
- 5 Enhancements (+431 each – Can tinker with other versions R-X to make it closer to 3208 but not recommended here)
- 11 Augments (+96 each)
Critical ( This is already the BiS ) – Rest of the stats :
- Any Enhancement slots left (+431 – Unlettered and Unnumbered version)
- Any Augment slots left (+96 each)
- Crystals (+41 each)
- Advanced Kyrprax Proficient Stim (+109) (Only use this if one wants to stack full crit)
Amplifiers
Right from the get-go, I will say that if anything outside of these two Amplifiers picked, there will be a loss of potential Heal output, and even still, only one is truly recommended. The choice here goes between MedTech and Periodic Restoration. Which one is better? Lets put it on the side for now.
It is true that Sawbones Scoundrel is a heavily focused HoTs spec and on the first hand, the logical choice would be to go for the Periodic Restoration Amplifiers, which give 2.20% each Armor mod and +0.88% with the one Amplified Champion piece, making it a total of 20.68% increase. A massive boost considering that around 65% – 70% of all healing from Scoundrel healer comes as a HoT. However, it is not 100%. Does this make it is a bad Amplifier? Not really. It is mostly because there are other burst heal abilities (Underworld Medicine, Kolto Pack and Emergency Medpac) and another(Kolto Waves) that, despite working like a HoT, won’t benefit from Periodic Restoration.
Does that mean that picking Med Tech is more of a viable choice her? When maxed out, Med Tech can stack up to 9,40% increase of the output for 100% healing abilities., 1% per Armor mod and 0,40% for the Amplified Champion piece.
Now, we come back to the question made earlier. Which is better? Well, this depends heavily on how the games go. The more interrupts that happen to you while casting abilities, the more viable your instant casts become, and these are coincidentally the HoTs, with the exception for Emergency Medpac or a buffed Underworld Medicine/Kolto Pack by Pugnacity. And this specific characteristic makes Periodic Restoration gain more in value.
However, there is also the pick between mixing these together, which is possibly the best thing to do. However, this is dwelling into a lot of testing between failure/success and how the player feels about it.
My personal preference goes for full Med Tech still, since I just prefer all my abilities to be buffed in the end. And you can also outplay any interrupt attempts by fake casting abilities and let you use the abilities that are not HoTs more freely.
Bonus Sets
I am going to only talk about two sets, those being the Tactician and Aggressive Treatment, as there is no purpose for covering other bonus sets, given their niche/underperforming utility.
 Tactician Tactician |
|---|
| Effect 2p: +2% Mastery. 4p: Hot Streak additionally resets the cooldown of Tendon Blast and Triage. Gaining a Upper Hand increases your critical chance by 10% for 10 seconds. Can only happen once every 18 seconds. 6p: Upper Hand gets an additional stack. Having a Upper Hand increases your damage and healing by 5%. |
| Recommendation Pretty much the only bonus set to use for PvP. Increasing Critical chance by 10% for 10 seconds every 18 seconds is a big yes. The player will have this buff 60% up all the time. The increased healing by 5% per Upper Hand is permanent, if one has Upper Hand on the buff bar, which is also a big help. And the reset on the cleanse if a good niche that comes along with it, when using Hot Streak. And the second bonus is the 6p. The additional Upper Hand, bumping it from 3 to 4, is actually a big thing, as we can spare one more for quick spam of heals, rather than planning out on what to use ahead. |
 Aggressive Treatment Aggressive Treatment |
|---|
| Effect 2p: +2% Mastery. 4p: Removes the energy cost for Bushwhack. 6p: Bushwhack heals any allies standing inside it. |
| Recommendation This bonus set is tricky for PvP with a very niche use. And, in all honesty, only when one wants to have fun, to which I think it is. When compared to Tactician, it is pretty much losing every buff of that in trade of another AOE heal, which is not exactly a great trade. Questionable at best, not good at worst. The disappointing truth is that this is a set that is far more helpful for DPS specializations of the class than it is for the Healer. Still, I will go over it, given that it is supposed to be a healer set. Just like the 4p describes, Bushwhack will not have Energy Cost, but it will still need 1 stack of Upper Hand to be casted. Do not get mistaken in this regard. The upside of this is that it helps massively regarding energy management, when also counting the 6p, but then again, you should not be struggling in energy when playing Sawbones Scoundrel. The 6p, at first, sounds goods, and honestly, it does give quite the decent output on its own (about 20% to 25% less than Kolto Waves), and it is on a relatively short cooldown, can be used at a distance (perk from Sawbones Scoundrel Specialization) and it is not channelled either, unlike Kolto Waves, it can be put it on any place and heals anything inside it. However, there are three problems with this set in the end. First, like previously mentioned, its weaker in prowess when compared to Tactician in basically every way; Second is that it still costs Upper Hand to cast Bushwhack, and the player will be limited to 3 with this set; Third and last, is that it is bound to an ability that also deals damage, which seems like a small upside, given that it counts to help the team doing damage BUT this makes any play of trying to mez/CC opponents impossible. So, unless the team that you are in, is just composed of DoT/AoE attacks, this set won’t help much. A set made for Unranked matches pretty much. |
Tacticals
On this topic, only four Tacticals will be covered, as the others, class specific or not, are useless for Medicine.
 Critical Surgery Critical Surgery |
|---|
| Effect Emergency Medpac always critically heals targets below 50% health. Source: Increased drop chance from defeating Flashpoint bosses. |
| Recommendation The only Tactical that will be worth the use, sadly, given that it’s the source of the burst healing for Scoundrel healers, given the specialization is based on HoTs, pretty much. This will be the bread cut for give some bite for healing. All this and the fact that other tacticals are flat out worse when compared to this one. |
 Regenerative Waves Regenerative Waves |
|---|
| Effect Kolto Waves consumes a Upper Hand and heals 20% more per tick. |
| Recommendation Extremely situational Tactical give that you need more than one player to stand inside Kolto Waves and that doesn’t happen all the time. Outside that scenario, its generally a worse tactical than the first one for PvP. And the only reason that makes it so, is the consumption of one Upper Hand. If it was flat out increase 20%, then it would possibly be the must have. |
 Combat Medic Training Combat Medic Training |
|---|
| Effect Hearttrigger Patch becomes an instant cast and Kolto Pack can be cast while moving. |
| Recommendation This one bolsters your mobility quite a lot. It’s the fact that it requires to be crafted, and usually expensive in terms of mats or price in GTN, along with the fact that it just gives mobility alone is that makes it average though. Still worth to get and try it out. Its fun to use but does not fit the more competitive gameplay. |
 Diagnostics Probe Diagnostics Probe |
|---|
| Effect Activating Emergency Medpac reduces the activation time of the next Underworld Medicine by 0.25 seconds. At 3 stacks, Underworld Medicine activates instantly and consumes all stacks. Source: Increased drop chance from defeating Operation bosses. |
| Recommendation A bad tactical. It forces the player to just waste all the Upper Hands to get 1 instant Underworld Medicine and the decrease cast on 1 or 2 stacks is not that great of a deal. I do not recommend using it. |
Utilities
This category in the guide is structured by recommendations.
Skillful
Recommended
-> Scar Tissue: Increases damage reduction by 5%.
Damage reduction for everything is always nice, even if it is a small amount, still affects in every type of damage taken.
-> Smuggled Get-up: Reduces all area of effect damage taken by 30%.
Specifically, against players/teams that deal a lot of AOE damage (Tanks, Engineer Snipers, Lightning Sorcerer and the AOE spams from others.)
Useful
-> Dirty Escape: Reduces the cooldown of Dirty Kick by 15 seconds.
Can be useful to have good control on the opponent’s actions and to create more DPS opportunities for the team or even save them by incapacitating the opponent and delay their actions on taking out a teammate of yours.
-> Sneaky: Increases movement speed by 15% and effective stealth level by 3
Only useful in guarding cap points or to approach someone to sap and/or steal before the opponent notices you. Otherwise, it’s generally useless. The added speed bonus can help with kiting however, so that is where the good stuff is.
-> Curbing Strategies: Quick Shot and Lacerating Blast reduce the movement speed of targets they damage by 40% for 6 seconds. In addition, when Flash Bang ends it leaves behind Flash Powder that reduces the target’s accuracy by 20% for 8 seconds.
Only the accuracy debuff is the useful attribute in this utility but it gives a chance to save you and/or your teammates by making the others have a chance to miss the attacks. The slowdown could be used to prevent kiting but then again, it’s a niche use.
Useless
-> Let loose: Lacerating Blast deals 25% more damage
If one plays Sawbones, then it is to play as a healer, not as a dps. This is purely a DPS utility.
-> Holdout Defense: Striking a target with Blaster Whip or Bludgeon grants Holdout Defense, increasing your movement speed by 50% for 3 seconds
Same as the one before, even though it has a very, very specific use to kit. However, if one wants to kite, just roll away.
-> Anatomy Lessons: Reduces the energy cost of Dirty Kick and Tendon Blast by 5 and makes Tendon Blast immobilize the target for 2 seconds
Yet another DPS utility, with the only use here is the reduce energy cost of Dirty Kick but then again, the use of it during fights will be rare AND one shouldn’t have energy problems with Sawbones.
Masterful
Recommended
-> Supplemented Medpac: While your Slow-release Medpac is active on yourself, your damage reduction is increased by 3% per stack.
A must-have for Sawbones Scoundrel. One of the must-do things for it is to keep the probes up all the time, and this will automatically let the Scoundrel healer have +6% damage reduction on itself. It won’t apply to others.
-> Skedaddle: When activated, Disappearing Act grants 2 seconds of Dodge
This utility works to ‘guarantee’ a safe escape after using combat stealth, since it will cleanse anything that Dodge that already can.
Useful
-> Med Shield: Your Defense Screen heals you for 5% of your maximum health when it collapses
Aside from mitigating damage, the player receives a small healing when it wears out.
-> Flee the Scene: Reduces the cooldown of Disappearing Act by 30 seconds and activating Disappearing Act increases movement speed by 50% for 6 seconds
Combat Stealth is used to leave combat entirely when in trouble and having a shorter CD for it is just good.
Situational
-> Dirty Trickster: Surrender purges all movement-impairing effects when activated. Additionally, when Tranquilizer wears off, the target is struck by Sedatives, reducing all damage dealt by 50% for the next 10 seconds
It is especially useful against basically everything with the constant rooting and movement debuff/root. I’d classify this as recommended if it gave a buff that would last some time and not just in that instant but still don’t underestimate this, as it can save your life. Also, do not forget that the 50% damage nerf for 10 seconds, as it can allow to prepare the burst and stack the heals and defenses before major damage is taken.
-> Keep Cool: Cool Head now immediately restores 15 addition energy
In theory, you, as Sawbones Healer, should not have energy problems. Still, if it comes to that, I suppose that it can be taken, but this means that you have issues using the specialization still. This is the only reason as to why I place it as Situational.
Useless
-> Get the Bulge: Tendon Blast will now grant a Upper Hand.
Another useless one. It’s a DPS ability and it has to do with Upper Hand. A resource that you should be swimming on and you have 2 other more reliable ways of gaining them.
-> K.O.: When used from stealth, Backblast and Point Blank Shot interrupt and knock down the target for 3 seconds. Player targets are immobilized for 3 seconds, rather than being knocked down
Yet again, another DPS utility. Instead of using this to root, its best to just hardstun the opponents.
Heroic
Recommended
-> Scramble: Every time you get attacked, the active cooldown of your Dodge is reduced by 3 seconds. This effect cannot occur more than once every 1.5 seconds
Mandatory utility yet still some people don’t take it. It simply is unthinkable not to. Having a constant reducing on the cooldown allows constant removal of dots/effects + sure way to avoid direct damage (weapon/melee, unless the player stunned) is always good.
-> Surprise Comeback: Pugnacity now additionally grants Surprise Comeback restoring 5% of total health every 3 seconds and reducing damage taken by 20% for the duration
Heals 25% of the health along with having damage reduction increase by 20%, along with Upper Hand and extra alacrity. I’d say it is imperative to take this. Even with its long CD, it is extremely useful, as it can relieve you from wasting a few precious global cooldowns on attempting to mitigate/healing the damage taken, giving the opportunity for a more aggressive approach.
-> Sly Surrender: Surrender grants Sly Surrender, causing your next Slow-release Medpac on a new target to immediately grant two stacks. Additionally, Surrender heals you for 1% of your maximum health every second for 10 seconds and Kolto Pack now initially restores X health and then additionally restores X health over 9 seconds.
A must have for Scoundrel healer. Helps the player out when in trouble by healing 10% over time, it will also give 2 stacks of Slow-release Medpacs and this aspect helps a lot when losing a bit of control of the probes falling off from teammates. And turns part of the amount of heals from Kolto Pack into HoTs, which are benefitted from running Periodic Restoration Amps.
Useful
-> Hotwired Defensives: Increases the amount of damage absorbed by Defense Screen by 30%
A good utility but too bad it is located on Heroic Tier. Would be a must pick if it was in a lower Tier, since it would be offering a much better mitigation that way, and that is the only reason as to why it is placed as Useful and not as Recommended like the others. Wasted potential here.
-> Smuggled Defenses: Reduces the cooldown of Escape by 30 seconds, Defense Screen by 5 seconds, and Smuggle by 60 seconds
Shield comes more often which means more damage mitigation through heals, in case Med Shield was picked, plus reduction on stun break. A good utility, although slightly inferior to the others in Recommended. Its like Hotwired Defensives. Great potential but in a tier where its wasted.
Situational
-> Back At Ya: Activating Dodge grants Back At Ya, returning 150% of direct single target tech and Force damage taken back to the attacker while Dodge is active. Note: This does not trigger with Skedaddle
Even though this is a great utility to work as a deterrence to stop opponents from attacking you, it does not mitigate any damage that is still taken through it. Plus, like many times said before, Sawbones Scoundrel is a Healer, not a DPS, and this is used as a DPS thing.
-> Sleight of Foot: Reduces the cooldown of Trick Move by 10 seconds and allows it to be used while immobilized. When activated it purges movement-impairing effects and grants a Upper Hand.
Highly underestimated as a root breaker and gap closer to teammates or opponents, in case one wants to hardstun them. Requires a good sense of opportunity to use this, which is extremely rare for Scoundrel Healer. Outside of this, it is useless.
Useless
-> Slippery Shooter: Scamper grants a charge of Slippery Shooter, reducing the energy cost of your next Quick Shot by 100%, increasing its maximum range by 20 meters, and making it knock the target back. Each use of Quick Shot consumes a charge of Slippery Shooter and grants 10 energy
DPS utility and even then, it’s mostly to troll the opponents really. Although it could be used for interrupting channel/casts of others, it’s still not that great. Focus should stay on healing and surviving.
My Preferences
This is the general build of utilities that I use when I play as Operative healer, regardless of it being Ranked or Unranked.
- Green = What I believe it should be taken
- Yellow = What I pick will depending on the situation but generally I pick the heal shield
- Red = What I don’t take

Abilities and Rotations
Healing Abilities
 Slow-release Medpac
The most important ability on Scoundrel’s tools. One that should always be kept up on the teammates, since it counts close to 1/2 of the healing that will be done at the end of the game.
 Kolto Cloud
The second most important heal ability due to its nature. This is what one could call a ‘smart heal’. When casted on the main target, it will reach to 3 more teammates with the lowest health.
 Kolto Waves
Big AOE heal. Affects up to 8 targets. A must use if the team is taking damage. Not worth of using it if it is on a single target.
 Emergency Medpac
The ‘big burst’ heal from Sawbones. This ability will be used to refresh probes (Only refreshes if there is a 2 stack on a target. If its only 1, it won’t work). So, not only will it apply its own heal, it will also be buffed by the Kolto probe refresh that one gets from applying 2 stacks.
 Kolto Pack
One of the main heals, costs 1 Upper Hand, relatively cheap in energy and has a short cast, which is a bit of the opposite of the next one. In the patch after the nerf of Tactician Bonus set, this ability is also now capable of refreshing Slow-release Medpacs on the target.
 Underworld Medicine
One of the main heals, generates Upper Hand, expensive in energy cost, and has long cast.
 Diagnostic Scan
Helps to regenerates Energy and has no Upper Hand cost. Can be interrupted and it’s a bad thing, if by chance you are also low on Energy and with the Resource regen is on cooldown.
Tool Abilities
 Triage
The cleanse. Used to remove negative effects such as crowd controlling effects (CCs), Hardstuns, Roots, and any other kind of debuffs that lets the opponents deal more damage on targets.
 Flashbang
Main CC. Will be used to save teammates or to create an opportunity for the team to shut down an enemy player. Breaks on damage.
 Surrender
The aggro drop ability, in PvE, but it will be a great asset to deal with some focus on oneself, if the player takes Sly Surrender utility, plus, will allow to place 2 Slow-release Medpacs immediately on a selected target. This second attribute won’t be consumed if the target already has 2 probes on it.
 Pugnacity
Great tool that will allow to instant cast Kolto Pack or Underworld Medicine; Can count as a DCD in case one takes focus, when the utility of Surprise Comeback is taken, giving +20% DR and 5% heal every 3 seconds. The cooldown on this ability is long, so its use should be considered, as there are two uses for it.
 Hot Streak
A cooldown reset of Pugnacity, Kolto Cloud, and if paired with Tactician Bonus sec, it will also count for the Triage cooldown reset, along with a great boost of +20% for Mastery stat pool for 15 seconds. It will heal a great deal to have bigger numbers on healing abilities. This is a very important tool, mind its use!
 Cool Head
Your main Energy regeneration. Should be used if below 60%. Not immediately though. The best value to use it on would be around 40%. It bumps back to +70%.
 Tranquilizer
To sap any opponent. Its use will be rare, given that you will be the healer, but if there is some chance to use it successfully, go for it, since it will put out a teammate of the other team down for a few seconds unless stunbreak is used, the target is cleansed or its broken through damage.
 Dirty Kick
The hardstun. Should be used to save oneself, a teammate, or even to create an opportunity to kill a target of the other team.
 Trick Move
A gap closer. Can be used to escape to a teammate that is far, or to cut te gap close, in case there’s LoS issues with your teammates.
 Smuggle
Cloaks entire team, if they remain within range. Can be useful but one thing is to be remembered and that is the teammates will have a lower stealth index compared to the one who used this ability, thus opponents can detect them easier.
Defensive Abilities
 Scamper
What many players call Roll. Its used to cover a decent distant by having your character roll to the direction where your camera is pointing at and not to where your character is facing towards. Keep this in mind!
 Escape
Usually used to break Hardstuns, CCs and Hinder effects. Outside of that, it shouldn’t be used. It will be covered later.
 Defense Screen
A defensive shield that can absorb a decent amount of damage, usually around 30k. Should be used to mitigate burst attacks. Not DoTs. That job goes for the next one below.
 Dodge
Dodge
Increase your defense rating by 200%, making any Ranged/Melee (White damage) based attacks miss automatically on you. Yellow attacks will still go through. If the Reflect utility is taken, then the Yellow damage-based, direct single target attacks will be reflected at the targets that casted them in the first place. Non-direct and AOE yellow ones, do not get reflected. It should also be used to cleanse any form of DoT abilities.
 Disappearing Act
Your combat stealth. It will forcefully make the player disengage and go into stealth from a fight. Usually used to escape situations of danger. It will also reset the use of Warzone Medpac! Keep this in mind. There is a current ‘feature’ (bug), where for the first second or so, you are ‘immune’ to any type of damage that may force you out of stealth again. Exception being Stealth scan abilities, of course.
 Warzone Adrenal
Usually used to aid in survivability, with a long cooldown (3 minutes) on it. 15% Damage reduction for 15 seconds. Should be used wisely to help survive.
 Warzone Medpac
Like the Adrenal, this will help in staying alive, but it is used in a different way. Instead of offering damage reduction to the player, it heals 35% of the health.
Key Buffs and Procs
I won’t give the full explanation of what these buffs and procs do. I will only highlight the more important ones that should be noted of.
Smuggled Technology – Granted at Level 16 – Gives Interrupt Immunity after using all Scamper (Roll) stacks for 4 seconds.
The interrupt immunity is the more important attribute here, since, if the rolls remain at 1 and then are used to turn into 0, those 4 seconds will be given.
Medpac Mastery – Granted at Level 28 – Each tick of Slow-release Medpacs, Kolto Cloud and Kolto Waves have a 10% chance to generate Upper Hand. Can only happen once every 6 seconds.
This is another reason as to why keeping up probes and other abilities is important. Generating Upper Hand will allow the player to use Emergency Medpac and Kolto Pack many times without resorting to Underworld Medicine and suffering its heavy energy cost.
Psych Meds – Granted at Level 32 – Triage can now remove mental negative effects and heals the target for X.
This means that the player will be able to cleanse quite a lot of CC abilities. Crucial knowledge during the fight. One should know about this already but still, I mention it. I will present a list of what can and cannot be cleansed on a topic below!
Accomplished Sawbones – Granted at Level 52 – Healing a target with Emergency Medpac, will refresh the duration of Slow-release Medpacs
No explanation needed here. This is pretty much an invite to use Emergency Medpac quite often, since the ability will heal, along with the bonus of the ‘re-heal’ from refreshing probes. 2 heals in 1.
Bedside Manner – Granted at Level 60 – Executing a Upper Hand with a heal increases all healing by 3% for 6 seconds
There are no words needed to explain how much this helps. Using Emergency Medpac and/or Kolto Pack will give this buff for 6 seconds. On the long run of trying to maximize it, can help a lot!
Bootlegged Remedy – Granted at Level 68 – Using Kolto Pack will make the next Emergency Medpac have a 100% critical chance. Can only happen once every 18 seconds.
Another one that doesn’t need explanation. Auto-critical heals is always good. Specially since this can become a great combo (Kolto Pack into Surgical with one added retick of Slow-release Medpacs on top of it as example. It won’t tick twice because there’s an internal cooldown in the refresh, apparently) to burst heal a target in need.
Heal Rotation
For healing, there is not exactly a rotation for abilities. If anything, it usually works in priorities. That works the same for Sawbones Scoundrel, although it will come up as keeping HoTs up and use the abilities according to the situation happening.
 Slow-release Medpacs
 Kolto Cloud
- Kolto Pack
- Underworld Medicine (single target) / Kolto Waves (multiple targets)
 Kolto Cloud
1 – Slow-release Medpacs is a must use and must be on as many targets as possible, although not too many that could hurt the gameplay. In arenas, its recommended keeping them up on ‘all’ teammates the whole time, but more importantly on the ones taking damage. On unranked matches, the best number would around 3 to 5 teammates but only those that need help. Any others that are nearby but not taking damage are not exactly worth the effort to put probes on them. Going over that number will make it too hard to keep everything in check.
Just as previously mentioned, these will do most of the healing during the fight. They are that vital. Also, use Emergency Medpac every so often to do the refreshing of these, as well to keep the +3% proc of heals up but do not spam too much so that Upper Hand does not run out.
2 – Kolto Cloud is next due to how it works. Like how it was previously described, it affects the main target and 3 extra targets, and these 3 will be the ones the lowest health level on the vicinity of the main one. And it also comes with a relatively short cooldown, as well. It should be used even if only one teammate is taking all the damage.
3 – Kolto Pack comes next due to the nature of it being a faster and cheaper cast compared to Underworld Medicine, even if it comes with the Upper Hand cost. Kolto Pack also refreshes Slow-release Medpacs, which adds to some burst healing value. There is also the proc, mentioned on the previous topic, that can offer 100% critical chance increase to Emergency Medpac, which will heal immensely. Adding this with the autocrit nature of the Critical Surgery Tactical is a big deal.
4.a – Kolto Waves is next if there’s multiple targets that need to be healed. Never use the first one for single target. It heals less, and there’s a risk that the target that needs help will walk out of it, as well, thus making it pointless.
or
4.b – Underworld Medicine if it comes to single target. A more energy costlier, slower cast option compared to Kolto Pack but can be “spammed” assuming that there’s no interruption. Its also the one ability that will grant Upper Hand for sure, without counting the uncloaking procs and Pugnacity.
Cleanses
Triage is an ability that is able to cleanse negative effects that come in the shape of Crowd Controls, Saps, Hard Stuns, Roots, Slows and Debuffs, and each of these have their attribute/type (I don’t know the correct term. Sorry!). These are distributed in 5 categories. Force, Tech, Mental, Physical and None.
Playing as a Scoundrel, the player is capable of cleansing Tech and Physical by default, and specifically playing Sawbones will add the Mental to the list. The only one that can’t be cleansed is Force, and lastly, the one type that can’t be cleansed, no matter what is the ‘None’. It is the awkward one of the group. Since it has no attribute liked to it, it means that one won’t be able to cleanse it either, no matter what class they play.
Below, I will demonstrate the symbols which they tend to take when the player sees them as debuffs on the teammates and later a list of the more relevant CC, Hardstun and so on. Effects that can be seen being used the most and that is capable of cleansing, and same for the ones that cannot be.
Priority on Cleanses
The order to cleanse should go
CCs/Saps > Hard Stuns > Roots > Debuffs,
but in the end the truly ones that you should care about really are the first 3, as the other two are relatively situational. Roots could still be considering though, in the case that it helps doing a good play in matches. Tanks that need to stay in range of guarded target. A teammate that is chasing an opponent and the likes. The debuffs cleansing is not recommended with the only exception and that is the Trauma effect!
Priority on Cleanses
The order to cleanse should go:
CCs/Saps > Hard Stuns > Roots > Debuffs,
but in the end the truly ones that you should care about really are the first 3, as the other two are relatively situational. Roots could still be considering though, in the case that it helps doing a good play in matches. Tanks that need to stay in range of guarded target. A teammate that is chasing an opponent and the likes. The debuff cleansing is not recommended, with the only exception and that is the Trauma effect!
Trauma Effect
This ‘little’ effect is a headache to a healer because it will reduce all healing by 20%, and this can change games. Snipers/Gunslingers, Marauders/Sentinels, Assassins/Shadows (with tactical) and any Tank can have the ability to apply the debuff. If you see it, try to keep it cleansed from your teammates, or at least the one that is taking most of the focus from the opponent team. Of course, there is also the headache that tanks can spam this ability quite a lot and throughout all their opponents. It is up to you to assess the situation and see if it is worth it, or not, the cleanse.
The Trauma symbol that appears on the debuff tray is this: ![]()
Ability Cleansing List
Cleansable Abilities
- Juggernaut/Guardian + Marauder/Sentinel:
 Intimidating Roar / Awe
- Ravage (with utility) / Blade Barrage (with utility)
- Saber Throw (with utility)
- Sorcerer/Sage: – none
- Assassin/Shadow:
- Low Slash
- Mind Trap / Mind Maze
- Powertech/Vanguard:
- Electro Dart / Cryo Grenade
- Flaming Fist / Shockstrike
- Rocket Punch (with utility) / Stockstrike (with utility)
- Grapple (with utility) / Harpoon (with utility)
- Mercenary/Commando:
- Concussion Missile / Concussive Round
- Electro Dart / Cryo Grenade
- Missile Blast (with utility) / Explosive Round (with utility)
- Sniper/Gunslinger:
- Flashbang / Flash Grenade
- Maim / Below the belt
- EMP Discharge / Sabotage
- Leg Shot
- Operative/Scoundrel:
- Flashbang / Flash Grenade
- Debilitate / Dirty Kick
- Sleep Dart / Tranquilizer
- Crippling Slice / Shank Shot
- Sever Tendon (with root utility) / Tendon Blast (with utility)
Non-cleansable Abilities
- Juggernaut/Guardian + Marauder/Sentinel:
- Backhand (Juggernaut Tank only) / Hilt Bash (Guardian Tank only)
- Force Choke / Force Stasis
- Sorcerer/Sage:
- Force Lift / Whirldwind
- Electrocute / Force Stun
- Static Barrier (Backlash) / Force Barrier (Kinectic Collapse)
- Assassin/Shadow:
- Whirldwind / Force Lift
- Electrocute / Force Stun
- Powertech/Vanguard:
- Carbonize / Neural Surge
- Mercenary/Commando:
- Electro Net
- Sniper/Gunslinger – none
- Operative/Scoundrel – none
All these abilities will cause these symbols to appear on the debuff tray and they are the ones to look out for.


Finally, the last topic! What I am going to cover here are some things that in theory, they look like basic stuff, but they are hard to execute. Having a general class knowledge is a good extra for this but I will help nevertheless and mention them anyway. This, of course, will need to be practiced, as well.
Resolve and Stunbreak
An important topic. After all, the healer is the one that keeps the team alive through recovering their health. The opponent team will very often try to CC to kill off teammates or hardstun while CCing the others to secure the kill on you or teammates. This is a thing that the healer wants to avoid. And for that, one needs to know about these two things.
What is Resolve
Resolve is a ‘resource’ that fills up whenever the player gets hardstunned / CC’d / sapped / pulled / pushed / knockbacked, and the amount it builds depends according to what kind of ability was used and its duration. When Resolve is full, you gain immunity to any other effects of this kind. Any root effects during full Resolve will instead become a Slow effect and regular Slow and Debuff effects will still work. On an extra note, Roots, Slows and Debuffs do not build Resolve.
It usually takes about 2 Hardstuns, 2 CC’s or 1 of each to completely fill it. When this happens, the player should make the most of it to kite, heal teammates, get a better position and so on.
However, some people can make moves and planning to manage this aspect on their opponents to ‘fit in’ more with their strategy before completing it. Krea has covered this topic rather well! I recommend checking out his guide about it!
Below there are pictures of how resolve looks like in the UI. There is also an option to turn the Resolve bar on below the nameplates.

No resolve – As it can be seen, the lay out is completely black on it. Means that no hardstuns were applied yet.

Mid resolve – The 3 bars can be noticed in it. Means a hardstun/CC or other abilities were used to accumulate up to that much.

Full resolve – When the bar looks white like that, means its full, thus immunity is given.

Full resolve depleting – And, of course, this effect does not last forever. Make it count!
When to use a Stunbreak
Usually, its used to save teammates or yourself when in trouble. One thing that one can take note of is that when under the stun/CC/Sap effects, the only highlighted ability in your quickbars will be your stunbreak. It doesn’t mean that you must use it, because there is a really long cooldown on it and can only be used once on it, and keep in mind, it is the most important DCD available. I will give some basic “guidelines” when to use it.
1 – Value your stunbreak.
Just as I mentioned, it is your most important defensive cooldown and doing a bad management of it changes everything. The opponents can get the upper hand later in the fight by locking you on more CCs and stuns later into the fight when your Resolve is back to zero again. Trust on your teammates to use their defensive cooldowns to stay alive until you get cleansed or the effects wear off.
2 – Avoid breaking stuns/CCs before having full Resolve.
Breaking without being a full resolve is generally a bad idea since the opponents can follow it up with another stun and that leaves you doing nothing for a while, and if you are on full Resolve they can’t do that to you.
3 – Pay attention to Electro Net (Mercenary and Commando) and Gore (Carnage Marauder) / Lance (Combat Sentinel)
These are the tools of nightmare as they will prevent you from using any high mobility ability (Rolls and Trick Move) that you have and that means you won’t be able to get away from your opponents if you get in trouble.
It is a troublesome thing to any healer that is in danger but even more towards Scoundrels because our tool set doesn’t offer any other ways of truly stopping any kind of focus aside from combat stealth after using the stunbreak to which we only have access to one, while Sorcerer/Sage can use stunbreak to get rid of Hinder effect and in the case they get stunlocked after, they still have access to their immunity barrier and phasewalk to prevent death on stunlocks (Something that Scoundrel cannot do), and Mercenary/Commando can just shrug off with their Reflect Shield.
The hinder effect from the Marauder/Sentinel spec is different given that it lasts 1,5 seconds but its relatively spammable every few seconds compared to the Mercenary/Commando that lasts around 9 seconds but can only be used once every minute and half.
How to counter these effects? Either stay within Guard Range of the Tank of your group or be close to a spot where you can hide/stay out of sight from the opponent team. And there’s this other characteristic about the Mercenary/Commando Net. The more one moves, the more stacks it builds, and the more stacks, the more damage it does.
The opponents will be looking to use this and expect you to use Stunbreak. It should be used preferably if under full Resolve. Breaking the effect without any Resolve is a pretty big gamble, since you will have to hope on having good teammates that can save you. And if that is the case, use other defensive abilities combined to survive any type of focus that could come in a stunlock.
4 – Never use a stunbreak to get rid of Root effects
This matters a lot. Please do not do this. You can use Dodge for this, as it also cleanses its effect. Triage can be used for most of them, except if it is a Force based ability. Only then, just Dodge can clear it.
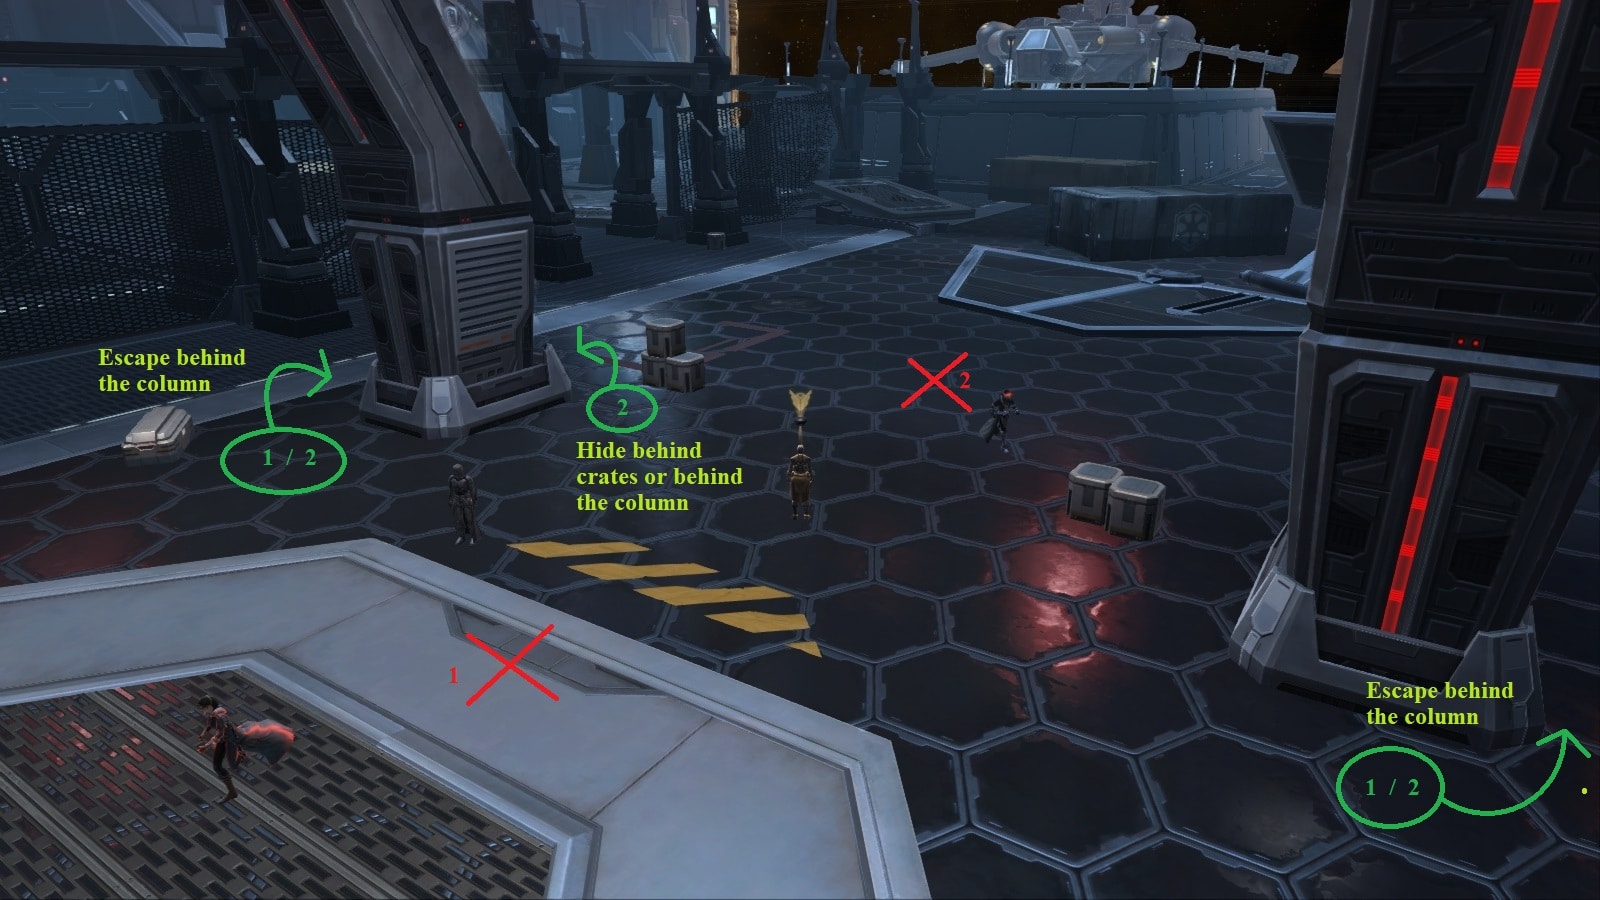
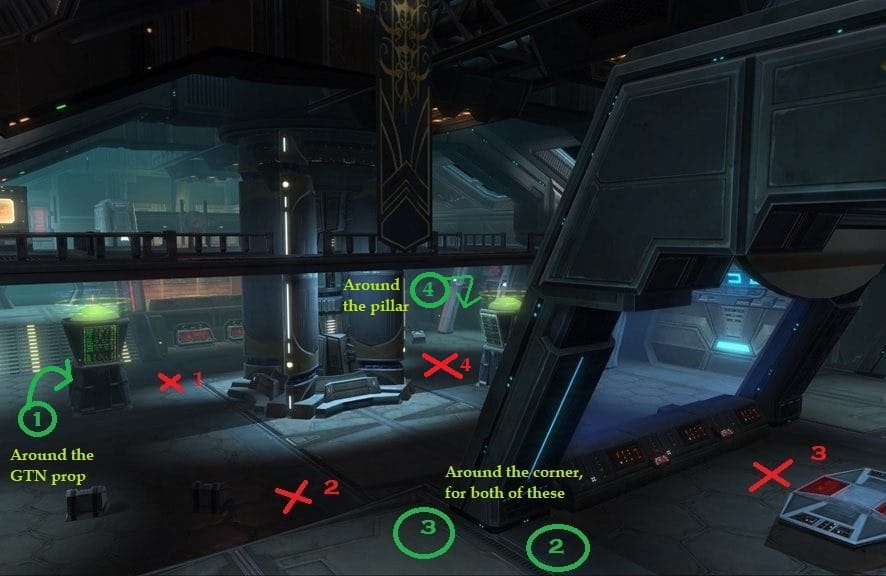
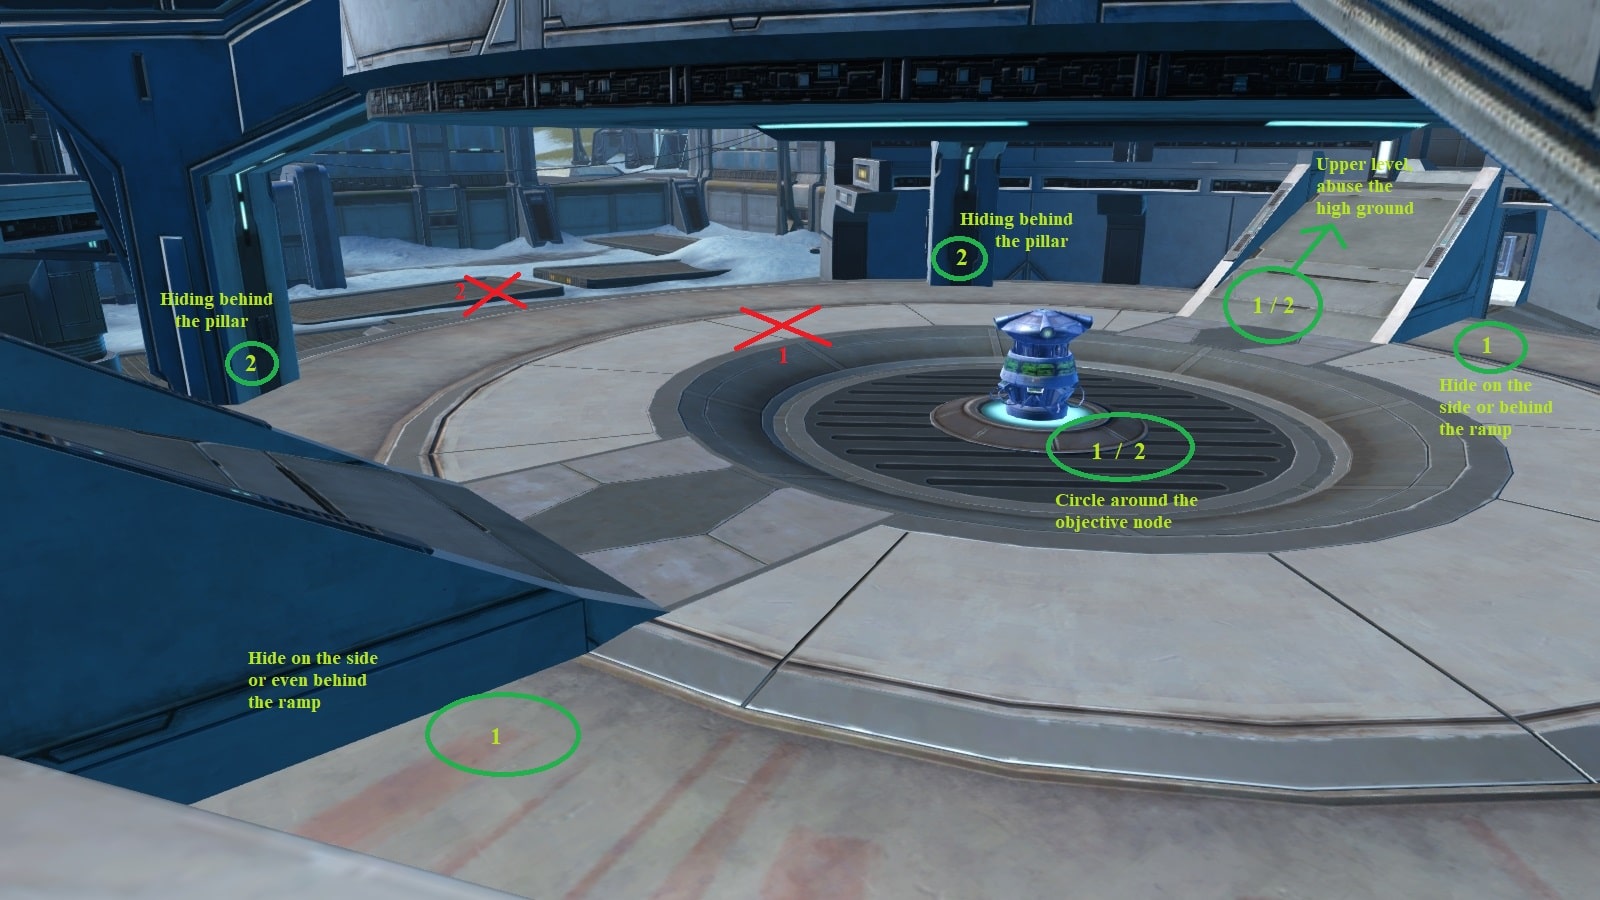
Positioning
Position in the map is crucial when you need to make an escape or at least break Line of Sight from the enemy team that is after you. As a Scoundrel Healer, you should always have an object close by to hide behind so that the opponents are forced to go around it or walk all the way to get to you. If that is done well, the opponents will have a much harder time killing you and your team.
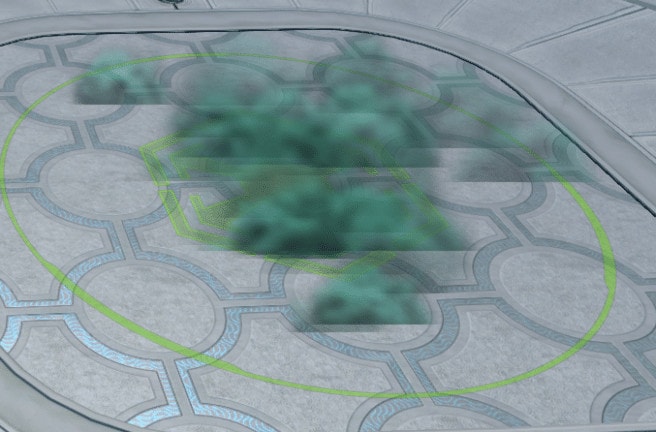
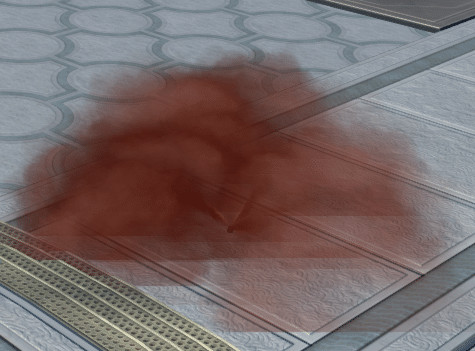
Here are some pictures with examples of good positions when the fight happens and that you can hide behind on when you suddenly become the target. The numbers will represent the situations.
- Red cross – where the group fight happens
- Green circle – Position that the healer should take.

Exceptions
There are a few situations that can be the exceptions, where you will be able to stand out, even still not exactly recommended, and remain ‘safe’ for most of the fight.
- That is when you’re up against teams that have a playstyle that revolve around using DoTs and AOE intensive attacks, like Engineer Sniper/Saboteur Gunslinger, Lethality Operative/Ruffian Scoundrel, Hatred Assassin/Serenity Shadow and more like that. That is done so that you can take advantage of their attacks and never get CC’d, and this will allow you to maximize the uptime of your healing for your team. Letting their attacks tick on you and denying any kind of suppression.
- There is also the situation where you have to stay close to your team and if you are the target and if there’s no spot where you can run to, you may have no other choice but to stay close to them.
If the fights can happen close to map props that you can hide behind AND you can take advantage of these aspects, then it becomes the best-case scenario for you. It’s a receipt for CC immunity and access to teamwork.
Kiting
What is Kiting? Running away from the opponents to survive. Its related on how you position yourself on the game, and that is why I hooked it up on the same topic. When you kite, you usually want to stand around some object where you can be a nuisance to the others by forcing them to move to reach you out and that gives time to your teammates to aid you. And while you do this, it is highly recommended to heal yourself up and use defensive abilities and other tools, such as Dirty Kick and Flashbang to help survive. Trick Move can also be used in here to escape to a teammate or to an opponent that is far from the fight, following with possibly hardstunning them, in order to escape and to hopefully having less people coming after you. In other words, to throw them off their game.
Guard Mechanic
The infamous Guard. An ability that is both hated and loved by many. It is something that will just bolster your team’s lifespan massively. Your tank can cast this on you or your teammates and 50% of all damage that you take will be redirected to it. You’ll recognize it by seeing the symbol on your or your healing target’s buff tray.

Picture 9 – GuardBuff
This ability has a limit of range of 15 meters from your tank, and when that happens, the damage no longer will be redirected. So do mind how far you are from your teammate when Guard is on you. And it is recognizable when a second symbol appears on the side of the Guard Symbol.

Guard alone, as well, also gives a 5% Damage Reduction buff to the target although I am not sure if it applies on PvP when out of Guard range. It should be considered that healing priority targets also change when there is a class that can Guard in play. Also, classes that have access to Guard but play as DPS will receive a -50% penalty and that can hinder the team’s DPS while bolstering survivability, something that a tank is not affected by.
Teammates Abilities / Buffs
I will only cover the more obvious buffs that are deployable on the field. Any other buffs that appear on the buff tray are related to the other classes won’t be covered but I can always answer any questions in the comments if requested.
Ballistic Shield (Sniper) / Scrambling Field (Gunslinger)
AOE shield that gives +20% Damage Reduction to any teammates that stand inside it. Just stay inside it to benefit from it.
Diversion (Sniper / Gunslinger)
This AOE ability can give a -45% accuracy debuff that affects all types of damage. If your teammate uses it, stand inside it to benefit from its effects. Although doing this may prove inefficient if the opponent team is composed mostly of Ranged classes.
Oil Slick (Powertech) / Riot Gas (Vanguard)
This one works like Sniper/GS Diversion, although slightly weaker and only works on Ranged and Melee attacks, around but comes with the bonus of slowing down the opponents. The greatest aspect of this one is the fact that it applies 75% slow effect on any opponent inside it.

Deflection (Assassin Tank / Shadow Tank)
This ability from tank spec variants have the attribute of reducing the damage from opponents by 15% on Force and Tech damage. If the other team has melee players, stay inside it so that they are also forced to stay inside it, thus less damage taken.
Acknowledgements
I’d like to thank Katrinka and Cerasi for fact-checking the guide and the awesome help on how to play Operative Healer in general. How to work around with the gear, buffs, utilities and more, along with taking notes of how to play during matches. Same goes for the Theorycraft Discord for the useful information it provides in BiS some stuff along with the research done in there! I do not think it would be possible to do this guide without their help!
About the Author
I’m known as Kamiala, from Darth Malgus, and Xelthìa, from Star Forge. Author of the Lethality Operative and Ruffian Scoundrel Guides.
Passionate player who loves to play SWTOR. Main Lethality and Ruffian, mostly on PvP but with quite the good time dedicated into PvE content, as well. I’ve, as well, quite the long and good experience when it comes to play as Medicine and Sawbones, for a good “chunk” of hours, and had good ‘teachers’ giving me good lessons and tips.
If you are skilled with a Class and Discipline that has not yet been covered with a guide on VULKK, and you want to provide one for the Community, contact me via email or wherever you see Vulkk present. I share on Facebook and Twitter whenever a new guide is available or will soon be ready.
How is the Class and Spec changing with SWTOR 7.0
In Update 7.0 BioWare is introducing a new term “Combat Styles”, which will replace the traditional class-specific disciplines. If you are curious and want to get a head-start, check out the SWTOR 7.0 Class Changes Previews available on the Public Test Server.
And if you are behind on the news, find out what the SWTOR Legacy of the Sith Expansion will have to offer.