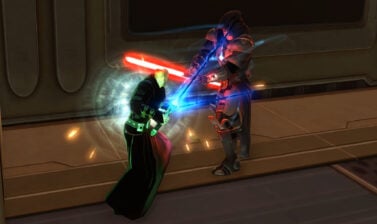
This is a Complete SWTOR Assault Specialist Commando PvP guide. It’s suitable for both beginner players and more advanced and experienced veterans, who seek to improve their performance! Written for VULKK.com by Xelthìa (previously known as Kamiala)
UPDATED FOR PATCH 6.2
Table of contents
- Introduction to Assault Specialist Discipline
- Performance Ratings
- Abilities and Rotations
- Utilities
- Gearing and Stats
- PvP Essentials
- How to play, Regs, Rankeds and Tips
- Acknowledgements
- About the Author
- How is the Class and Spec changing with SWTOR 7.0
Introduction to Assault Specialist Discipline
Assault Specialist is the one spec that is, quite often, overshadowed by other DPS, Gunnery, for the reasons where it has less simplicity on the way it works, the way it deals damage where it is forced to be a mixed hybrid of Dots and high damage abilities, something that a lot of players don’t like much and how it is more punishing on mistakes and bad plays, where it can lead to lose the momentum and lose the control of energy.
Its damage is quite high considering it is a Dot based spec, even when compared to burst specializations although can suffer from less opportunities to do certain actions. It is also the only specialization of the game where it has two dot spreads and both in a relatively short cooldown, which can help in melting teams. Of course, its greatest attribute is where a good chunk of the damage ignores armor, so your value increases when it comes to tunnelling through tanks and high armor targets.
When it comes to defensives, Assault Specialist offers quite the good group of abilities, possibly superior to Gunnery. The mobility is average to great at best, depending on the situations that you can yourself in.
And in utility, being a Commando, you offer powerful tools, with a special note on the Net, a game changer ability, which will be covered in the guide later.
Performance Ratings
Single target damage
Many people, despite knowing or not what Assault Specialist can do, still underestimate the damage it can deal, and you can take advantage of it. The variety of dots is great, where it can go up to five of them in a single target at same time, and all of them have a relatively short duration but they still deal a good amount of damage on their own. And adding the procs and the setups to deal massive damage by combining multiple attacks, well… the health bar of others can go down quick.
AOE damage
Assault Specialist possesses two dot spreaders and it’s the only one that has them and both come in a short cooldown. And not only that, there is also a tactical that allows to refresh the same dots on multiple targets. The damage over all can go high with this, although the energy consumption to do this is quite high so it must be used with care to not go overboard
Survivability
Survivability as an Assault Specialist Commando can be simultaneously good or average. It really depends on the focus of the opponent players, your teammates, and the positioning on the maps. All the abilities to mitigate damage are good but they come in a long cooldown and if you are forced to burn through them, its expected for you to abuse these as much as you can or well, you won’t live that long.
Group utility
Commando possesses powerful tools. Game changing ones. And when combined with proper DPS and teamwork, its hard to overturn these but most of the times, they’ll come to fruition with how you and your team can abuse them.
Abilities and Rotations
Key Abilities
 Incendiary Round Incendiary Round |
|---|
| Instant Energy: 15 Range: 30m Launches an incendiary projectile, setting the target ablaze for elemental damage and an additional amount of elemental damage over 15 seconds. |
| One of the main DoTs. Keep it on target(s) as much as you can. |
 Serrated Bolt Serrated Bolt |
|---|
| Activation: 1,5s Energy: 15 Range: 30m Fires special serrated bolts at the target that deal weapon damage and cause the target to bleed for internal damage over 15 seconds. |
| The other of the main DoTs. Keep it on target(s) as much as you can. |
 Assault Plastique Assault Plastique |
|---|
| Energy: 15 Cooldown: 15s Range: 30m Throws a moldable plastic explosive that sticks to the target and detonates after several seconds, exploding for kinetic damage. Standard and weak enemies enter a state of panic when the explosive attaches and are knocked down when it detonates. |
| One of the two big burst abilities you got in Assault Specialist specialization. Quite the overpowered ability, especially when popped by Mag Bolt, where it deals additional damage and also leaves a lingering dot. |
 Mag Bolt Mag Bolt |
|---|
| Energy: 15 (Free with proc) Cooldown: 15s Range: 30m (Replaces High Impact Bolt) Fires a very powerful shot at the target that deals weapon damage. Replaces High Impact Bolt. |
| The other of the two big burst abilities you got in Assault Specialist specialization. It can be buffed to have autocrit, when using Concentrated Fire bonus set and under the effects of Supercharged Cell. There is also the perk where it can be of no cost occasionally. Goes well when used after Assault Plastique. |
| Channeled: 3s Energy (in total): 24 Range: 30m Cooldown: 15s Fires a continuous stream of bolts that deals weapon damage and depletes 24 energy cells over the duration. Weak and standard enemies caught in the blaster fire are stunned for the duration. |
| One of your big DPS abilities, as well, but channelled. The ticks have a very high chance of proccing the Fire dot. |
| Activation: 1,5s Energy: 15 Range: 30m Spins up the assault cannon and fires off a quick burst of powerful, charged rounds at the target weapon damage. Requires Assault Cannon. |
| It’s the “third” of the big burst abilities, but only when you build stacks, that were already mentioned before, where it increases the damage of this ability. It can also force Assault Plastique to explode. |
 Hammer Shot Hammer Shot |
|---|
| Range: 30m Fires a series of hammering shots that deals weapon damage to the target. |
| It will sound surprising how strong the ‘free-shot’ ability is just because it has the Fire proc from the Specialization itself. You’ll find yourself using this more often than you believe, in case this is your first-time playing Assault Specialist, given that it has no cost and will do good damage. |
 Explosive Round Explosive Round |
|---|
| Energy: 20 (10 with under 30% buff) Range: 30m Fires a heavy round that deals kinetic damage to the primary target and additional kinetic damage to up to 7 standard or weak targets within 5 meters of the primary target. If the primary target is weak or standard enemy, it is knocked to the ground. |
| It’s a controversial ability. If you pair it with the utility that adds root effect to this, it will become a relatively useful tool throughout the game. That and there is also the fact that Assault Specialist buffs this ability’s damage by 75% and the energy cost goes down by 10 when your target is below 30%. I recommend to use, when the target has more than 30%, only when you see its trying to escape a tricky situation and the root will prevent him from doing so. If under 30%, just use it right away. The damage is worth it. |
 Plasma Grenade Plasma Grenade |
|---|
| Activation: 1,5s Energy: 15 (After being in Assault Specialist) Cooldown: 13,5s (After being in Assault Specialist) Range: 30m Lobs a plasma grenade that detonates on contact, dealing kinetic damage to up to 8 targets within 8 meters and igniting the targets in fiery plasma, dealing additional elemental damage over 6 seconds. Standard and weak targets enter a state of panic from the flames. |
| One of two main dot spreaders while also being a dot on its own. Fairly strong and can be buffed by Supercharged Cell, so its worth the using it, as well, given that the ability does good damage on its own. Its downsides is that it’s a cast and anyone can interrupt it, unless under the effects of Tech Override. |
 Sticky Grenade Sticky Grenade |
|---|
| Energy: 15 Cooldown: 15s Range: 30m Throws a sticky grenade that will detonate after several seconds. Standard and weak enemies enter a state of panic when the grenade is active. The explosion deals kinetic damage to up to 8 enemies when it detonates. Standard and weak targets are knocked back from the blast. |
| The other of the two main dot spreaders. It’s a useful one, too, with different mechanics compared to Plasma Grenade. Its instant on cast but it remains on target for a few seconds before it explodes and only then it spreads the main dots that the target of it may have. If you use the tactical Magnetized Shrapnel, this ability will deal comparable damage to Assault Plastique and it can be popped by Mag Bolt, as well. |
 Mortar Volley Mortar Volley |
|---|
| Channelled: 3s Energy (in total): 30s Cooldown: 45s Range: 30m Launches a volley of mortar shells at the target area, dealing kinetic damage to up to 8 enemies within 5 meters over the duration. Standard and weak targets are knocked down by the blasts. Depletes 30 energy cells over the duration. |
| The stronger AOE ability(not by much though) and can’t be spammed. Its not a bad one but its rather expensive, so its use will be rare. If Continuous Fire Tactical is taken, then you’ll be wanting to use this, of course. |
 Hail of Bolts Hail of Bolts |
|---|
| Channelled: 3s Energy (in total): 32 Range: 30m Launches waves of blaster fire at up to 8 targets within 5 meters of the target area, dealing weapon damage over the duration. Standard and weak targets are sometimes knocked back by the hail of bolts. Requires Assault Cannon. Spends 32 energy cells over the duration. |
| The “weaker” AOE ability but can be spammed. Again, like the other, it is not a bad one but just as expensive. The use of it will usually be to decloak enemy Assassins and Operatives that might be lurking around or trying to escape to regen to full. If Continuous Fire Tactical is taken, then you’ll be wanting to use this often, of course. |
| Plasma Cell ( Passive ) |
|---|
| Ranged weapon attacks have a 25% chance to deal additional elemental damage over 6 seconds. This effect cannot occur more than once per second. |
| What I call as ‘Fire Proc’. This is possibly the main ‘dot’ of Assault Specialist, where every Ranged weapon damage ability can proc. And it will deal immense damage on the long run. |
 Supercharged Cell Supercharged Cell |
|---|
| Converts 10 stacks of Supercharge to regenerate 10 units of energy and provides a buff unique to each discipline. For Assault Specialist, Supercharged Cell increases periodic damage by 10% for 8 seconds and causes the next successful ranged attack on a target affected by Incendiary Round to leave Supercharged Burn and deal damage over 4 seconds. |
| It’s your main buff to all your Dots on this specialization and it’s a welcoming one. Its also easy to farm the 10 stacks. The best use of it is when you’re sure to use shortly after applying all dots or when you’re using abilities that tend to proc the Fire proc passive as much as possible in a short time, those being Full Auto, Mag Bolt, Charged Bolts and Hammer Shot. |
Defensive Abilities
| Tenacity |
|---|
| Cooldown: 2m:00s Purges all incapacitating and movement-impairing effects. |
| The standard CC breaker that every class possesses. Should be used if it is to escape death or to prevent the opponent from capturing objective points, etc… |
 Echoing Deterrence Echoing Deterrence |
|---|
| Cooldown: 2m:00s Engages a defensive response system that absorbs all incoming direct single target damage for the next 6 seconds, reflecting 50% of the absorbed damage back at the attacker and healing you for 5% of your maximum health each time an attack is absorbed. Can be used while stunned. |
| The broken Reflect of the game. Every time someone injures you with direct damage, you’ll not only take no damage but will also heal 5% per tick. It has no internal cooldown, so if someone uses an attack that has multiple ticks of damage, you’ll heal in every single one of them. It won’t stop or proc your heals on Dots and AOE attacks though. |
 Degauss ( Passive ) Degauss ( Passive ) |
|---|
| Cooldown: Tied to Diversion Activating Diversion makes you immune to interrupts and increases your defense chance by 35% for 6 seconds. |
| I believe this should be mentioned, given that, despite being tied to a tool ability, it still is a defensive on its own. As it says, it offers 35% defense chance against all types of attacks. It’s a great asset, although relying on RNG, of course, to save you. |
 Adrenaline Rush Adrenaline Rush |
|---|
| Cooldown: 3m:00s Activating this ability makes you Fired Up for up to 60 seconds, which triggers an Adrenaline Rush when your health is reduced to 35% or less. If your health is already 35% or less, Adrenaline Rush triggers immediately. Once triggered, Adrenaline Rush goes on cooldown for 3 minutes and rapidly heals you up to 35% of your max health for 8 seconds but will not exceed 35% of your max health. |
| Your ‘last line’ of defensives. This ability will heal you and keep your health maxed out on 35%, however, you’ll most likely have to take the other utility, so it will remain on the other %. It should be the last defensive to be used to save you but don’t save it when you’re at an extremely low health because this is not instant but rather it progressively heals you up. |
 Reactive Shield Reactive Shield |
|---|
| Cooldown: 2m:00s Increases damage reduction by 25% for 12 seconds. |
| Your main defensive cooldown. You’ll find yourself using this quite often, specially paired with the utility that reduces its cooldown. Knowing how and when to use this will help a long way to live longer. |
 Hold the Line Hold the Line |
|---|
| Cooldown: 45s Grants 6 seconds of immunity from all movement-impairing effects, knockdowns and physics and increases movement speed by 30%. |
| Your immunity to any forms of roots and movement impairment. It will usually be used for kiting or preventing any form of knockback that the enemy players may use. |
| Energy: 5 Cooldown: 25s Charges: 2 Fire a specially compressed round, propelling you backward 20 meters and granting you immunity to controlling effects while propelled. Cannot be used while immobilized or hindered. Requires Assault Cannon. |
| It’s your kiting tool or gap closer if you can maneuver with the camera around properly. You’ll cover a good distance to the back of your character and not where you’re looking at, so its important to ‘redirect’ your character first before using it, or, at least, have a good idea where you’ll go to. On 6.0, you have two charges of this instead of just one. There is also the occasional bug where you can get stuck on floor and no longer move, so be careful! |
| Warzone Medpack and Warzone Adrenal |
|---|
| Players will always have the option to use these in a warzone. PvP vendors, at the fleet and warzones, sell them. Warzone Medpack is basically an emergency heal. If someone is about to burst, you can use the Medpack to have enough HP to not die. Warzone Adrenal grants 15% damage reduction for 15 seconds. It shouldn’t be underestimated. Any damage reduction option will help you to stay alive. |
| Instant Energy: 10 Cooldown: 21s Range: 30m Instantly heals a friendly target. |
| Your big main heal. Its instant but has a cooldown and can be used to save teammates or yourself. Using often to keep health up is good and helps in burst healing too. |
| Channeled: 1,50s Energy: 13 Range: 30m Summons a probe that heals. |
| Castable heal, with no cooldown, used to save teammates or yourself. Its use won’t come as often unless when in desperate need to heal someone. Its also quite expensive when spammed, so be careful. |
| Instant Range: 30m Fires a quick stream of bolts, causing healing. |
| Your freebie heal. Used to when you need those Supercharged Cell stacks and as to manage when trying energy when healing yourself up. Of course, its not as good as the other two. |
Tool Abilities
 Cryo Grenade Cryo Grenade |
|---|
| Energy: 5 Cooldown: 1m:00s Range: 10m Hurls a cryo grenade that freezes the target, dealing energy damage and stunning it for 4 seconds. |
| Your standard Hardstun. Use it to stun opponents and seize opportunity to kill them or their teammates. |
| Energy: 5 Cooldown: 1m:00s Range: 30m Fires a round at the target that knocks it out for up to 60 seconds. Non-player, non-standard and non-weak targets regenerate health rapidly while knocked out. Damage causes this effect to end prematurely. |
| Your standard CC. Use it to keep a valuable target out of the fight. For example healer, tank or a DPS that is a threat to you and your teammates. It breaks of damage, so watch if you or your group are using AOE around. |
 Concussion Charge Concussion Charge |
|---|
| Energy: 5 Cooldown: 25s Deals elemental damage and pushes up to 8 nearby enemies back away from the Trooper. Targets have their movement speed reduced by 50% after being knocked back. |
| Your standard knockback. Its quite the powerful one but still requires a proper positioning to abuse it. Usually it works like your CC. You want to push away valuable opponents away from your group fights and force them to stay out of it and even force them to walk around long ways to reach back to you. |
| Cooldown: 24s Range: 30m Interrupts the target’s current action and prevents that ability from being used for 4 seconds. |
| Used to interrupt channeled abilities, most of the time, key abilities belonging to each class/spec. |
 Stealth Scan Stealth Scan |
|---|
| Cooldown: 20s Range 30m Fires off probes that scan the area for stealthed opponents. The probes last 10 seconds. |
| Your stealth scan to force Operatives/Scoundrels and Assassins/Shadows out of their cloaked state and reveal these and Marauders/Sentinels out when they are trying to escape. |
| Energy: 10 Cooldown: 12s Range: 30m Cleanses a friendly target of up to 2 negative tech or physical effects. |
| It is good if you can afford to cleanse roots, slows and cc’s that opponents may use on you and your teammates. |
 Electro Net Electro Net |
|---|
| Energy: 10 Cooldown: 1m:30s Range: 30m |
| Your most important tool. The net prevents any use of high mobility, like rolls and dashes, and also use of some defensives like the big barriers that Sages and Sorcerers have and any form of combat stealth that Marauders/Sentinels, Operatives/Scoundrels and Assassins/Shadows have. It is mostly to be used to secure kills on opponents. |
 Diversion Diversion |
|---|
| Cooldown: 45s Reduces the threat towards all current enemies. |
| Your Aggro drop. A specially valuable asset for Assault Specialist because of Degauss passive. Value this well because it can save you. |
 Recharge Cells Recharge Cells |
|---|
| Cooldown: 1m:30s (Lowered from Assault Specialist) Recharges 50 energy cells over 3 seconds. |
| Your Energy Regen. Assault Specialist will need to use this and the fact that it has a lowered cooldown from the specialization tree alone, makes it good. |
 Tech Override Tech Override |
|---|
| Cooldown: 1m:00s Your next ability used within 15 seconds with an activation time will activate instantly and then grant immunity to pushback and interrupts for 6 seconds. |
| Used to be able to cast abilities that need to be activated/charged instantly. Usually used for heals but can be saved for other abilities, depending on the need. |
| Cooldown: 12s Reduces the cooldown of Recharge Cells and Reserve Powercell by 30 seconds. Additionally, lowers the energy cost of Medical Probe by 5. |
| This makes your next ability free from the cost of its energy. Usually you want this to be used on expensive abilities. |
 Supercharged Celerity Supercharged Celerity |
|---|
| Cooldown: 5m:00s Requires and converts 10 stacks of Supercharge to issue Supercharged Celerity to you and your Operation group members within 40 meters, increasing alacrity by 10%. Lasts 10 seconds. |
| This is your class buff. You won’t be able to use it on arenas, regardless of them being Unranked or Ranked. Only on standard 8v8 maps though and this, of course, bolsters your team for a good amount of alacrity. |
 Emergency Medical Probe Emergency Medical Probe |
|---|
| Cooldown: 5m:00s Range: 30m Summon a droid that revives an incapacitated ally. This ability is usable while in combat. When used, all party members can neither use nor be the target of an in-combat revival for the next 5 minutes |
| Its your revive. Like the class buff. Only be used on 8v8 and in open world, when travelling in PvP instances. You can revive your tank or healer and get them up quick that way. |
Rotations
Curiously enough, dealing damage as Assault Specialist is surprising easy, when it comes to Single Target, and it is because the Dot spreading abilities count as secondary on killing someone, so you don’t have the risk to accidentally pop off the CCs/Saps that you or your teammates haved used on others.
Rotation on Single target (Priority System)
First: Prepare the 10 stacks of Supercharged Cell and the Mag Bolt Buff before starting the fight.
- Keeping
 Incendiary Round / Serrated Bolt up (Mandatory. Keep them up.)
If possible, any ability that procs Mag Bolt buff, ( Full Auto / Charged Bolts /
  Hail of Bolts). Still, it will come out naturally and this step may not be necessary anymore. Unless your energy is really low, of course.
 - Assault Plastique
- Mag Bolt (Pref. if buffed by Supercharge and/or Free energy proc) after Assault Plastique (In theory, it should have a higher priority than Assault Plastique BUT I am trying to encourage its use after so that you do the ‘combos’ for the highest damage possible. Also, you can add Sticky Grenade if tactical is used! They both explode on it and even at same time if both present)
- Full Auto
- Instant Charged Bolts
- Instant Charged Bolts
- Buffed Explosive Round
- Fillers ( Non-buffed Mag Bolt / Non-instant Charged Bolts / Hammer shot)
 Supercharge and/or Free energy proc) after
 Notes:
- Keep the Dots up on main target, preferably all the time but there is no need to panic and recast dost when they are still halfway or something. Assault Specialist has no problems with tempering with CCs on other targets as long as you don’t use abilities that can dotspread or do AOE.
- Watch your energy often and try not go below below 60%, because it really is hard to recover from it and Assault Specialist has quite the expensive abilities. Hammer Shot is quite powerful despite being the ‘freebie’ attack, given that the Fire proc happens quite often and deals significant damage.
- Never use Supercharge without dots being on target. You’re wasting potential DPS that way.
Rotation for AOE Only (Priority System) without Continuous Fire Tactical
- Apply Incendiary Round & Serrated Bolt on a target
- Use a couple of abilities according to the single rotation on your main target
OR
Do Mortar Volley or Hail of Bolts (Be careful with your energy pool. It will drain ridiculously fast with this)
Reason for this is so that you can re-spread later instead of having to do step 1 again - Either Sticky Grenade or Plasma Grenade
- Use other abilities according to the single rotation on your main target
OR
Spam Mortar Volley and Hail of Bolts ( Be careful with your energy pool. It will drain ridiculously fast with this) - Between Sticky Grenade or Plasma Grenade that is not on cooldown from before to re-spread the dots from others target back to main one, after they have ran out. Back to 2.
Back to 1 if both dots have ended on other targets before being able to re-spread.
The AOE on Assault Specialist, without Continuous Fire Tactical, is relatively complicated to keep it up but it does deal quite the good damage that way, on others. The reason to delay is that so there is a sort of desync between the dot duration between multiple targets. Keeping them at different times can help plan it out to have them hop back and forth and saves GCDs on having to reapply the 2 dots over and over again. There is also the option to just use dotspreads right from the get-go and then reapply dots on main target again, but keeping that synchrony is relatively hard.
Rotation for AOE Only (Priority System) with Continuous Fire Tactical
- Apply Incendiary Round & Serrated Bolt on a target
- Either Sticky Grenade or Plasma Grenade to dot spread
- Use a couple of abilities according to the single rotation on your main target and later use Mortar Valley or Hail of Bolts to refresh dots one everyone. REPEAT
OR
Spam Mortar Valley and Hail of Bolts, constantly re-ticking and refreshing the dots on targets. REPEAT
Utilities
This category in the guide is structured by recommendations.
Skillful
Recommended
-> Tenacious Defense : Reduces the cooldown of Concussion Charge by 5 seconds, Propulsion Round by 3 seconds, and Tenacity by 30 seconds.
Easily a mandatory utility. Reduces the cooldown of your kiting ability, knockback and your stunbreak. Its something that you want, in case you’ll get focused, which will happen quite often.
-> Parallatic Combat Stims : You recharge 20 Energy Cells when stunned, immobilized, knocked down, or otherwise incapacitated. Additionally, your next Tech ability deals 10% extra damage or healing.
Another strong candidate for a must have and simply because the abilities are quite expensive on use. This works on every form of incapacitation. Slows, hardstuns, roots and CCs and that helps regain energy that you might have lost before.
-> Cell Capacitator : Recharge Cells now recharges an additional 15 Energy Cells and grants 10% alacrity for 6 seconds.
The last strong candidate to take on Skillful tier. Simply due to the additional energy it gives, where you can abuse a bit more the threshold below 60%. And it comes with the added 10% alacrity which is always nice!
-> Concussive Force : Explosive Round immobilizes the target for 4 seconds. Direct damage caused after 2 seconds ends the effect. This effect can only occur once every 8 seconds. In addition, Concussion Charge’s knockback effect is stronger and pushes enemies 4 meters further away.
A very strong candidate to be mandatory. Your knockback pushes your opponents further away and you get to root someone for 4 seconds every 8. It can help you kite or to root opponents that are trying to get away. Plus, adding this to the fact that Assault Specialist also gets a buffed Explosive Round when under 30%, is a great asset.
Useful
-> Chain Gunnery: Increases the damage dealt by Hail of Bolts by 25%.
Not a bad utility to take, specially if you use Continuous Fire Tactical. Then again, if you take this, you’ll make Mortar Volley basically useless, as the damage will be comparable.
Situational
-> Suit FOE : Increases your steal detection level by 3, increases your melee and ranged defense by 3%, and reduces the cooldown of Stealth Scan by 5 seconds. Additionally, when you activate Field Aid on yourself, all periodic damage taken is reduced by 30% for 12 seconds
The only uses this one has is the damage reduction against any dots for 30% during 12 seconds. It’s a good perk but not that strong, and the Stealth Scan reduce. The increase of defense against those types of damage is relying on RNG.
-> Sticky Mods : Charged Bolts and Grav Round reduce the movement speed of targets they damage by 40% for 9 seconds. In addition, the slowing effect applied by Kolto Residue lasts an additional 3 seconds.
This one is situational. Your teammates should be able to do that work for you, really. Besides, its applying a slow to an attack that is not used so often, but then again the duration of the slow is also relatively long. Its use is debatable.
Useless
-> Efficient Conversions : Eliminates the Energy Cell cost from Concussion Charge, Concussive Round, Field Aid, and Cryo Grenade
It is a generally bad utility since those abilities are not expensive. Don’t recommend at all, anyway.
Masterful
Recommended
-> Reflexive Shield : When you take damage, the active cooldown of Reactive Shield is reduced by 3 seconds. This effect cannot occur more than once every 1.5 seconds. In addition, when taking damage, you have a 20% chance to emit an Energy Redoubt, which lasts up to 6 seconds and absorbs damage. This effect cannot occur more than once every 10 seconds.
A must have. It reduces the cooldown of your shield whenever you are hit, which will be the most important defensive cooldown. And it also offers a mini shield that absorbs a certain amount of damage every so often, whenever attacked.
Useful
-> Advance the Line : Increases the duration of Hold the Line by 4 seconds
Useful, indeed, since it bolsters you immunity to knockbacks and also helps with kiting.
-> Combat Shield : Reactive Shield now further decreases ability activation pushback by 30%, increases all healing received by 20%, and makes you immune to interrupts.
Useful due to the possible immunity interrupts when you come and try to burst down players. That and there’s also the part of increased heals when the shield is up, which is good!
-> Overclock : Reduces the cooldowns of Concussive Round and Tech Override by 15 seconds each. In addition, Tech Override grants a second charge, making your next two abilities with an activation time activate instantly.
Cooldown reduction on your CC and instant cast buff, and extra charge for the second one. It may be useful, but other utilities on this tier prove to be better than this one.
-> Reflexive Battery : Activating Concussion Charge generates 2 stacks of Supercharge and heals you and up to 7 other allies within 8 meters for X health. In addition, Concussion Charge deals 30% more damage and reduces its active cooldown by 1 second when you take damage. This cannot occur more than once every second.
It can be a useful one since it reduces the cooldown of your knockback, and don’t get me wrong, since it is a powerful tool but there’s not much outside that. The heal is also minor. Not enough to create a big impact in games. Of course, the fact it also gives Supercharge stacks makes it better.
-> Charged Barrier : Charged Bolts, Grav Round, and Medical Probe generate a Charged Barrier that increases damage reduction by 1% for up to 15 seconds. Stacks up to 5 times
Possibly useful, due to the fact you won’t spam Charged Bolts that much but again, the duration to refresh the duration is also long, making it possible to have free 5% damage reduction.
-> Electro Shield : When activated, your Reactive Shield charges with electricity, zapping attackers for elemental damage when they deal direct damage to you. This effect cannot occur more than once each second
Situational if not outright useless because the damage it deals back is low and there are some players who will avoid hitting your shield, thus making it pointless. That and there’s also the fact that dots and AOE damage won’t activate this effect.
Situational
-> Supercharged Reserves : Reduces the cooldowns of Field Aid and Disabling Shot by 3 seconds. In addition, you build up to 10 stacks of Supercharge over the course of using Recharge and Reload. This effect cannot occur more than once every 30 seconds.
CD Reduce on your interrupt and cleansing ability. That’s strong but that’s it. The other attribute of granting 10 stacks of Supercharge is average given that its just as easy to gain them.
Heroic
Recommended
-> Trauma Stabilizers : While Reactive Shield is active, you generate a stack of Trauma Stabilizers each time you receive direct damage. Stacks up to 10 times. When Reactive Shield expires, each stack of Trauma Stabilizers instantly heals you for 4% of your maximum health
A must-have, for sure. Every time you’re hit with direct damage, it will build those stacks. Stacking this utility with the shield reduce cooldown from the Masterful Tier and it makes this one as one of the best utility combos in the game. Of course, there will be players who will avoid this, or they’ll just burn through as much as they can without caring. You can also click the shield off from your buff tray and heal up instantly.
-> Forced March : Allows Full Auto, Blazing Bolts, and Progressive Scan to be activated while moving.
A very strong utility, given that it bolsters you mobility altogether. Could say that it’s a must have, as well.
-> Adrenal Surge : Adrenaline Rush triggers at, and can heal you up to, 60% of your maximum health. Additionally, Adrenaline Rush lasts 2 seconds longer and heals for twice as much each time it restores health.
Another must have, since it bumps up your Adrenaline Rush from 35% to 70% and it doubles the tick rate, keeping you much safer. Of course, its still risky to go too low on health, even with this. A must have anyway!
-> Shock Absorbers : Reduces damage taken from area effects by 30%. Additionally, while stunned, you take 30% less damage from all sources.
Another very useful utility, where it reduces damage after being stunned. Works really well when you’re the focus target of the opponent team. Players nowadays jump on players and having this harstun damage reduction can go well in a long way.
Useful
-> Supercharged Defense : Activating Supercharged Cell increases your defense by 15% and grants immunity to interrupts for 8 seconds. In addition, your endurance is increased by 3% and all healing received is increased by 3%.
A useful one, given that it offers increase on health pool, increased healing that you receive and offers 15% defense to every type of attack and gives interrupt immunity. Pretty undervalued utility.
-> One Man Army : Hindering a target with Electro Net grants One Man Army, increasing your Alacrity by 15% for 9 seconds. Additionally, Supercharged Cell reduces the cooldown of Adrenaline Rush by 5 seconds.
This one is very useful. Alacrity for 15%, which you can stack with other buffs, in case you also take them. That and every time you use Supercharged, the Adrenaline Rush is reduced by 5 seconds.
-> Smoke Screen : Propulsion Round generates Smoke Screen when used, keeping you from being leapt to or pulled and making you immune to interrupts and ability activation pushback for the next 4 seconds. In addition, taking melee or Tech damage within 4 seconds of previously using Propulsion Round refreshes its cooldown. These effects cannot occur more than once every 40 seconds.
Useful utility when facing melee classes that target you heavily. It simply doesn’t let you be leapt at all, and makes you immune to interrupts. And there is the chance that they might regenerate the stack of Propulsion Round when hitting you within 4 seconds after using the ability. A win in a lot of situations.
Situational
-> Suppression Protocols : Stealth Scan grants Suppression Protocols, increasing the damage or healing dealt by your next non-channeled direct damage or healing ability by 20%. For each target revealed from stealth, you generate an additional charge of Suppression Protocols. This effect stacks up to 5 times and lasts for up to 10 seconds.
Situational utility given that the Stealth scan ability has a long cooldown and you may not face cloaked opponents either, making this perk useless
My recommendations for Utilities
I am going to leave a screenshot with the highlighted utilities that go from green to red and what I think its most beneficial to when you’re playing with Innovative Ordnance.
- Green = What I believe it should be taken
- Yellow = What I pick will depending on the situation but generally I pick the heal shield
- Red = What I don’t take
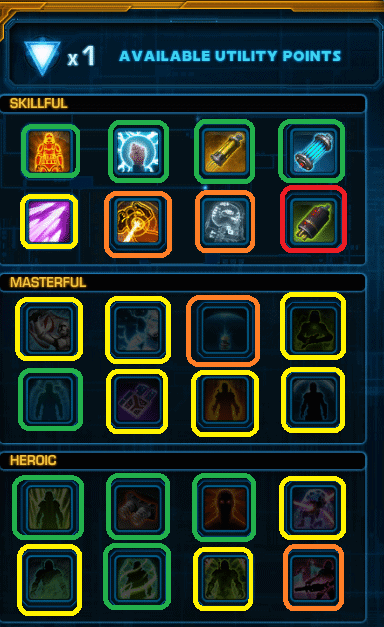
My build tends to be this:
- Skillful: Tenacious Defense + Concussive Force + Parallitic Combat Stims + Cell Capacitator
- Masterful: Reflexive Shield + Pick between Electro Shield and Advance the Line
- Heroic: Adrenal Surge + Trauma Stabilizers + Pick between Forced March and Shock Absorbers
Gearing and Stats
I am going to give a brief explanation on what Bonus Sets/Tacticals generally work, along with brief description how to reach the desired stats and Best In Slot on the gearing, in terms of mods and the like. I will give versions with the new augments first, and then, in case you lack credits/crafting materials to buy specific things, I will also give an alternative in cheaper augments.
Warning regarding gear:
- All Armorings, Mods and Enhancements can be moved around on all characters unlike the previous patch, which is a thing that you no longer need to be careful about.
- On the other hand, you have to be careful when buying gear. It cannot be refunded at the vendors once purchased. Even with how easy it is to grind things now and same to be said about credits, it doesn’t mean that it can be just shrugged off because other details, like amplifiers as they are a credit sink.
- All forms of Gear are considered Legacy (Not Cartel Market or low level world drops on planets though).
Stats for PvP
Gearing in PvP comes in different tastes. One can stack low Alacrity, high Critical and others stack high Alacrity with rest dumped into Critical. Although I will explain what is generally needed.
- +3300 for Critical Rating as it gives easily above +42% with +1213 for 1st threshold in Alacrity;
- +3208 for 2nd Alacrity threshold builds with as much Critical Rating you can have.
- Below it will be displayed how these stats can be achieved.
- The best Mods on 6.0, at the moment, are the unlettered R-2, unlettered R-3 and unlettered R-5 but unlettered and unnumbered version work just fine;
- The best Armorings, Barrels and Hilts are the unlettered and unnumbered and unlettered R-1 versions.
Notes:
- Accuracy, in general, can recommend to be close to 105% on the builds which would lead to have certain benefits like:
- Negating the Defense rating from the opponents as much as possible: the usual being 5% accross most classes, with Assassin and Sorcerer being exception with 10% Defensive Rating;
- To minimize the effects from certain classes/specs. F.e. Powertech’s Oilslick and Sniper’s Diversion. It doesn’t do much about it but still. It is up to your choice to take, or not.
- Earpiece and Implants will be considered as Enhancement as they give the same stats.
- I am using the 274 Augments from patches/updates but I will provide the BiS as much as I can, including the new 300 augments and the old versions of 228 versions.
- Relics will usually be the ones that give Mastery (Focused Retribution) and Power (Serendipitous Assault), although the Critical(Devastating Vengeance) can be picked on 1,3s GCD build.
- Crystals will always be +41 critical stat (Eviscerating).
- It is highly recommended that you get the companion bonuses, otherwise some stats may not match. Screenshot below to show what I mean. It can be found in the legacy window on the Global Unlocks Tab, following with Imperial Classes/Republic Classes.

The example in the screenshot, Imperial Agent players(Sniper/Operative) need to finish Scorpio story companion and/or max affection to have access to the bonus from her. It gives exactly 1% extra on accuracy. It is not accumulative with other companions from other classes.
Low Alacrity with High Crit
Gear in 306 rating + Advanced Augments 45 (228)
- Alacrity: 1213+
- 3 Enhancements (+431 each – Unlettered and Unnumbered version)
- It gives 1,4s Global Cooldowns
- Critical:
- 7 Enhancements (+431 each – Unlettered and Unnumbered Version)
- 1 Augment (+96)
- Crystals (+41 each)
- Advanced Kyrprax Proficient Stim (+109)
- Mastery:
- 13 Augments (+96 each) (If Accuracy Enhancement was not taken)
- Accuracy: 264
- Advanced Kyrprax Proficient Stim (+264)
- It gives slightly above 102,7 % Accuracy
If you decide to take an accuracy enhancement, the build will be like this:
- Alacrity: 1213+
- 3 Enhancements (+431 each – Unlettered and Unnumbered version)
- It gives 1,4s Global Cooldowns
- Critical:
- 6 Enhancements (+431 each – Unlettered and Unnumbered)
- 6 Augments (+96 each)
- Crystals (+41 each)
- Advanced Kyrprax Proficient Stim (+109)
- Mastery:
- 8 Augments (+96 each) (If Accuracy Enhancement was taken)
- Accuracy: +650
- 1 Enhancement (+431 – Unlettered and Unnumbered Version, R-20 version is the better one)
- Advanced Kyrprax Proficient Stim (+264)
- It gives slightly above 102,7 % Accuracy
Gear in 306 rating + Augments 74 (286)
- Alacrity: 1213+
- 3 Enhancements (+431 each – Unlettered and Unnumbered version)
- It gives 1,4s Global Cooldowns
- Critical:
- 7 Enhancements (+431 each – Unlettered and Unnumbered versions)
- 1 Augment (+108 each)
- Crystals (+41 each)
- Advanced Kyrprax Proficient Stim (+109)
- Mastery:
- 13 Augments ( +108 each) (If Accuracy Enhancement was not taken)
- Accuracy: 264
- Advanced Kyrprax Proficient Stim (+264)
- It gives slightly above 102,7 % Accuracy
If you decide to take an accuracy enhancement, the build will be like this:
- Alacrity: 1213+
- 3 Enhancements (+431 each – Unlettered and Unnumbered version)
- It gives 1,4s Global Cooldowns
- Critical:
- 6 Enhancements (+431 each – Unlettered and Unnumbered versions)
- 5 Augments (+108 each)
- Crystals (+41 each)
- Advanced Kyrprax Proficient Stim (+109)
- Mastery:
- 9 Augments (+108 each) (If Accuracy Enhancement was taken)
- Accuracy: +650
- Advanced Kyrprax Proficient Stim (+264)
- 1 Enhancement (+431 – Unlettered and Unnumbered Version, R-20 version is the better one)
- It gives slightly above 102,7 % Accuracy
Gear in 306 rating + Advanced Augments 77 (300)
- Alacrity: 1213+
- 3 Enhancements (+431 each – Unlettered and Unnumbered version)
- It gives 1,4s Global Cooldowns
- Critical:
- 7 Enhancements (+431 each – Unlettered and Unnumbered version)
- 1 Augment (+130 each)
- Crystals (+41 each)
- Advanced Kyrprax Proficient Stim (+109)
- Mastery:
- 13 Augments ( +130 each) (If Accuracy Enhancement was not taken)
- Accuracy: 264
- Advanced Kyrprax Proficient Stim (+264)
- It gives slightly above 102,7 % Accuracy
If you decide to take an accuracy enhancement, the build will be like this:
- Alacrity: 1213+
- 3 Enhancements (+431 each – Unlettered and Unnumbered version)
- It gives 1,4s Global Cooldowns
- Critical:
- 6 Enhancements (+431 each – Unlettered and Unnumbered version)
- 5 Augments (+130 each)
- Crystals (+41 each)
- Advanced Kyrprax Proficient Stim (+109)
- Mastery:
- 9 Augments (+130 each) (If Accuracy Enhancement was taken)
- Accuracy: +650
- Advanced Kyrprax Proficient Stim (+264)
- 1 Enhancement (+431 – Unlettered and Unnumbered Version, R-20 version is the better one)
- It gives slightly above 105 % Accuracy
High Alacrity with Low Crit
Gear in 306 rating + Advanced Augments 45 ( 228 )
- Alacrity – 3208+ (It gives 1,3s Global Cooldowns)
– 6 Enhancements (+431 each – Unlettered and Unnumbered version)
– 6 Augments (+96 each)
Or
– 5 Enhancements (+431 each – Unlettered and Unnumbered version)
– 11 Augments (+96 each)
Or
– 7 Enhancements (+431 each – Unlettered and Unnumbered version)
– 2 Augments (+96each) - Critical:
– Rest of the Enhancements (+431 – Unlettered and Unnumbered version)
– Rest of Augments (+96 each)
– Crystals (+41 each)
– Advanced Kyrprax Proficient Stim (+109) - Accuracy: 264 (It gives slightly above 102.7 % Accuracy)
– Advanced Kyrprax Proficient Stim (+264)
If you decide to take Accuracy Enhancement, the build will be like this:
- Alacrity – 3208+ (It gives 1,3s Global Cooldowns)
– 6 Enhancements (+431 each – Unlettered and Unnumbered version)
– 6 Augments (+108 each)
Or
– 5 Enhancements (+431 each – Unlettered and Unnumbered version)
– 10 Augments (+108 each)
Or
– 7 Enhancements (+431 each – Unlettered and Unnumbered version)
– 2 Augments (+108 each) - Critical:
– Rest of the Enhancements (+431 – Unlettered and Unnumbered version)
– Rest of Augments (+96 each)
– Crystals (+41 each)
– Advanced Kyrprax Proficient Stim (+109) - Accuracy: 650+ (It gives slightly above 105% Accuracy)
– 1 Enhancement (+431 – Unlettered and Unnumbered Version, R-20 version is the better one)
– Advanced Kyrprax Proficient Stim (+264)
Gear in 306 rating + Advanced Augments 74
- Alacrity – 3208+ (It gives 1,3s Global Cooldowns)
– 6 Enhancements (+431 each – Unlettered and Unnumbered version)
– 6 Augments (+108 each)
Or
– 5 Enhancements (+431 each – Unlettered and Unnumbered version)
– 10 Augments (+108 each)
Or
– 7 Enhancements (+431 each – Unlettered and Unnumbered version)
– 2 Augments (+108 each) - Critical:
– Rest of the Enhancements (+431 – Unlettered and Unnumbered version)
– Rest of Augments (+108 each)
– Crystals (+41 each)
– Advanced Kyrprax Proficient Stim (+109) - Accuracy: 264 (It gives slightly above 102.7 % Accuracy)
– Advanced Kyrprax Proficient Stim (+264)
If you decide to take Accuracy Enhancement, the build will be like this:
- Alacrity – 3208+ (It gives 1,3s Global Cooldowns)
– 6 Enhancements (+431 each – Unlettered and Unnumbered version)
– 6 Augments (+108 each)
Or
– 5 Enhancements (+431 each – Unlettered and Unnumbered version)
– 10 Augments (+108 each)
Or
– 7 Enhancements (+431 each – Unlettered and Unnumbered version)
– 2 Augments (+108 each) - Critical:
– Rest of the Enhancements (+431 – Unlettered and Unnumbered version)
– Rest of Augments (+108 each)
– Crystals (+41 each)
– Advanced Kyrprax Proficient Stim (+109) - Accuracy: 650+ (It gives slightly above 105% Accuracy)
– 1 Enhancement (+431 – Unlettered and Unnumbered Version, R-20 version is the better one)
– Advanced Kyrprax Proficient Stim (+264)
Gear in 306 rating + Advanced Augments 77 ( 300 )
- Alacrity – 3208+ (It gives 1,3s Global Cooldowns)
– 6 Enhancements (+431 each – Unlettered and Unnumbered version)
– 5 Augments (+130 each)
Or
– 5 Enhancements (+431 each – Unlettered and Unnumbered version)
– 9 Augments (+130 each)
Or
– 4 Enhancements (+431 each – Unlettered and Unnumbered version)
– 1 Enhancement (+451 – Savant R-1)
– 8 Augments (+130 each)
Or
– 7 Enhancements (+431 each – Unlettered and Unnumbered version)
– 2 Augments (+130 each) - Critical:
– Rest of the Enhancements (+431 – Unlettered and Unnumbered version)
– Rest of Augments (+130 each)
– Crystals (+41 each)
– Advanced Kyrprax Proficient Stim (+109) - Accuracy: 264 (It gives slightly above 102.7 % Accuracy)
– Advanced Kyrprax Proficient Stim (+264)
If you decide to take Accuracy Enhancement, the build will be like this:
- Alacrity – 3208+ (It gives 1,3s Global Cooldowns)
– 6 Enhancements (+431 each – Unlettered and Unnumbered version)
– 6 Augments (+108 each)
Or
– 5 Enhancements (+431 each – Unlettered and Unnumbered version)
– 10 Augments (+108 each)
Or
– 7 Enhancements (+431 each – Unlettered and Unnumbered version)
– 2 Augments (+108 each) - Critical:
– Rest of the Enhancements (+431 – Unlettered and Unnumbered version)
– Rest of Augments (+108 each)
– Crystals (+41 each)
– Advanced Kyrprax Proficient Stim (+109) - Accuracy: 650+ (It gives slightly above 105% Accuracy)
– 1 Enhancement (+431 – Unlettered and Unnumbered Version, R-20 version is the better one)
– Advanced Kyrprax Proficient Stim (+264)
Amplifiers
Periodic Intensity will be the strongest of the Amplifiers, by far. A big part of your damage will come from Dots and it is that what you want to buff since you’ll be having them 100% of the time, or close to that, on your targets.
Tech Wizardry could help to buff some of the other attacks, and same with the Weapon Expertise, but they have less impact, thus opting for this is the way to go. You could think that, perhaps, Armor penetration could also work, since Gunnery Commando works well with it. That sounds alright except that all your dots are internal, and by nature, they already ignore armor completely. Adding more of that won’t do anything.
Bonus Sets
I am going to only talk about two sets and they are the Concentrated Fire and the Apex Predator.
| Effect (2) +2% Mastery (4) Damaging an enemy or healing an ally has a 10% chance to generate a stack of Supercharge. Cannot occur more than once every 5 seconds. (6) Activating Supercharged Cell makes your next Rail Shot, Mag Bolt, or Bacta Infusion automatically critically hit or heal.. |
| Notes The best set for Assault Specialist. Allowing us to gain extra stacks of Supercharge just by dealing damage, and given the uptime that we can do on one target and one can imagine on doing multiple ones, its almost guaranteed that its that easy and it also helps keeping the +10% crit chance up more often. The autocrit for Mag Bolt is also very welcome, specially that it is ability that deals the highest damage by itself alone and autocritting it, makes it better. |
| Effect (2) +2% Mastery (4) Activating Charged Bolts, Grav Round, or Medical Probe increases the critical chance of your next Charged Bolts, Grav Round, or Medical Probe by 10%. Stacks up to 5 times. (6) Dealing damage with Charged Bolts or Grav Round and healing with Medical Probe grant a stack of Power Step, stacking up to 5 times. At 5 stacks, your next Charged Bolts, Grav Round, or Medical Probe is more effective and costs no Energy Cells. |
| Notes Even though this set is powerful for Gunnery Commando, the same thing can’t be said for Assault Specialist, and that is because you can’t afford to spam Charged Bolts as often as you’d like. It may be good for offhealing though, although you’ll be more preoccupied DPS’ing most of the time rather than doing that unless forced to. |
Tacticals
On this topic, only five Tacticals will be covered, as the others, class specific or not, are generally useless for Innovative Ordnance and, of course, a small description of each.
 Energized Charges Energized Charges |
|---|
| Effect The duration of Assault Specialist’s Supercharge Cell and Supercharged Burn are doubled, and their effectiveness is improved. |
| Source Increased drop chance from defeating Flashpoint bosses. |
| Recommendation By far, the best tactical for every content. It directly buffs your Dots damage by making Supercharge last longer, and thus abusing this quite for a lot more. You can still take other tacticals but most of the time, it will be this one that you’ll use. |
 Continuous Fire Continuous Fire |
|---|
| Effect Hail of Bolts and Mortar Volley refresh and tick your Incendiary Round burn and Serrated Bolt bleed. This effect can only occur once every 2.5 seconds. |
| Source Increased drop chance from defeating Operation bosses. |
| Recommendation This is a good tactical for when you want to play with the focus on doing AOE damage. Like it says, it refreshes the duration of the dots on targets that you hit with your Hail of Bolts and Mortar Valley. Unfortunely it has a very slow ‘re-tick’ rate. Bioware could very well buff it to 1,5 seconds and it still wouldn’t be that strong but it would give better use for sure. |
 Magnetized Shrapnel Magnetized Shrapnel |
|---|
| Effect Sticky Grenade now remains dormant on the target for 12 seconds. Mag Bolt detonates it, dealing double its standard damage to the primary target. |
| Source Increased drop chance from defeating Flashpoint bosses. |
| Recommendation This is your burst tactical. Increases the damage of sticky grenade to being close to your other thermal grenade and lets you use Mag Bolt to trigger it, which can let you have a controlled dot spread in a target. A good tactical in the end. |
 Missile Backblast Missile Backblast |
|---|
| Effect Explosive Round knocks targets back and refunds 10 energy. |
| Source Crafted by Biochem. |
| Recommendation This tactical can useful in PvP, to knock back enemy players for high ground, for example, bridges or ledges and allow to snipe others more easily, given that they won’t have support. Still, its not better than the others above. |
 The Life Warden The Life Warden |
|---|
| Effect Taking damage below 20% health will rapidly heal you for a large amount. 10-minute cooldown. |
| Source Increased drop chance from Conquest Equipment Crates. |
| Recommendation This tactical is useful in both PvP and PvE. Low health? Combat stealth, swap tacticals into this one and swap back.It heals quite the significant amount, almost full health actually. I’d say it is a must have. |
PvP Essentials
How Commando Works
As a Commando, you’ll have, usually, an easy time playing for the simple reason that people tend not to focus ranged classes a lot unless they know you don’t perform well, you’re playing “bad” class/specialization or if you are a threat to them, which can go from playing too good in various ways.
Of course, it won’t be like that all the time. Your turn comes when you’re not surrounded by other groupmates that are under the 3 bits mentioned before, the opponents will probe around and see who is the weakest, and a lot of players perceive, for some reason, that Assault Specialist is weak and, on that part, its your turn to show how they are wrong.
Dealing Damage
You can turn the saying of “The best defensive is a good offense” into truth. Assault Specialist lets just ‘delete’ anyone from the match relatively quick, or at the least cause them to use a lot of defensives in a very short span of time before you used any of your major ones. That, in return, will also help your teammates to kill others quick too and relieve them from some pressure. Of course, there is a downside to this, and that is you must commit on really doing it. You can’t go at half or almost full. Assault Specialist has the potential and you must abuse it to do the best.
Using defensives
What if you are the target and overwhelmed? Well, you can still use your defensives to last long enough to kill or at least help in lowering the health of an opponent, and hopefully outlast them too so you receive potential help from your team, before you go down.
You’re a Commando, and you have access to some of the tankiest abilities in the game that can change the outcome of the match just by lasting longer, which is a result /compensation for your “bad” mobility, where in 6.0, it is not an issue anymore due to all the dashes and roots that you got access to. Avoid using multiple defensives at a time. One by one is more than enough but also read the situation. Example: You’ll have to guess if your opponents will hit, or not, your Reflect shield, which can potential heal a lot or nothing, and if it’s the second case, you’ll see yourself forced to use Adrenaline Rush, find yourself relying on teammates or something else to survive.
Tools and Healing
Now, outside that, you may ask as to what you can do besides being a ‘tanky’ class with big dps? Well, you have your cleanses, knockbacks and healing
How do you use your cleanses? Well, the only thing you can cleanse is Flashbangs, from Snipers/Gunslingers and Operatives/Scoundrels, and Low Slash from Assassins/Shadows, as those are the only CC’s with Tech and Physical atribute. You can cleanse hardstuns too, but the occasion will be rare, but if you can pull it off, your teammates will appreciate that.
Maybe you can support in healing? Yes, it is possible, with your instant casts or spam the ones that have activation time, after clearing the opponents around. And you also must be careful because the heal abilities on Commando are relatively expensive on energy.
Electro Net
At the last part of this topic, comes the Electro Net. Easily the most important tool you have. It deserves its own topic. Why? Like I mentioned in the ability list, this prevent the use of any high mobility abilities, such as rolls from Operatives/Scoundrels and Snipers/Gunslingers; dashes from Marauders/Sentinels, Juggernauts/Guardians and Mercenaries/Commandos, Phasewalks from Sorcerers/Sages and Snipers/Gunslingers; Combat stealth from Marauders/Sentinels, Assassins/Shadows and Operatives/Scoundrels, immunity abilities like Barriers from Sorcerers/Sages, any form of leap, like Intercede from Guardians/Juggernauts, Leap from Marauders/Sentinels, Juggernauts/Guardians and Powertech/Vanguards, or teleport to targets like Assassins/Shadows and Operatives/Scoundrels.
That’s a big, sure, and perhaps I could have summarized it, but this shows how much power the Electro Net has during a match. It can be a deciding factor to deliver killing blows and win matches and knowing when to use it is that very key to success. Still, this is not an almighty ability without counter. Opponents can overturn this effect and allow them to use the same abilities but at the cost of using their Stunbreak. This means, as well, that they can be hardstunned after and they, most likely, won’t be able to escape that.
Now, when should you use it and help secure kills? There are very ways you can abuse it. If you and your team have immense damage potential in a short time and you can play in synchrony, you can do a fast apply of it immediately on sight on a full health target and blitz it. Another is to apply early again, the net and burn them quick enough that makes them panic and use stunbreak and follow that up with hardstuns so that they can no longer escape. A third option is waiting for the opponent to waste the stunbreak from using on hardstuns to stay free and later apply net and not allow them to escape too far and die there, possibly.
As you can see, this tool requires some thought to be used well and not just randomly throw it and expect it to do its work. Using it with teamwork is the best you can do.
How to play, Regs, Rankeds and Tips
How to play
How to play… What I am going to cover here will be mostly on how you position yourself, how you want to fight depending on what class you are facing, how to use line of sight and possibly more.
How to position yourself. That is both simple and complicated topic. It depends on what you want to do in the match really. If you plan to help out your team in pushing opponents and force them to fight in a number disadvantage, you’ll have to play close to anything that has the high ground, ledges, bridges and more, go to the spot and use the knockback. Be careful because it is a bit hard to work with at start but easy to grasp the concept of it.
If you want to focus your DPS on a target, be on a place where you easy line of sight of your target, but also try to be in a safe place, where you might be able to hide behind, just in case you are their main target of focus of your opponents.
When hiding/running away from the opponent team, you’ll want to have an easy escape route with lots of objects that you can put in between yourself and your opponents, to force them to go the long way, either moving straight to you to you or having to walk sideways around until they have you on their sight again. This is a hard thing to grasp at start and the only way you’ll get good at it is just going through the punishment of being put on that situation over and over again, given that you need to think quick and act just as the same. You can also abuse the high ground and knockback any chasers by playing around the ledges in a clever manner but try not to be the victim of that. In the end, all of this will be hard and you need to practice, practice, and practice.
Your Propulsion Round ability can also be used for kiting. It covers a great distance, it also works as a hardstun/CC/root/slow resisting ability if properly timed but it can also be used to chase off targets that are running away. The way you use this ability is simple. Wherever your character is facing (Not where you camera is looking at), this ability will make you dash backwards from that direction, and that means you have to be quick turning around to properly escape or chase targets to.
Don’t break saps/CCs before or right after the fight start since you’ll probably need that stunbreak later. This is a common mistake, so don’t do it!
Cleanse your allies debuffs and CC’s. You can save the match just by keeping your healer without CCs that you can cleanse from them.
Regs
Not much is needed here to input. You’re going to be great at picking off targets, harass outside the main fight areas, support team by laying off the damage and occasional quick heal and cleanse but nothing outside that. Commando, in general, is not exactly the greatest class to defend objective nodes alone but can be, given that you have tools to allow such.
Ranked
On ranked, things are a different story. Commando is not only a powerhouse but you’ll also be a target for others to take down, and all because it goes from the damage it can, the capability to ‘live forever’, the support by healing and cleanse and the tools it has. The most important one is the net, by far, but its not all about that. Knowing what and when to cleanse can and is a key factor. When to use your knockbacks and roots will be essential, too. And having a general knowledge of the other classes and specs and your own, and awareness of what is around you, will help you perform marvellously. Train hard before you go into this. I extremely recommend doing so and your team will appreciate that!
Tips against classes
Assassin/Shadow
Force them to pop Force Shroud as early as possible and its not hard to do that, as all it takes it applying dots and your Thermal Detonator and they’ll do it. That or they’ll wait and try to predict when you’re going to use net so they can nullify its effects. It is important since there is a long CD on this defensive (unless when facing a Tank Shadow/Assassin, which can reduce the CD of it, but still is a long CD), giving you a good control on what damage they can deal, until they decide to combat stealth and run away.
If the opponent uses combat stealth, try to predict where they’ll run off too and use your stealth scan or Sweeping Blasters to pop them back out. If you get sapped, don’t break, unless you are on low health and they are setting you up for the kill. If it comes to that, make sure you’re ready to deal with a barrage of burst. Heal yourself up while resolve is full/ on white bar.
Always keep dots on them, no matter what spec the opponent is using. In the rare chance that they don’t use shroud on combat stealth, they’ll be popped off. You can also use Explosive Dart or Thermal Detonator. Even if they have shroud and resist the damage, the fact that it still blows up during that time, will put them back into combat.
Don’t be discouraged from doing tank tunnelling. Assassins/Shadows are, in theory, the weakest of tank classes on this patch, so if you see them, its encouraged to harass or even kill them. Other players will do that to them, too. Join the fray and take them down
Powertech/Vanguard
Early stuns during their burst peak and stay out of their range. The less time they have being close to you the better.
Always stay out of the Oil Slick/Riot gas when facing tank PT/Vanguard. It will harm your accuracy and most of all, your mobility.
If PT comes with the Stun effect on the Grapple/Harpoon, don’t use your stunbreak. If anything, you can even anticipate that, specially in arenas by seeing them using Hydraulic Overrides/Hold the Line, before the fight begins or at high health and isolated among allies. It happens often that they’ll try to pull you or a teammate for that quick kill.
Don’t be discouraged from doing tank tunnelling. Powertech/Vanguards, like Assassins/Shadows, don’t have greatest abilities to stay alive, even as a tank, and like I said before, other players will do this quite often, so join them if that is the plan of the match
Juggernaut/Guardian
Use Rapid Shots on Enraged Defense/Focused Defense. You can burst them down real quick again, so, even if you are healing them, they stacks may go to waste and do ‘overhealing’, in other words, they’ll heal more than what the health bar allows.
In case of being a tank spec though, if you can avoid, great, otherwise, do it as quick as you can.
Tank Juggernauts/Guardians have 4 stuns {3 hard stuns and 1 CC} Pay attention as they are rather easy to spam over a short period of time and can prevent you from doing any damage.
When facing a Tank Juggernaut/Guardian, don’t be discouraged from doing some tank-tunnelling. It’s a legit strategy. Just because others don’t like it, doesn’t mean you can’t do it, and it can win games. After they use their Enraged Defense/Focused Defense, you are somewhat setup to try and melt them down at same time, if you feel confident enough that you can lower their health considerably fast.
Juggernauts/Guardians will, most likely, use Force Bound bonus set. Their CC will be able to cast a debuff that reduces the Accuracy of your Tech/Internal/Elemental abilities by 75% for 6 seconds after the CC is over or broken. That will basically nullify any damage you’ll do for that duration, on top of being CC’d and unable to fight for a while. So, that means that you have to stay ouf of range when they are going to use their CC.
Marauder/Sentinel
Don’t waste your attacks that have Ranged Weapon damage attribute(Power Shot/Mag Shot/Serrated Shot/Sweeping Blasters/Rapid Shots) when you have Obfuscate/Pacify on you. It is a 90% debuff to your accuracy, and its highly likely that they are also using the Ruthless Aggressor, that reduces the damage taken by any Tech / Kinetic / Force / Internal / Elemental based attack. Use that time to stun them or knock them back, root and kite away while healing.
Take advantage of reflect when expecting big damage or when they are trying to go for the kill. Not only they’ll take a lot of damage back, they’ll heal you and their AOEs are generally bad. The move they tend to pull off when they see you with reflect tends to be to stun/cc or just stealth away. Force them in combat by rooting them on place.
If you can, CC them while Cloak of Pain/Rebuke is up and stop using your dots, so they’ll stop triggering it and dealing damage to you. At start, its something small but that accumulates over time. And those abilities also give them damage reduction, so you’re killing two problems in one go.
Marauders/Sentinels also have access to Force Bound set, like Juggernauts/Guardians, but the use of them will be a bit more rare in comparison but still don’t rule out that possibility. Stay ouf of range when they are going to use their CC.
Mercenary/Commandos
Don’t panic when under Electro Net. In fact, your opponents will tend to become more aggressive, offering you the chance to turn the tables, in many ways. Given that you know your class, they’ll try to avoid from having you abusing your abilities the most, so just predict and use defensives on those times.
If you can, CC them during Energy Shield/Reactive Shield and Kolto Overload/Adrenaline Rush. You don’t have to worry much about the reflect, as long as you don’t do direct damage to them while its up. And if you can’t CC them, just stay out of their line of sight and don’t let them heal up either.
Sorcerer/Sage
Use Reflect on predictable attacks in case you’re in trouble. Specially if they are spamming attacks that force ticks on it, like Force Lightning/Telekinetic Throw when you’re facing a Madness Sorc/Balance Sage or a Lightning Sorcerer/Telekinetics Sage with its Stormwatch Tactical and spam of its other attacks, where every tick of damage it deals, it will heal you instead.
Try to find where they put Phasewalk is, before and during the the fight start. It will help out chasing. You can also track them if you left dots on them, as you will be able to see the popping text through the walls.
Sniper/Gunslinger
Stay out of Diversion, really. It harms your accuracy by quite a lot. Don’t play them. If their shield is up, don’t fight. Let it end. Kite and stay out of their line of sight.
Same thing with Sorcerers and Sages, know where the Sniper or Gunslinger have put their phasewalk, so you can chase later.
All the specs of snipers/gunslingers are hard to face, given that each have their strengths that can counter you relatively easy:
- Virulence/Dirty Fighting are basically full dots, so all their damage will ignore your armor and wear you down slowly;
- Marksmanship/Sharpshooter are focused on dealing high amounts of burst in short times and can come at their demand. They’ll try to outplay your defensives in every way;
- Engineering/Saboteur are the annoyances that will keep you stunned and slowed. Their AOE has enormous radius and they have a spammable stun. Their damage is heavily dot based too, so it will be hard to abuse some of your defensives.
Operative/Scoundrel
Keep in mind that they can cleanse your dots off very often and they can have reflect the damage from your Thermal Detonator easily, just by using Evasion/Dodge.
If they use combat stealth, it will be the same as if it was Assassins. Just prepare yourself.
Do a lot of kiting and use knockbacks and roots on them. The less uptime they have on you, the better.
Concealment/Scrapper can deal a lot of damage in a short duration and they’ll try to use Volatile Substance/Bludgeon + Backstab/Backblast while you’re CC’d or Hardstunned. If you know how they play out, you can use your reflect to mitigate and heal back up a bit from them using those abilities.
Concealment/Scrappers players tend to roll a lot to resist attacks. Their rolls do have the buff to allow them to do that. And net is your best tool, as well, to handle with this. The cooldown of rolls is 10 seconds each, or 8 seconds if they are using the Debilitator bonus set. Keep the timer and how many rolls they have left and use your full arsenal to take advantage of that vulnerability.
If you’re up against a Lethality/Ruffian and on low health, you can abuse your reflect when they have their dots and Toxic Blast/Sanguinary Shot on you. Every single tick of dots will trigger TB/SS and these can proc your reflect shield. It also works for your Energy Shield, as it does build stacks for them too.
Stay outside of Toxic Haze/Bushwhack if you’re against a Lethality/Ruffian. Its not hard to see their animation. For the Operative, it’s a green cloud, and for the Scoundrel, its spinning blades. And if you can’t stay outside, use your knockback or even hardstun them.
Reflect (Echoing Deterrence)
What abilities can be reflected by Echoing deterrence? Well, its easy to tell, really. If it is an AOE, which is usually visible and dots, then you can’t count on them to triggering your reflect. Anything else will do it. Ranged, melee, tech, force, kinetic and even internal. As long as they are not of those two types, you’re good to go. And there is quite the advantage of knowing this. When you’re being jumped on and focused by a lot of opponents, someone is bound to make a mistake, even if it’s a sliver of one, it will be enough to heal up a bit. I can update this topic to include the attacks, if requested, of course!
Acknowledgements
I’d like to thank Vulkk for the opportunity to put up the guide and the people at SWTOR Theorycraft Discord channel for the help provided regarding multiple topics. Cerasi and Martijn for fact-checking, optimizing and insight on the making of the guide.
About the Author
I’m known as Kamiala, from Darth Malgus, and Xelthia, from Star Forge. Author of the Lethality Operative and Ruffian Scoundrel Guides.
Passionate player who loves to play SWTOR. Main Lethality and Ruffian player, mostly on PvP but with quite the good time dedicated into PvE content, as well. Despite not being my main class, I still have a considerable experience when it comes to playing Assault Specialist Commando and Innovative Ordnance Mercenary and had some tips here and there to improve at it.
Check out some of Kamiala/Xelthia’s other SWTOR 6.0+ Guides:
- SWTOR 6.0 Innovative Ordnance PvP Guide by Xelthìa
- SWTOR 6.0 Ruffian Scoundrel Guide by Kamiala
- SWTOR 6.0 Lethality Operative Guide by Kamiala
- SWTOR 6.0 Sawbones Scoundrel PvP Guide by Xelthìa
- SWTOR 6.0 Sawbones Scoundrel PvE Guide by Xelthìa
- SWTOR 6.0 Medicine Operative PvP Guide by Xelthìa
- SWTOR 6.0 Medicine Operative PvE Guide by Xelthìa
If you are skilled with a Class and Discipline that has not yet been covered with a guide on VULKK, and you want to provide one for the Community, contact me via email or wherever you see Vulkk present. I share on Facebook and Twitter whenever a new guide is available or will soon be ready.
How is the Class and Spec changing with SWTOR 7.0
In Update 7.0 BioWare is introducing a new term “Combat Styles”, which will replace the traditional class-specific disciplines. If you are curious and want to get a head-start, check out the SWTOR 7.0 Class Changes Previews available on the Public Test Server.
And if you are behind on the news, find out what the SWTOR Legacy of the Sith Expansion will have to offer.