SWTOR Marksmanship Sniper PvE Guide (DPS) for beginners and more experienced veterans: Skills, Choices, Rotations, Gearing, Builds, Tips!
Table of contents
Introduction to Marksmanship Sniper
Right now, Marksmanship is one of the best and most authentic specs in the game for solo content. Thanks to their non-stop Ambush autocrits, you’ll truly feel like a Sniper as you pick off every single enemy from afar with a single shot.
Thanks to the buff they received in 7.7, Marksmanship Sniper is more competitive with other ranged direct damage specs, though it’s still weaker than practically all DoT specs.
When it comes to survivability, most disciplines got defensive nerfs with the launch of 7.0, but Snipers got hit particularly hard. They lost Vital Regulators, roll heal, and typically don’t have access to the effects of Evasion. That said, Marksmanship still offers barely acceptable survivability thanks to the tools they didn’t lose.
Despite all this, thanks to their group utility, there are still situations where Marksmanship can be worth bringing to a raid. Most notably, Marksmanship is the only ranged spec that offers the armor debuff, so if your group needs ranged DPS and lacks the armor debuff, the group DPS gain from the armor debuff can be enough to compensate for the reduced output from Marksmanship itself. (Yes, I know Arsenal also offers the armor debuff, but that spec is in such bad shape, I don’t consider it to be fully functional at the moment).
BioWare will likely be making balance changes throughout the first few patches, so be sure to check back to this guide after each update. You can check at the top of the guide to see if the guide has been updated for the most recent patch.
Major Changes in 7.0
Utility points are gone! Instead, there is a new system called the Ability Tree. Each discipline has 8 choices where they pick 1 of 3 options. The options have several similarities across the Combat Styles:
- 2 choices buff a discipline-specific ability (2 abilities, 1 choice each).
- 3 choices which are just old Utility effects. These choices are almost always the same for all disciplines.
- 2 choices where you’re picking between 1 ability or 1 of 2 passives. One of the ability choices tends to be an offensive cooldown (OCD). The other seems to be related to PvP balance, but there isn’t a clear pattern beyond the choice, forcing players to decide which of 3 capabilities they want to keep.
- 1 choice where you’re picking 1 of 3 abilities. One of the abilities is almost always one of your primary CCs, either the 8s mez or 4s hard stun, though Sniper has their hard stun locked away in a different choice instead. Another of the abilities is the movement ability with the longest cooldown. The third option is less consistent, it seems to be there as an extra balance lever for BioWare since some abilities that got locked away are more impactful than others. The 3 abilities are almost always the same for each discipline.
This means almost all disciplines had 5 abilities locked away behind choices with the option for players to keep up to 3 of them. In addition, many extremely situational abilities were pruned entirely. Marksmanship permanently lost access to 3 abilities:
- Evasion
- Shatter Shot
- Flash Bang
The word Imperial has been replaced with something that is faction-agnostic since Republic Origin Stories now have access to the Combat Style. The most notable change is Imperial Preparation ▶ Meticulous Preparation, though it affects the names of a few passives as well.
Battle rezzes in general are now healer-only, but there is no longer a global 5 min lockout on those abilities, so it’s treated just like any other ability, albeit with a much longer cooldown.
Guarding is now a tank-only ability, which is the logical next step since the nerf to Guard for DPS partway through 6.0 was ineffective at stopping its ubiquity in PvP.
Group Composition Tips
In order to deal maximum damage, Marksmanship requires 2 other DPS debuffs:
| DPS Debuff | Presence of debuff increases DPS by approximately |
|---|---|
| Tech | 1% |
| Internal / Elemental | 1.4% |
| Total DPS Gain: | 2.4% |
Marksmanship is extremely independent when it comes to DPS debuffs. Corrosive Dart is the only ability that isn’t covered by the debuffs Marksmanship provides for itself. This allows it to be slotted into any group composition without causing problems.
Marksmanship Snipers pair best with Operative / Scoundrel DPS since both parties provide both of the DPS debuffs needed by the other and offer all necessary debuffs for any Tech DPS Combat Style (besides the non-essential AoE debuff). To be clear, Operative / Scoundrel DPS is by no means required and is not the only Combat Style that provides the DPS debuffs used by Marksman, they are just the most efficient and allow greater flexibility in terms of what the other group members can bring.
Honestly, I wouldn’t specifically cater to Marksmanship’s needs at all. There are very few disciplines that match Marksmanship’s level DPS debuff independence.
DPS Mindset
How can I do as much damage as possible in each GCD (global cooldown, 1.5s duration before you can activate another ability) given the constraints of the fight? Which ability do I use right now that will provide me the most DPS? How can I maximize my uptime? If I’m not activating an ability right now, why not? Can I finish this cast before I need to move? What happens if I don’t have time to finish a cast before moving? Can the healers deal with it without too much stress?
Check out the SWTOR Damage Types and Damage Mitigation guide for more details on how they differ from each other and how to determine which attack does what damage!
Our in-depth analysis and breakdown of the relationship between mechanics and strategy in boss fights in SWTOR may also help you perform better in group content.
Abilities Explained
Please have the game open while reading through the next few sections. I will not be writing out ability descriptions and I will only be transcribing the components of discipline passives that directly relate to the ability and rotation. This forces you to read through what everything does so that you can understand what all of your passives and abilities do as well as locate these abilities in-game. Make sure you place all of these abilities on your bar in an order that makes sense to you.
Single-Target Rotational Abilities, Attributes, and Important Procs
 Followthrough
 Followthrough
(Ranged/Energy/Direct/Single-Target/Instant)
The existence of Followthrough is what makes Marksmanship so different from all the other specs in the game. You’re able to use it immediately after every single Penetrating Blasts, Ambush, or Takedown, or after 2 Snipes in a row.
You’re able to do this because the ability is only usable within 5 seconds after using each of those abilities. While it may not be immediately obvious, the entire spec is set up around doing this. Followthrough has 2 procs that are relevant to your rotation:
Recoil Control
Firing Snipe twice in a row, firing Takedown or Ambush once, or completing a Penetrating Blasts channel now finishes the cooldown on Followthrough. Without this proc, Followthrough has a longer cooldown and would not be usable in the way that you’re supposed to use it.
This proc also helps to reinforce that Followthrough is only supposed to be used once per every 2 Snipes. Please note that you can still activate non-damaging abilities in between the 2 Snipes and still get the cooldown reset on Followthrough, including Diversion.
Muzzle Fluting
Followthrough reduces the Energy cost of your next 2 Snipes by 5. This is important because Snipe is far too expensive to use as often as we want to use it without this passive.
Snipe
 Snipe
Snipe(Ranged/Energy/Direct/Single-Target/Casted)
This is the weakest of your rotational abilities, though since you’ll be using it more than twice as often as your true heavy hitters, it still accounts for a considerable amount of your total damage output. It also has some fairly strong procs that help to compensate for its low damage and there isn’t really anything else you can use that isn’t weaker.
Snipe will typically be used twice in a row or when the gap in your rotation comes, you’ll use it once. In addition, it can also be used while moving if you’re taking Calculated Pursuit. Snipe has 3 procs associated with it that are relevant to your rotation that I haven’t already mentioned:
Zeroing Shots
Dealing damage with Snipe reduces the activation time of your next Ambush by 0.25 seconds. Stacks up to 2 times. This proc further reinforces that Snipe is supposed to be used twice and turns Ambush from a 2s cast into a 1.5s cast, meaning it is a GCD.
Honed Shots
Snipe grants Honed Shots, increasing the critical hit chance and damage done by Snipe by 4% for 20 seconds. Stacks up to 3 times. Unless there’s very significant downtime, this will only need to be built up at the start of the fight and then you’ll have it. If you do constantly have to rebuild it because the fight has a lot of downtime, you will have slightly less DPS overall.
Marksmanship’s Finesse
Snipe grants Marksmanship’s Finesse, which increases the armor penetration and damage dealt by your next Followthrough by 10%. Stacks up to 2 times. This proc further reinforces that Snipe is supposed to be used twice per Followthrough.
In addition, when you arrive at the gap in your rotation where you only have time to use a single Snipe, you’ll still get one stack of this proc to increase the damage dealt by your next Followthrough, which will typically be the one after using Ambush or Penetrating Blasts, which helps with your burst in some cases.
Ambush
 Ambush
(Ranged/Energy/Direct/Single-Target/Casted)
This is one of your hardest-hitting abilities. It used to be Marksmanship’s most damaging ability, but thanks to the Agitating Energies tactical and Penetrating Blast ability tree choices, it has some competition when it comes to sustained DPS.
It’s still the Marksmanship’s strongest singular hit by a huge margin, especially when Laze Target is available. Remember to pre-cast even if you don’t have the Zeroing Shots proc from Snipe. Ambush has 1 proc associated with it that is relevant to your rotation.
Finish the Job
Dealing damage with Ambush to a target with less than 30% health grants Finish the Job, increasing the damage of your next Takedown by 20%. This proc is pretty straightforward, it just makes it so that Takedown is buffed when below 30%.
Please note that the cooldown of Ambush is the same as the duration of the proc and since Takedown has a fairly long travel time, it is possible for the proc to fall off before the damage goes out, especially if you’re standing further away from the boss.
Takedown
 Takedown
(Ranged/Energy/Direct/Single-Target/Instant)
This ability is only usable on targets that have less than 30% of their max health, but it still hits pretty hard, harder than Snipe or Followthrough. There is usually already a gap for a single extra ability every cycle, so it’s easy to insert Takedown into your rotation when sub-30, and above 30%, you’ve been using Snipe in this spot.
Using both Takedown and its Followthrough will cause you to delay Penetrating Blasts and Ambush, though since those abilities have such long cooldowns, it takes a little while for you to delay them long enough for it to result in you missing out on an extra use of each of them and you aren’t actually losing DPS until this happens.
The cutoff is 9 uses of Takedown, which takes a little over 90 seconds, so if the boss has enough health to where you’re using more than 9 Takedowns, then you should skip using the Followthrough procced by Takedown and just use Takedown exclusively in the gap slot until there are 90 seconds left since Followthrough + a Corrosive Dart tick is less than the damage dealt by Ambush or Penetrating Blasts.
There isn’t much of a discernable DPS difference between the two approaches and if you’d rather not have to worry about this sort of thing at all, it’s okay to just never use Followthrough if it’s procced by Takedown.
The more notable distinction is that you’ll have to use Adrenaline Probe if you don’t use Followthrough. Takedown does not have any additional procs or discipline passives associated with it that are relevant to your rotation that I haven’t already mentioned.
 Corrosive Dart
 Corrosive Dart
(Tech/Internal/Periodic/Single-Target/Instant)
Corrosive Dart also helps to diversify the damage output of Marksmanship which would otherwise be entirely direct weapon damage (besides the very occasional Orbital Strike).
Thanks to the Agitating Energies tactical, this ability accounts for a gigantic proportion of your total damage output. In actual raids, you’ll probably need to apply it more often. Whenever there’s downtime, make sure to check if it’s still applied and if it isn’t, make sure you reapply it before your next Followthrough.
If you’re switching targets temporarily, like to an add that needs to be focused down, only apply Corrosive Dart if you’ll get more than 5 ticks out of it, otherwise using Snipe instead will deal more damage.
I would also like to point out that without the Agitating Energies tactical and prior to 6.0, the purpose of the gap in your rotation was partly so that you could apply this ability every 18 seconds without delaying anything else.
Corrosive Dart has 1 advanced class passive associated with it that is relevant to your rotation that I haven’t already mentioned:
Efficient Targeting
Increases the range of Flash Bang, Overload Shot (abilities you don’t even have anymore), and Distraction to 30m and increases the range of all rifle, probe, and dart attacks by 5m and Corrosive Dart marks its target for 45 seconds. Marked targets take 5% more damage from Ranged weapon attacks.
This combat style passive is responsible for giving Snipers their 35m range on damaging abilities and 30m range on CC, as well as giving them one of their DPS debuffs (the individual specs only provide 1 debuff as opposed to 2).
I don’t know why they decided it would make sense from a lore perspective for a Tech attack to apply a Ranged debuff. The only reason I can see is that it’s a debuff that gets used by all 3 specs.
Unfortunately, the Ranged debuff is arguably the worst DPS debuff in the game because all the specs that already deal a significant amount of their damage as Ranged damage already provide it themselves.
Only a tiny portion of the other specs’ total damage output is considered Ranged damage. It’s still a noticeable DPS increase for the specs that provide it, but as a DPS debuff and piece of raid utility, it doesn’t matter.
Penetrating Blasts
 Penetrating Blasts
(Ranged/Energy/Direct/Single-Target/Channeled)
This ability accounts for an absolutely gargantuan proportion of your damage output thanks to its dedicated ability tree buff choice, tactical item, respectable base damage, and tight integration with the rest of your rotation. It is essential that it is channeled on cooldown.
In addition, since your Sniper Volley utility resets the cooldown on Penetrating Blasts, you end up getting to use it back to back, resulting in even more Corrosive Dart ticks, which adds a touch of burst.
With 7.7, Penetrating Blasts was buffed to deal an additional tick of damage (6 total, up from 5), resulting in the spec getting buffed substantially.
In case you needed another reason to want to use Penetrating Blasts on cooldown, it also applies the strongest of the DPS debuffs in the game, the armor debuff. Penetrating Blasts does not have any additional procs or discipline passives associated with it that are relevant to your rotation that I haven’t already mentioned.
Other Semi-Rotational Abilities
Orbital Strike
(Tech/Elemental/Periodic/AoE/Casted)
This ability technically deals about the same amount of DPS as Snipe, though thanks to its longer cast time, higher Energy cost, and the fact that it gets placed on the ground, it isn’t typically used rotationally.
Despite all that, it is still used in single-target situations when you get to pre-cast, like prior to pulling or right before downtime ends, particularly if that downtime is right before a burst DPS check.
This ability can also be used in the gap slot for some rotational AoE, though make sure at least one target gets hit by the entire thing. You will slightly delay Ambush and Penetrating Blasts if you do this, but you’d only miss out on a single use of each of those abilities if you were using Orbital Strike on cooldown in a fight that lasts over 15 minutes.
Frag Grenade
 Frag Grenade
(Tech/Kinetic/Direct/AoE/Instant)
If you’re unable to take Calculated Pursuit, Frag Grenade is a great option to use while moving, though it does cost 20 Energy, so only use it if you can afford it. Please note that for Snipers, Frag Grenade only deals AoE damage to Standard and Weak enemies, which you usually don’t see at all in raids.
Rifle Shot
 Rifle Shot
(Ranged/Energy/Direct/Single-Target/Instant)
Depending on your ability tree build, you may need to use this ability during the gap in your rotation sometimes when Adrenaline Probe is unavailable in order to keep your Energy at a safe level.
Crouch and Take Cover
 Crouch and
  Take Cover
When you create a new Sniper or Gunslinger, the ability that gets placed on your bar is called Take Cover. If there’s a cover position in range (denoted by a little green silhouette), you quickly roll to that location and if you aren’t in range, you deploy your portable cover shield where you stand.
This inconsistent behavior can cause problems in raiding, which is why you should just remove the Take Cover ability from your bar entirely. Thankfully, there is another ability called Crouch, which just always deploys your portable cover shield wherever you are currently standing. This is the only ability you should ever use when entering cover.
While it used to be the case that you couldn’t use most of your abilities unless you were in cover, nowadays the only abilities you have to be in cover for are Suppressive Fire, Cover Pulse, and Entrench.
This means that the cover bar isn’t really useful anymore, so feel free to turn it off in the settings (User Interface ▶ General ▶ uncheck Enable Cover Bar). That said, there is still 1 discipline passive, 1 combat style proc, and 1 combat style passive that provide significant benefits to you while in cover:
Sniper’s Nest
Increases your Energy regeneration rate by 1 per second while in cover. This Energy regeneration is essential to you being able to do your rotation. If you aren’t in cover, you will run out of Energy.
Hold Position
While in cover, Ranged defense is increased by 20%, you cannot be leapt to or pulled, and you are immune to interrupts and ability activation pushback. The most important component of this passive is the pushback protection and in general, this is the most important reason to be in cover at all.
You will lose a massive amount of DPS if you can’t be in cover since your APM will be much lower because all of your casts will take much longer to complete.
In case you aren’t familiar, pushback is when the progress of your cast is pushed back as a result of taking damage. In-universe, this is supposed to represent that casting things requires more focus; for a Sniper, you’re going to have trouble lining up your shot if you’re taking a bunch of damage, so it will take longer.
If you want to see it in action, just try to do your rotation on enemies out of cover. This used to be more prevalent back before 3.0 when you had to actually spec into pushback protection, but now every class gets a reduction on it as part of some passive.
Spotter
Upon entering cover, your stealth detection level begins to increase gradually, reaching up to 30 additional levels of stealth detection over the following 30 seconds. This effect falls off completely if you ever leave cover, including if you just roll.
Stealth detection capabilities generally don’t work correctly in PvE, so don’t rely on the fact that your stealth detection is higher to conclude that there aren’t any enemies in stealth. It would be kind of neat if they put more effort into having this work though since Snipers aren’t the only class that have something like this.
While your positioning is significantly more restricted, Spotter is quite powerful when defending in PvP. You still have to keep your eyes peeled, but it does let you see stealthers long before they are in range to engage.
AoE Abilities
The formula for determining how much damage an AoE ability does per GCD such that it can be compared to single-target abilities is: (Damage Dealt/Number of GCDs) x Number of Enemies. An AoE ability’s place in the priority is as high as it can be until it reaches a single-target ability that deals more damage than the AoE will deal to all enemies in the GCD.
AoE damage is considered fluff if the adds do not need to die immediately or if you are otherwise shirking your main responsibilities to deal more damage than necessary to adds. It’s pretty easy to tell what is and isn’t fluff, don’t be greedy and don’t hurt your group’s chances of beating the boss.
Suppressive Fire
 Suppressive Fire
(Ranged/Energy/Direct/AoE/Channeled)
This is your spammable AoE. It’s easily the strongest spammable AoE in the entire game. Unfortunately, you can’t really use this rotationally, so unless there’s a phase where the entire group is only AoEing, it’s best to hold off on using it and see if other classes’ rotational AoE and DoT spread can take care of it or switch to Virulence or Engineering if you know them so that you can do rotational AoE.
You can also just do a single GCD of the channel in your gap, though sometimes you really do need to channel it for a while. Here is how many targets it takes for Suppressive Fire to surpass each of your rotational abilities in terms of damage per GCD, so if at least X number of targets are present, you can keep channeling Suppressive Fire instead of one going into one of these groupings:
- 2 targets: Snipe grouping
- 3 targets: Takedown and Ambush without Laze Target groupings
- 5 targets: Ambush with Laze Target and Penetrating Blasts w/ Agitating Energies tactical groupings
If you ever use this ability in a boss fight, make sure you’re taking the Ruthless Efficiency ability tree buff. Suppressive Fire benefits from 1 discipline passive in Marksman:
Accurized Rifle
Increases the critical chance of Suppressive Fire by 15% and its critical damage dealt by 30%. Almost all of the burst specs in the game have a passive very similar to this one where their spammable AoE has increased critical chance and damage in a failed attempt to compensate for not having a DoT spread.
Orbital Strike
(Tech/Elemental/Periodic/AoE/Casted)
This ability is quite powerful, though it’s not the easiest thing to use since it takes almost 5 seconds from the start of the cast to when damage actually starts going out, and then it keeps going out for another 6 seconds.
A lot of the time, adds just don’t survive that long. Don’t bother using this ability if the enemies will die before Orbital Strike really does anything.
Definitely still try to use it and be as preemptive as possible, but this ability really only works when you can predict when and where AoE will be needed well in advance, so this ability is better suited to fights with constant adds. Otherwise, you’re better off just using Suppressive Fire or letting the other players in your group handle it entirely.
Due to all this and the fact that the cast fits in the gap in your rotation, you don’t have to worry about this taking priority over your other abilities. Just use it during the gap if you can reliably hit something that actually needs to take damage with every single tick.
 Refraction Point Tactical Item
Marksman’s AoE tactical adds AoE damage to some of your abilities, so just keep doing your rotation and adhering to the priority I listed for when to use Suppressive Fire over your other abilities and you’ll be fine. The only difference is to always use Penetrating Blasts and its Followthrough on cooldown.
If you’re having to use Suppressive Fire consistently during the fight and there isn’t a huge single-target DPS check, definitely use this tactical, but single-target DPS checks almost always take priority over AoE DPS checks.
Refraction Point also has a very nice bonus, since it causes Penetrating Blasts to deal damage to multiple enemies and Penetrating Blasts applies the armor debuff, this tactical allows you to provide the armor debuff to multiple enemies at the same time, which is super rare. The only other specs that can do this are Juggernaut | Guardian DPS.
Diversion
 Diversion
This ability technically does not do any AoE damage, but it will only ever be used in AoE situations so I am going to talk about it here. Diversion works wonders against adds. It’s about as strong as Saber Ward, Deflection, and Explosive Fuel + Oil Slick, which are the strongest DCDs tanks have against adds, though it doesn’t last quite as long. Usually, the raid lead will tell you when they want it or a tank will ask for it, but if you see someone getting hit by a bunch of enemies, chuck this at them.
Offensive Cooldowns
All offensive cooldowns (OCDs) should be used as frequently as possible under the conditions stated here and should only be delayed if they need to be saved for a DPS check or burst window, but don’t start delaying them until you see that you have to.
Laze Target
 Laze Target
This ability now has a unique effect and name in each discipline. For Marksmanship, the unique effect is that it has 2 charges. Laze Target grants a buff that makes your next Ambush or Takedown an autocrit.
The buff lasts 20 seconds, but only affects the very next use of a single ability, and the specific abilitilies it affects have cooldowns that is less than 20 seconds.
Laze Target should have at least 1 charge on cooldown at all times, but thanks to that second charge, it’s not important to use the second charge as soon as it becomes available.
Activating Laze Target while you already have the buff will overwrite it, just like any other proc, so be careful not to activate it until you’ve consumed the previous one. It’s safest to apply it right before casting Ambush.
In a similar vein, Laze Targets are usually better spent on Ambush rather than Takedown, though you can crank your spike damage higher by using both charges back to back on Laze Target ▶ Ambush ▶ Laze Target ▶ Takedown in PvP, but beware of the unreliability of weapon damage.
I recommend saving up one of those charges for checks, DPS-intensive phases, or only use them during Sniper Volley for the cooldown reduction without losing any DPS.
Adrenaline Probe
 Adrenaline Probe
This ability will get different amounts of usage depending on which build you’re using, though in general, you want to use it when you find yourself around 45-50% Energy.
The goal is for the initial 25 Energy to get you back up to the maximum Energy regeneration rate and supply you with enough Energy for your next GCD so you don’t fall back into the lower regeneration rate bracket.
It’s still necessary to activate Adrenaline Probe ASAP if you find yourself below 45 Energy, but it’s less optimal to wait that long if you can help it.
In all builds, you’ll need to use it sub-30% after you’ve used Takedown a few times. Each use of Adrenaline Probe will allow you to use Snipe or Orbital Strike during 3-4 gaps instead of Rifle Shot, though you don’t have to think about it like that, just use Adrenaline Probe when you get down to 45-50% Energy and only use Snipe for your gap GCD if you’re above about 80% Energy.
If you’re parsing on the dummy, it’s a pretty smooth experience to use Orbital Strike or Takedown (with proc) during the gap and otherwise use Rifle Shots.
There should be no need to save Adrenaline Probe for emergencies in case you mess up your rotation. You should practice on the dummy if you’re not able to consistently execute the rotation correctly.
Target Acquired
Target Acquired is pretty weak for Marksmanship in sustained DPS situations. The 15% increased armor penetration for 10 seconds is only equivalent to a 5.25% damage increase for your weapon attacks (so everything but Corrosive Dart and Orbital Strike).
It also gives you a charge of Laze Target and recovers 15 Energy, but boss fights, you’ll get more out of the alternative ability tree talents. Still, it is useful in PvP and solo content.
The best time to activate this is right before you cast the Ambush before Sniper Volley that will be followed by Penetratrating Blasts x2 thanks to Sniper Volley so your Target Acquired window will look like:
- Target Acquired
- Laze Target
- Adrenal
- Ambush
- Followthrough
- Penetrating Blasts
- Followthrough
- Sniper Volley
- Penetrating Blasts
- Followthrough
 Adrenal
 Sniper Volley
The accuracy increase is not applicable in PvE because bosses don’t have additional defense chance like that. You gear for the 10% defense/resist chance they have and then if there is some additional effect that messes with accuracy, like the clouds of dust you encounter during the Foreman Crusher fight in KP, it’s generally much stronger, so 30% wouldn’t do enough.
In case you were curious, the accuracy increase helps Snipers do better against some classes in PvP since accuracy over 100% reduces your opponent’s defense chance, though it’s still not a perfect counter.
The highest defense chance that DPS and healer classes have is 10%, though most classes have 5% so you gear to counteract the majority and can use Target Acquired on the others.
To get the full benefit, you’d use Target Acquired anytime on a tank or another role that’s using a DCD that increases their defense chance, like Deflection for Assassins, Saber Ward for Warriors, or Chaff Flare for Mercenaries.
It would still be imperfect though since the worst of these DCDs still grant 35% defense chance while the others grant 50%. It still significantly reduces the effectiveness of their DCD, but not all the way.
Sniper Volley
This cooldown is unique to Marksmanship Snipers. It’s pretty straightforward, it increases your alacrity by more than enough to get you from the 1.4s GCD to the 1.3s GCD and lasts long enough to allow you to get an extra ability in the same amount of time, which means you can fit Penetrating Blasts alongside the additional Followthrough into the gap in your rotation.
Your Energy regeneration is increased indirectly thanks to the alacrity increase in excess of the 1.3s GCD as well as through a direct increase in your Energy regeneration rate.
Activating Sniper Volley also finishes the cooldown on Penetrating Blasts, but the cooldown of Penetrating Blasts and Sniper Volley aren’t exactly synchronized like other parts of the spec.
It’s conventional to activate Sniper Volley during the post-Penetrating Blasts activation of Followthrough or Takedown.
Adrenal
The Adrenal should always be paired with 2 charges of Laze Target and a double Penetrating Blasts via Sniper Volley. The best time to activate your Adrenal is right before casting Ambush, since this will allow you to cast it twice while the Adrenal is active alongside
It is highly unlikely that a fight will last long enough where this delay will be enough to where it will result in missing out on a use of the Adrenal.
Defensive Cooldowns and Mobility
Defensive cooldowns (DCDs) are not used just to stop you from getting killed, they’re there to minimize overall damage taken. For any Combat Style in any fight, your most effective DCDs should be mapped to the most damaging attacks in the fight while weaker DCDs should be used against weaker attacks.
Don’t pop all of your DCDs at once or only use them when your health gets low. You should be attempting to mitigate as much damage as possible by using your DCDs against predictable damage.
In fights where you’ll be taking a high amount of sustained damage, it’s important to use your DCDs in the order that maximizes your overall uptime. If you can tweak the order that you use your DCDs where it allows you to get an extra use out of one of them over the course of a long burn phase, you should definitely do that instead of activating your potentially stronger DCDs first.
It’s good to have 1 emergency panic button too, but everything else should be used to prevent your health from getting low in the first place. Part of knowing a fight is understanding how much damage you take and what you can do to mitigate that damage.
Entrench
 Entrench
Entrench now directly provides the 60% AoE RDT (reduced damage taken); there is no utility point required. Without the Pillbox Sniper ability tree buff, Entrench has 30% uptime if it’s activated on cooldown. This means your average AoE RDT is only 20% compared to most other disciplines which have 100% uptime on 30% AoE RDT.
Even with the inconsistent uptime, you can easily wind up taking less damage than other classes since you can control when your mitigation is active to take less damage against big hits.
You can also utilize this higher DR so you don’t have to move out of certain circles when other classes would. It doesn’t always work, but it’s worth trying to figure out which circles will kill you and which you can survive completely, or at least survive long enough that you can get to a point in your rotation where you will lose minimal DPS from moving.
The vast majority of damage that bosses deal in raids is considered AoE damage. Even if the attack looks like a single-target attack, there’s a good chance that it’s still considered AoE damage. This is why there’s always so much emphasis on the AoE RDT buffs and part of why Snipers should generally have very low DTPS.
Entrench also provides CC immunity. This benefit comes up occasionally in PvE, usually during DPS checks, though it isn’t nearly as useful as it is in PvP. Marksmanship specifically also has 1 discipline passive that affects Entrench:
Portable Bunker
Increases the duration of Entrench by 3 seconds. In addition, when you enter cover after using Covered Escape, you gain Entrench for the first 3 seconds. This passive is a bit buggy.
The increased duration of Entrench results in slightly higher uptime, but the animation still ends after 20 seconds even though the buff sticks around for the correct duration. The 3 seconds of Entrench after using Covered Escape synergizes really well with the Seek Cover ability tree buff. Basically, you get a 50% movement speed boost after every roll.
Shield Probe
 Shield Probe
Unless you know that a big hit is coming up and you don’t have anything else available, this ability is best used if you can time it for when Entrench is not active, or on cooldown if there’s just a bunch of damage going out.
Since Shield Probe has such a short cooldown and is relatively weak, this ability won’t really protect you from a whole lot on its own and it’s much better served just keeping your health high and mitigating minor spikes so that your health will be higher when the actual damage comes.
Countermeasures
 Countermeasures
As of 7.3, the effect that makes activating Countermeasures increase your movement speed by 75% movement speed for 6s is now baked into the ability and it has been finally decoupled from Series of Shots knockback. The movement speed boost is the primary benefit, but Countermeasures also functions as your threat drop.
The movement speed boost is best whenever you don’t need to travel as far as Covered Escape will take you (18m), are able to keep dealing damage while moving, or if your movement otherwise must be fast and precise.
Please note that speed boosts do not get added together, only the fastest speed boost is applied, so Countermeasures will take effect over Seek Cover. Avoid activating both effects at the same time.
Meticulous Preparation and Over-prepared
 Meticulous Preparation and
 This ability resets the cooldowns of all the abilities I have mentioned in this section thus far plus Cover Pulse. Meticulous Preparation works great as your emergency panic button, but if you’re out of DCDs and about to take a hit that you’d rather have a DCD for, do not hesitate to activate this ability. Make sure that all DCDs are on cooldown before activating Meticulous Preparation.
If you’re able to take Over-prepared, you get a nice bit of extra DR for 15 seconds that should help when you find yourself needing to activate Meticulous Preparation.
Ballistic Shield
This is not a personal defensive cooldown. It is a raid buff. Use it when the entire raid is taking a lot of damage or may wipe because one of the tanks just died and now the boss is running around whacking random people.
Since damage intake management is primarily a tank and healer job, this ability is primarily to make their lives easier. If a tank is out of defensive cooldowns and needs another it’s okay to use.
Tell them you have it available for them to ask for. Healers are also a lot more focused on the raid frame than you will be as a DPS, so they are far better equipped to know when it will be useful for the raid than you will. Tell them to call out if and when they want it and be ready to activate it. Here are some times when it’s generally a good idea to use Ballistic Shield:
- During a burn phase.
- When one of the tanks or healers just died, pop it instantly, especially if a tank just died, because there’s a good chance that the boss is about to hit someone else or the group really hard.
- If healers call out for players to use their medpacs or if you find yourself having to use yours and see that the rest of the group could also probably benefit from their medpac.
- If everyone’s health is below 40-50%. Get in the habit of taking a quick glance at the raid frame to see people’s health level.
Medpac
 Medpac
Don’t save it for a rainy day because today is that rainy day! Unless you get hit by a one-shot mechanic (which you shouldn’t), you should never let yourself die while your Medpac is still available.
If everyone’s health is getting low or there’s a heal check in the current phase, do not hesitate to use your Medpac if you can take full benefit of the health provided or need to be above a certain health level to survive an imminent mechanic.
If you think Medpacs are too expensive, it’s time to get Biochem on one of your alts or even better, your raiding toon so that you can make your own or get reusables. Choosing not to use a medpac for financial reasons and subsequently dying is not a valid excuse.
 No Cleanse
I just wanted to point out that Snipers are one of the two classes that do not have any sort of cleanse ability, the other is Powertech. A long time ago, they could cleanse with Evasion, just like Operatives can.
Covered Escape
 Covered Escape
This ability is both a defensive cooldown and movement ability. As a defensive cooldown, it’s your cheese ability. It gives you 100% defense/resist chance for the duration of the roll, meaning you’re completely immune to taking damage during your roll, provided that it’s damage that is mitigatable, so it won’t work against things like 0 damage kills and typeless damage.
Since the mitigation is so short, it can be fairly difficult to time, so you may need to practice it a little bit and don’t be afraid to completely stop DPSing for a moment if there’s something that will kill you if you don’t do the cheese correctly.
As a movement ability, Covered Escape does help you cover a fair bit of distance, but it does cost a GCD to use, so it is best used when you’re out of range of the boss so you couldn’t deal damage anyway or after your other movement abilities have been used.
It’s not the end of the world to use this ability for movement though since there isn’t a lot of damage you can do when out of cover anyway, so sometimes you just have to give up the GCD.
Thanks to the Portable Bunker passive that makes it so you get Entrench for 3 seconds after using Covered Escape, you always get the Seek Cover speed boost after using your roll as well.
Hololocate
In 6.0, they gave Snipers Phase Walk. While it seems pretty identical to Sorcerer | Sage Phase Walk on the surface, there are several key differences:
- Hololocate’s cooldown is twice as long as Phase Walk’s.
- The teleporting animation is significantly longer for Hololocate because there’s an actual teleportation animation you have to do prior to teleporting but after pressing the button rather than Phase Walk where you just wave your hand and pop up somewhere else instantaneously. This makes it more difficult to escape at the very last second.
- The act of teleporting with Hololocate breaks your channel after teleporting, even if you’re still in range while Phase Walk does not break your channels (provided you’re still in range).
- In general, Hololocate’s animations are much smoother and happen more sequentially while Phase Walk’s animations just kind of happen on top of everything else.
Luckily, the ability is still off the GCD, even though it has a castbar, so you can still use it while the GCD is active for another ability. In addition, you can still teleport while stunned, so even if the button is grayed out, it will still work.
Hololocate isn’t always useful as a movement ability, but it’s incredible when you can use it. The best time to use Hololocate is when you know of a specific location that you are certain you will want to return to at some point later in the fight that will be generally safe to return to.
Crowd Control and Other Notable Abilities
There are only a handful of instances in operations where CC is required, so I will briefly go over what this Combat Style has at their disposal in addition to any other abilities I haven’t yet mentioned.
Maim
This is your hard stun, meaning it does not break on damage. In PvE, this will generally only be used for specific mechanics since most things you’d care about stunning are immune. Be sure to pay attention when something is stunnable though, because that often means you’re intended to stun it. Snipers have a slightly shorter cooldown duration on their hard stun than most other classes.
When Maim is used, you get a proc that enables Takedown to be used against any target regardless of remaining health and makes that use of Takedown deal 15% more damage. Be sure to take advantage of this proc whenever you have to use Maim since it mitigates the DPS loss from having to spend a GCD to stun something.
Distraction
 Distraction
This is your interrupt. Ranged DPS in general tend to have longer cooldowns on their interrupts, than Melee, so if there’s something specific that needs repeated interrupting, a Melee DPS or tank will be assigned to it, though this doesn’t mean you can’t interrupt things as well. If you really want to be a clicker, I highly recommend you at least keybind this ability or you will have trouble with some of the shorter casts that need to be interrupted.
Cover Pulse
 Cover Pulse
This is your knockback. Outside of specific mechanics, it’s not usually something at your disposal in group content. A lot of the time things are immune to being knocked back and when they aren’t immune, it’s better that they’re all grouped up to be killed as fast as possible.
Technically it’s okay to use this if you genuinely think you will die if you don’t knock the enemies back right now, but honestly I think the better play is to just let yourself die and then throw a tantrum about why the tanks didn’t keep the adds off of you and why you didn’t get enough heals, though make sure you’ve used your threat drop and all your DCDs already.
Escape
 Escape
This is your CC break. Use it when you get CC’d.
Leg Shot
 Leg Shot
This ability applies a root, which is an ability that stops you from moving, but does not stop you from activating abilities directly, it also breaks on damage after 2 seconds. It deals nearly identical damage to Rifle Shot, has a 35m range, and the actual root lasts for a fair bit of time, so I could see it getting some use in the same sort of situation that you might use a slow or a stun on a Melee add. It would also work as an alternative to stunning one of the Chained Manifestations on Styrak NiM.
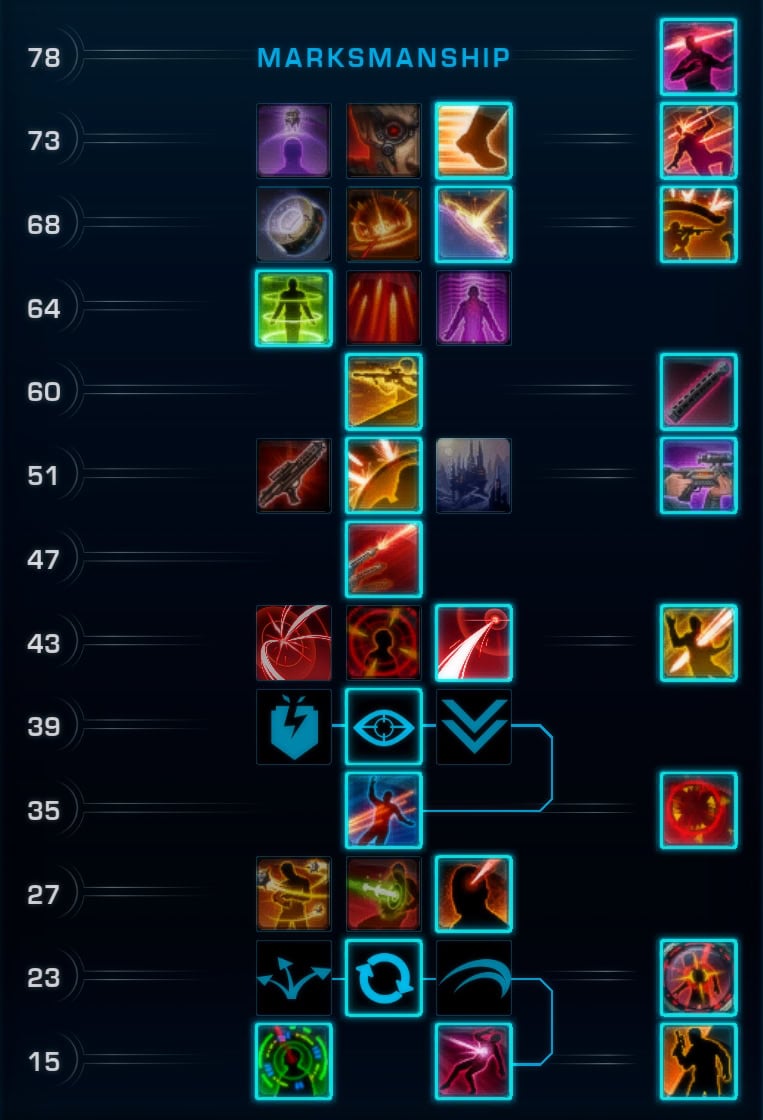
Ability Tree Choices
Make a habit of reading through all of your Ability Tree choices each time you log in. They are intended to be changed on the fly and having a clearer idea of what all of them do will help you to recognize situations where individual choices will be useful in-game.
Level 23 Choice – Ambush Buffs
 Shrap Shot
- Effect: Ambush deals partial damage damage to up to 8 enemies within 5m of the primary target and slows them by 30% for 6 seconds.
- Recommendation: Take this in AoE situations. Unfortunately, the splash damage only deals about 40% damage dealt to the primary target, so it becomes the optimal choice when you can consistently hit at least 3 or 4 targets. If you want a more traditional approach to defeating enemies in solo content, this option should be more efficient than Targeted Ambush, but you won’t get those glorious instakills.
 Relentless Ambush
- Effect: The Energy cost of Ambush is reduced by 5. Each use of Ambush grants Relentless Ambush, which reduces the cooldown of your next Ambush by 1.5 seconds. Stacks up to 3 times.
- Recommendation: Take this in boss fights only. At 2 stacks, the cooldown reduction closes the gap in the rotation so you don’t have to do single Snipes anymore when you used to reapply Corrosive Dart. At 3 stacks, the cooldown reduction causes Ambush to become available more frequently than when the gap is available, though it isn’t worthwhile to leverage the third stack.
 Targeted Ambush
- Effect: Increases the critical hit damage of Ambush by 20%. Killing a target within 3s of hitting the target an Ambush critical hit resets the cooldown of Laze Target and Ambush.
- Recommendation: Take this option for solo content or when frequent burst is required. It will enable you to one-shot kill every single standard enemy, reinforcing the Sniper identity. This option synergizes with other options that significantly reduce the cooldown on Laze Target, enabling you to deal higher DPS on frequent burst DPS checks. Since the gap still exists when using this option, it can also result in a DPS increase if you find yourself having to apply Corrosive Dart frequently.
Level 27 Choice – Evasive Maneuvers, Maim, or Shatter Snipe
 Evasive Maneuvers
- Effect: Countermeasures grants Evasive Maneuvers, which increases your chance to dodge Melee and Ranged attacks by 200% and reduces the damage you take from Force and Tech attacks by 75% for 3 seconds. In addition, Countermeasures resets the cooldown of Covered Escape.
- Recommendation: Take this in solo content, PvP, and specific fights. Evasive Maneuvers is nice, but it doesn’t offer protection for very long. If you need to mitigate a big hit or avoid adds, Covered Escape is typically sufficient. The only time I’d take this option is if I’m getting aggro from a lot of adds in AoE situations or if Covered Escape is insufficient.
 Maim
Maim
- Effect: Grants the Maim ability, which stuns the target for 4 seconds, deals a small amount of damage, and grants Executioner, which makes Takedown usable against any target regardless of remaining health and deal 15% additional damage.
- Recommendation: Take this only as a last resort. It’s rare for stuns to be required in PvE content. It’s better to have stun mechanics handled by some other Combat Style who doesn’t have their hard stun locked away behind a choice.
 Shatter Snipe
- Effect: The critical hit damage of Snipe is increased by 20%. In addition, dealing damage with Snipe inflicts Trauma, which reduces all healing the target receives by 20%. Lasts 10 seconds.
- Recommendation: Almost always take this in boss fights. Marksmanship uses Snipe quite frequently and Shatter Snipe synergizes with the Honed Shots proc to amplify the DPS increase provided by this option. Only give it up in fights where one of the other options is essential to beating the fight.
Level 39 Choice – Penetrating Blasts Buffs
 Penetrating Rounds
- Effect: Increases the armor penetration of Penetrating Blasts by 20% and Penetrating Blasts now immobilizes targets for the duration of the channel.
- Recommendation: Take this in PvP only. The root is valuable for control and the armor penetration goes through their survivability, though the former doesn’t work reliably in boss fights and it’s weaker in terms of overall damage output.
 Energy Barrel
- Effect: Increases the Energy cost of Penetrating Blasts by 10 and increases the critical chance and critical damage by 20%.
- Recommendation: Take this for most PvE content. Always pair this option with Ballistic Redistribution or Energy Regulators. The Energy cost increase is not sustainable for long periods of time. Ballistic Redistribution mitigates this Energy cost. The Relentless Ambush option is insufficient in mitigating the Energy cost increase on its own and is overkill when paired with Ballistic Redistribution.
 Retargeting
- Effect: Whenever Penetrating Blasts deals damage, the cooldown of Laze Target is reduced by 2 seconds.
- Recommendation: Take this option when you can’t take Energy Barrel or Ballistic Redistribution. It pairs best with Targeted Ambush and Laser Focus, but it offers slightly less sustained DPS compared to Energy Barrel.
Level 43 Choice – Ballistic Redistribution, Target Acquired, or Lazer Focus
 Ballistic Redistribution
- Effect: Critically hitting with a weapon attack restores 2 Energy.
- Recommendation: Only take this option if you can’t use the Energy Regulators Implant. The Energy regeneration from this option is excessive without the increased Energy consumption from Energy Barrel or AoE spam. Technically, you can benefit from it outside of those situations, but Adrenaline Probe and a couple of Rifle Shots during the gap in your rotation can cover it.
 Target Acquired
- Effect: Grants the ability Target Acquired, which immediately restores 15 Energy and grants a charge of Laze Target. In addition, Ranged and Tech accuracy are increased by 30% and armor penetration is increased by 15%. Lasts 10 seconds.
- Recommendation: Take this in solo content and PvP. The actual DPS increase from the 15% armor penetration works out to being only 5.25% and you’re not always gonna be able to use a second charge of Laze Target in the same burst window anyway. Target Acquired isn’t even close to being strong enough to compete with the other options in sustained damage output and its long cooldown means that you can’t utilize it for frequent DPS checks. The key benefit of Target Acquired is that it will technically provide a DPS increase in the moment, which can be helpful for specific infrequent checks like you’ll find in the Dread Master Calphayus fight.
 Lazer Focus
- Effect: Dealing damage has a 50% chance to reduce the cooldown of Laze Target by 2 seconds.
- Recommendation: Take this in boss fights. It offers more DPS than the Improved Targeting Implant, so it’s better to use Energy Regulators and Lazer Focus than Improved Targeting and Ballistic Redistribution. When paired with Targeted Ambush and Retargeting, you’ll be able to use Laze Target on every single activation of Ambush.
Level 51 Choice – Snap Shot, Ballistic Dampers, or Pillbox Sniper
 Snap Shot
- Effect: Entering cover makes your next Snipe activate instantly. Cannot occur more than once every 6 seconds.
- Recommendation: Never take this. Since Snipe already costs a GCD to use and you can’t move while in cover, making Snipe instant does not provide a DPS increase on its own. All you’re doing is moving the damage from the end of the GCD to the beginning. The only possible way to increase your DPS with this utility is if you manage to get an extra ability into some sort of damage boost window like one of your relic procs or if your Adrenal is about to fall off. The DPS increase from something like that is quite small and very unreliable since you still have a priority to follow. Furthermore, the other two options are far more valuable.
 Ballistic Dampers
- Effect: Entering cover grants 3 stacks of Ballistic Dampers, which absorb 30% of the damage dealt by an incoming attack. This effect cannot occur more than once every 1.5s and Ballistic can only be gained once every 6 seconds.
- Recommendation: Take this in all PvE content. Ballistic Dampers needs to be refreshed by exiting and reentering cover. Some experienced Snipers will cover hop, where they jump to exit cover and immediately reenter cover to reapply Ballistic Dampers, but that is annoying to do and can be quite distracting if it isn’t muscle memory for you. If you don’t cover hop and aren’t moving a whole lot, the uptime on Ballistic Dampers is gonna be pretty low and not end up mitigating very much damage.
 Pillbox Sniper
- Effect: Reduces the cooldown of Entrench by 15 seconds. In addition, Cover Pulse knocks targets back an additional 5m and the final tick of Penetrating Blasts also knocks the target back if they are within 10m of you.
- Recommendation: Take this in PvP only. Pillbox Sniper offers more mitigation when you can take advantage of your CC immunity and additional control to reduce your opponent’s uptime significantly, so it’s not very useful in PvE but extremely valuable in PvP.
Level 64 Choice – Vital Regulators, Ruthless Efficiency, or Over-prepared
 Vital Regulators
- Effect: While in cover, you heal for 3% for your max health every 2s.
- Recommendation: Almost always take this. The boost to your survivability is equivalent to ~6500 HPS depending on your max HP, which is typically way better than the alternative options in this tier in PvE.
 Ruthless Efficiency
- Effect: Increases the damage dealt by Suppressive Fire by 25%.
- Recommendation: Take this in fights where you’re using Suppressive Fire. You should only be using Suppressive Fire against adds that need to die ASAP; otherwise, leave it to Ambush splash damage from the Shrap Shot option and other players’ rotational AoE.
 Over-prepared
- Effect: Reduces the cooldown of Meticulous Preparation by 45 seconds and activating Meticulous Preparation grants Over-prepared, which increases your damage reduction by 15%. Lasts 15 seconds.
- Recommendation: Never take this. If you need more survivability, Vital Regulators is significantly stronger.
Level 68 Choice – Hololocate, Orbital Strike, or Ballistic Shield
 Hololocate
- Effect: Grants the Hololocate ability, which allows you to place a mark on the ground that lasts up to 10 minutes. At any point, you can teleport back to that mark if you are within 60m, at which point the ability goes on cooldown for 2 min.
- Recommendation: Take this in PvP and in specific PvE situations. In single-target situations where you can use Hololocate to move a great distance, you’ll likely lose less DPS than you’d gain by being able pre-cast Orbital Strike. That being said, Hololocate can be tricky to use outside of dealing with specific mechanics and the potential DPS increase doesn’t always work in Hololocate’s favor, so if you’d prefer not to bother with this ability outside of very specific situations, that’s fine. Determining whether to take Ballistic Shield is more important anyway. If there’s a Sorcerer or Sage in the group, they should use Phase Walk to the fullest extent for a mechanic before you take Hololocate. In solo content, I find Hololocate to be quite useful if you need to come back the way you came after completing some sort of objective. It also helps to train you to identify situations in group content where Hololocate would be useful.
 Orbital Strike
- Effect: Grants the Orbital Strike ability, which deals a high amount of damage to up to 8 enemies within 8m of the target area. Standard and Weak enemies are knocked down by the blasts. Lasts 9 seconds. 2s cast, costs 20 Energy, 45s cooldown.
- Recommendation: Take this for solo content and fights with extremely tight burst DPS checks that allow you to pre-cast. For group content, Ballistic Shield is too good and Orbital Strike is too small of a DPS increase outside of the tightest applicable DPS checks to be worth taking. In AoE situations, it’s flat-out unnecessary. Suppressive Fire spam should be sufficient for killing adds.
 Ballistic Shield
- Effect: Grants the Ballistic Shield ability, which places a shield at your present location that spans 10m and reduces the damage taken by all allies that remain inside by 20%. Lasts 20 seconds, 3 min cooldown.
- Recommendation: Almost always take this for PvE group content. Ballistic Shield is fantastic. It helps significantly with recovery when a tank or healer dies unexpectedly and makes heal checks a lot easier. Remember, the goal is to beat the fight, and Ballistic Shield helps with that a whole lot more often than Orbital Strike.
Level 73 Choice – Augmented Shields, Calculated Pursuit, or Seek Cover
 Augmented Shields
- Effect: Increases the amount of damage absorbed by Shield Probe by 30%. In addition, when taking damage while Entrench is active, the cooldown on Meticulous Preparation is reduced by 2s. This effect cannot occur more than once every 3s.
- Recommendation: Take this in fights with almost no movement. The effects are pretty weak, but always useful. Only take this option when Calculated Pursuit and Seek Cover are not useful.
 Calculated Pursuit
- Effect: Upon exiting Cover, you gain 4 stacks of Calculated Pursuit, which allow Snipe to be activated and cast while moving. Can only occur once every 20 seconds once a stack has been consumed. Lasts up to 15 seconds. Reentering Cover removes the effect.
- Recommendation: Take this in fights where there is a lot of movement, but you can stay in range of your target. Calculated Pursuit is useful for maintaining uptime on the boss.
 Seek Cover
- Effect: When Entrench ends or you leave Cover while Entrench is active, you gain Seek Cover, which increases your movement speed by 50% and grants immunity to movement-impairing effects. Lasts 6 seconds.
- Recommendation: Take this by default. Seek Cover is useful for covering distance. This option becomes more valuable when paired with Pillbox Sniper due to the higher uptime on Entrench. It also synergizes with Marksmanship which gets Entrench for 3 seconds after using Covered Escape, so you always get a movement speed boost after rolling.
Gearing and Stats Priorities
Tactical Items
 Agitating Energies Agitating Energies |
|---|
| Effect: Corrosive Dart deals more damage and dealing damage with Followthrough and Penetrating Blasts refreshes its bleed effect on its target and ticks its damage. |
| Recommendation: This is your default tactical item. It provides the greatest single-target DPS increase compared to the other MM tacticals and gives you additional burst at the beginning of Sniper Volley. |
 Refraction Point Refraction Point |
|---|
| Effect: Penetrating Blasts does splash damage to targets around the primary target and causes your next Followthrough to deal splash damage as well. |
| Recommendation: This is your AoE tactical item. It’s pretty straightforward, it just allows you to deal AoE damage rotationally and spreads your armor debuff. It is best used when you have a primary target with higher health alongside enemies with lower health, like on Dash’roode in S&V. That said, anytime you are using Suppressive Fire frequently during a fight, you should consider taking this. Virulence and Engineering do both provide rotational AoE though without having to use a tactical, so if the adds can be handled by other players, keep your single-target tactical on or switch specs. |
| Effect: Activating Covered Escape grants Sniper’s Ambush for 10s, which increases the damage dealt by your next Ambush by 30% and makes it activate instantly. |
| Recommendation: This is your spike damage tactical. It’s meant for PvP and offers some value by slightly improving your mobility and concentrating more damage into your heaviest hitter while making it more reliable. Both alternatives are really strong and still provide a lot of value in PvP, so it’s hard to justify using this. |
In our Catalog of all Tacticals in SWTOR you will find information about all other Tacticals that we didn’t list in this guide. You may find something adequate that is also cheaper and easier to obtain for your needs while you work on getting the recommended one for your combat style and build.
Legendary Implants
BioWare has removed set bonuses from the game and replaced them with Legendary Items, which are just implants with old 4 or 6-piece set bonus effects on them, so rather than needing to collect 4 pieces of a gear set to get the 4-piece set bonus, or 6 pieces for the 6-piece, you’ll get either a 4 or 6-piece set bonus effect on an implant.
This was done to improve customization (now you can mix and match set bonus effects), make them easier to obtain, and consume less inventory space. Here are the Legendary Items you should use as a Marksmanship Sniper.
- Energy Regulators – Your Energy Regeneration Rate is increased by 1 while in cover.
- Second Wind – Defeating an enemy heals you for 20% of your max health and sets your movement speed to 175% for 8s. Cannot occur more than once every 8s.
- Locked and Loaded – Ranged and Tech bonus damage are increased by 5%.
- Improved Targeting – Reduces the cooldown of Laze Target by 15 seconds.
Sniper implants are build-dependent. If you’re using Energy Barrel, you take Energy Regulators. Otherwise, you take Improved Targeting. If you’re doing PvP or solo content, you take Second Wind instead of Locked and Loaded.
Both Improved Targeting and Locked and Loaded are pretty weak. Improved Targeting is the weakest but can synergize with your build better than Locked and Loaded.
You can learn more about Legendary Items in SWTOR 7.0 from my dedicated guide. It also has a full list of all currently available Legendary Implants for all classes.
Stat Priority
As a DPS, you’ll need to care about 3 different stats: Accuracy, Alacrity, and Critical Rating. There are thresholds associated with Accuracy and Alacrity, so you need to prioritize reaching those thresholds to get the full benefit from each stat point.
- Accuracy to 110.00% – Before investing in any other stats, make sure you hit 110% Accuracy because attacks that miss deal 0 damage, and no other stats matter if the attack doesn’t land. Furthermore, many procs require you to actually deal damage, not just activate the ability, so you can mess up your rotation if an attack misses. You need 110% Accuracy in PvE and not just 100% because bosses have a 10% chance to dodge/resist player attacks, and any percentage over 100% reduces this chance. Anything over 110% is not helpful in PvE, so you do want to go over 110%, but with as little excess as possible.
- Alacrity to ~7.5% – Once your Accuracy is above 110.00%, it’s time to think about Alacrity. It has the second-highest priority because you do not get the full benefit of the stat unless you surpass one of the GCD thresholds. It’s less important than Accuracy because your attacks still need to hit. You need 7.15% Alacrity to get from the 1.5s GCD to the 1.4s GCDs. However, as you approach 7.15%, you actually start getting a mix of 1.4s and 1.5s GCD, resulting in an experience that feels clunky and inconsistent. You need roughly 0.4-0.5% more Alacrity past the exact threshold to effectively eliminate those 1.5s GCDs.
- Critical gets the rest – After you’ve got your thresholded stats sorted out, you can start investing in crit. To be clear, Critical Rating is still valuable; it just has the lowest priority because it does not have a threshold associated with it that you need to meet to get the most out of each point of stat as the other tertiary stats you care about do. Critical Rating increases both your Critical Chance and Critical Damage. If you have a single effect that increases your Critical Chance by 100% all on its own (it can’t be from multiple effects combined), all of the Critical Chance percentage for that attack gets added to your Critical Damage percentage, causing the attack to deal supercritical damage.
Find out which mods to purchase from Hyde and Zeek in SWTOR on the Fleet to minimize spending and optimize your build. The dedicated guide contains tips for all roles in both PvE and PvP.
Augments
Augments allow you to put additional stats on every piece of gear except tactical items. Since Augments allow you to put additional stats on every piece of gear except tactical items. Since the stats come in much smaller amounts, augments allow you to fine-tune your gear to provide almost as much of each total stat as you want.
To equip an augment, you must first use an Augmentation Kit that matches the crafting grade of the augment (ex. Grade 11 augments require MK-11 Kits).
The 296, 302, 310, and 318 iRating augments released with 7.6 and 7.7 are BiS. The higher the iRating, the more stats they offer and the more expensive they are to make or buy, though most of the benefit is provided by having augments at all, and the base-rarity blue 296 augments are the cheapest.
Almost everyone should buy the blue 296 augments because they provide the greatest bang for the buck, but you do have multiple options:
- Gold 318 augments (Superior [Type] Augment 86). These are overall best-in-slot (BiS) and offer ~25% more stat than gold 300 augments, which is roughly equivalent to 4 additional gold augments. They’re extremely expensive and completely unnecessary for all content in the game, so I only recommend them to the wealthiest individuals.
- Purple 310 augments (Advanced [Type] Augment 86). They offer ~13% more stat than gold 300 augments, which is roughly equivalent to 2 additional gold 300 augments worth of stat. They are cheaper than the gold 318s, but they’re in the same price bracket in terms of affordability, so there’s no reason for anyone to use them at this point.
- Blue 302 augments ([Type] Augment 76) are the mid-tier augments. For all intents and purposes, these are equivalent to the gold 300 augments from 6.0. I only recommend them if you’re close to a stat threshold or don’t already have gold 300 augments and want something a bit better than the blue 296s.
- Blue 296 augments ([Type] Augment 83) are the most basic tier of augments for level 80 players. They are pretty cheap as only the schematic comes from the associated lair boss, Propagator Core XR-53. You don’t need any Corrupted Bioprocessors to craft these augments.
Check out our 7.7 Augments Guide for everything you need to know about augmenting gear!
Earpiece
Which Earpiece you use will depend on what specific tertiary stats the rest of your gear and augments provide. Typically, you’ll need to use either an Accuracy (Initiative, yellow icon) or Alacrity (Quick Savant / Nimble, green icon) Earpiece.
Crystals
Advanced Eviscerating Crystals are the best. They are the only type of crystal that increases one of your tertiary stats. Since the stat pool for tertiary stats is much smaller than that of primary or secondary stats, adding 41 is a more significant upgrade than it would be if you were to add 41 to one of the primary or secondary stats (mastery, power, or endurance).
Relics
I recommend the Relic of Focused Retribution (FR) and Relic of Serendipitous Assault (SA) for all PvE content. Each relic offers a proc; FR’s proc boosts your Mastery, whereas SA’s proc increases your Power stats. If you have the choice, purchase the Relic of Focused Retribution first because in equal amounts, and only in equal amounts, Mastery offers more of a DPS gain than Power.
Biochem Items
I recommend the Advanced Kyrprax Proficient Stim, Advanced Kyrprax Medpac, and Advanced Kyrprax Attack Adrenal for all PvE content. Grade 11 Biochem items from the crafting tier released with 6.0 remain BiS. Since they haven’t been updated to level 80, their effects are weaker than they should be, though they can still have an impact.
You should use the Proficient Stim as a DPS because it provides 2 tertiary stats that you need, Accuracy and Critical Rating, and tertiary stats are harder to come by and what you build your gear around. You should use the Attack Adrenal because it provides Power, which typically provides the greatest DPS increase, though it’s also more consistent, which is what you need for DPS checks.
Regarding the Zeal Guild Perk Alacrity Boost
If your guild uses the Zeal (cyan) guild perk set bonus, which gives a passive +5% Alacrity boost, you won’t need nearly as much Alacrity stat to reach your desired Alacrity threshold. My recommendations do not factor in these boosts, so if you have one, you’ll need to pay attention to percentage thresholds rather than the stat amounts. Just keep adding one augment at a time until you reach the desired percentage.
Guild leaders, I recommend using the Fortune (yellow) guild perk set bonus instead. It grants +5% Critical Chance and also boosts the Critical Rate and Time Efficiency of all Crew Skills by 2%. The reason for this is that you don’t have to change the way you gear in order to benefit from the effect.
Neither effect works in MM raids or PvP, so if you or your guild members do either of those activities, you’ll need to tweak your gear to reach the desired threshold depending on the activity, which I find super tedious. Even if your guild doesn’t do those activities, leaders still need to actively maintain the set bonus because your gear will become suboptimal on top of losing the bonus, whereas it’s not a big deal if your crit is a little lower for a bit.
The Alacrity boost is much stronger than the Critical Chance boost. Still, PvE content isn’t balanced around these guild perk set bonuses anyway, so I find it better to have a smaller boost I don’t have to worry about than a larger boost I have to manage.
Best Marksmanship Sniper Builds in 7.0
These are the builds that I recommend for different types of content and situations. The Build Essentials are what I consider to be the core components that make the build viable.
Without them, the build no longer accomplishes its primary function. Build Essentials can include important ability tree buffs, a tactical item, and even legendary items occasionally.
The ability tree buffs that aren’t listed as Build Essentials can be changed as needed without compromising the integrity of the build, though I have included a full set of default choices that will be most consistently helpful in accomplishing what the build sets out to do.
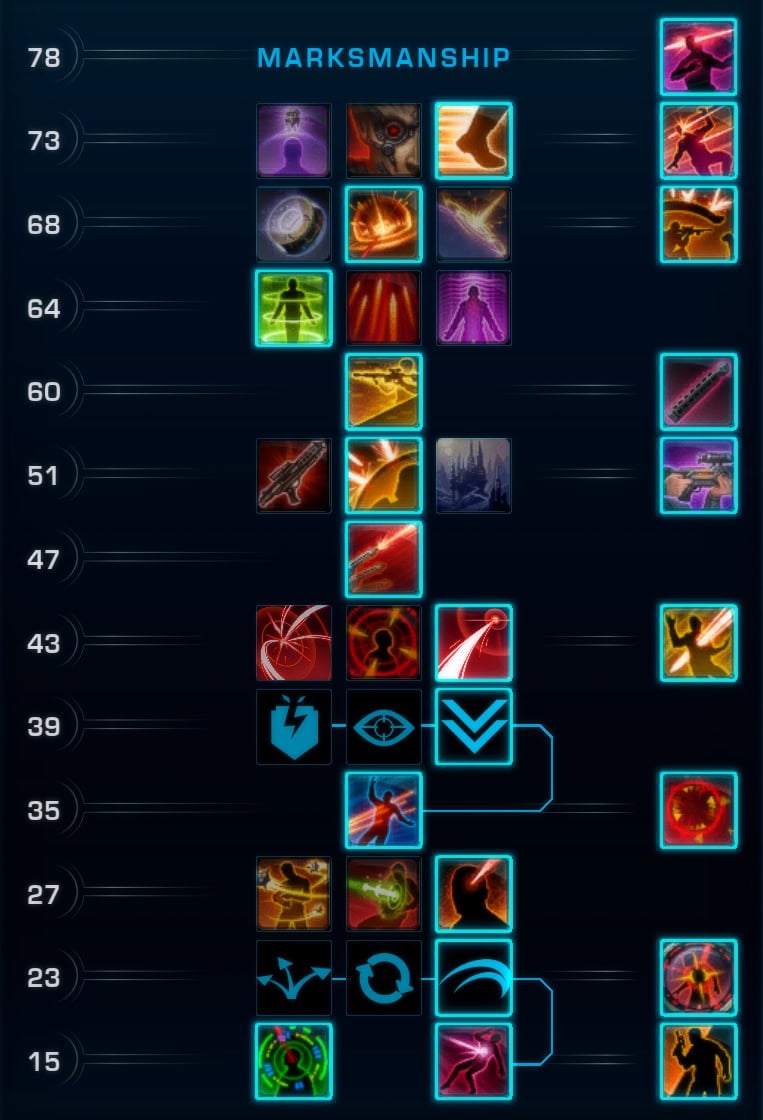
Marksmanship Boss Fights Build 1
Build Essentials:
Relentless Ambush Shatter Snipe Energy Barrel Lazer Focus Ballistic Dampers Vital Regulators Locked and Loaded Energy Regulators Agitating Energies
In boss fights, your top, coequal priorities are executing mechanics and dealing maximum, typically single-target, sustained DPS. The talents in this build enable maximum sustained DPS, though sometimes you will need to adjust to account for specific mechanics or provide utility to your group.
You’ll also be taking talents that increase your survivability and active mobility because you can’t deal damage or do mechanics if you aren’t alive or in range.
The boss build is inferior against regular enemies because your AoE is weaker and less immediate in exchange for being more efficient and sustainable. You’re relying on your target to be alive for an extended period of time to deal damage, and enemy health typically doesn’t line up with a full-fledged boss rotation.
This build is not as performant in PvP because your CC is primarily limited to whatever you get for free, and your instantaneous burst will be weaker or outright non-existent.
Still, if you want to deal the absolute maximum DPS in easy boss fights, this build will get you there.
Relentless Ambush and Energy Barrel offer the highest DPS in a vacuum by reducing the cooldown of Ambush to eliminate the 1 GCD gap in your rotation (and then some) and providing the strongest damage increase to Penetrating Blasts.
The combination of Relentless Ambush and the Energy Regulators implant compensate for the increased cost of Penetrating Blasts from Energy Barrel. Lazer Focus + Energy Regulators offers more DPS than Ballistic Redistribution + Improved Targeting, though both will work if you’re short on Tech Fragments.
Since the gap in your rotation is eliminated and the cooldown on Ambush is reduced excessively, there isn’t a lossless place to insert Takedown anymore.
The cooldown of Takedown and Penetrating Blasts remain the same, so it is optimal to use Takedown instead of Followthrough after Penetrating Blasts. This approach also makes it easier to avoid wasting Laze Targets on Takedowns.
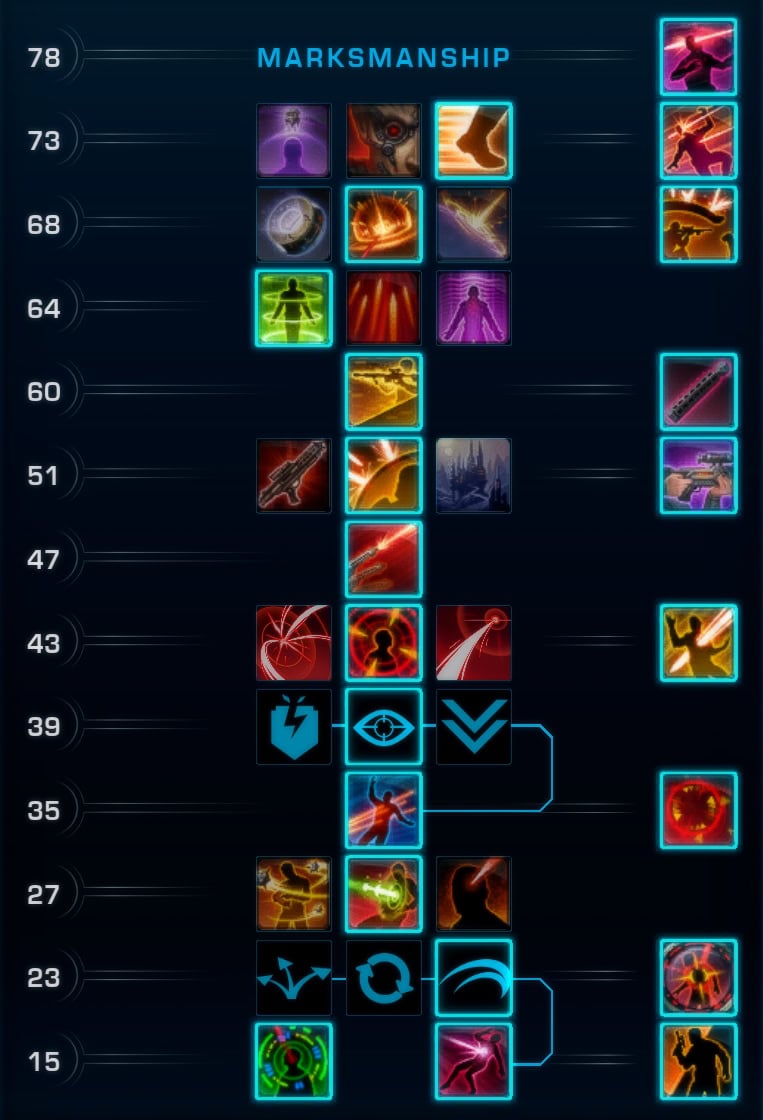
Marksmanship Boss Fights Build 2
Build Essentials:
Targeted Ambush Shatter Snipe Retargeting Lazer Focus Ballistic Dampers Vital Regulators Locked and Loaded Improved Targeting Agitating Energies
This build offers slightly a few hundred less sustained DPS compared to the former boss fight build, but it’s a lot more flexible. It’s great for burst DPS checks are tight enough and frequent enough to where you need 2 charges of Laze Target for each one and can’t get that with the normal cooldown.
Combining all of the cooldown reductions to Laze Target enables you to apply Laze Target to all uses of Ambush.
This build doesn’t eliminate the gap in your rotation and still offers a good sustained DPS increase. I include Orbital Strike by default because it works well for your energy to use Orbital Strike during the gap and Rifle Shot otherwise, though it’s not as nice as the raid utility of Ballistic Shield, not by a long shot.
Retaining the gap helps to cover for a lot of things that occur in an actual raiding environment, but not on a dummy, like needing to spend a GCD to roll, activate Diversion, reapply Corrosive Dart, hard stun, etc., so you might end up performing better in a lot of fights, particularly ones with a lot of mechanics, by using this build instead of the first one.
Marksmanship Solo Content Build
Build Essentials:
Targeted AmbushEnergy Barrel Target Acquired Ballistic Dampers Energy Regulators Second Wind Refraction Point
In story content, on planets, and in flashpoints, you’ll almost exclusively encounter regular enemies AKA trash mobs. While you can technically use DPS to measure performance against trash, it is far more appropriate to think in terms of how many GCDs it takes to defeat each enemy and a whole group, and which talents get you over the threshold and actually reduce the number of hits to kill.
As of 7.0, SWTOR now offers dedicated talents and tactical items that are designed and balanced for use specifically against trash mobs.
These talents almost always have effects that trigger when you specifically defeat an enemy or when you enter or exit combat. They expand single-target attacks into powerful AoEs or reset cooldowns on specific abilities, often with a massive yet short-lived, damage boost attached to it.
These factors come together to create a truncated rotation that incentivizes a high APM and deals enough damage to defeat an entire group of trash in a flashy way in a matter of seconds.
Yes, trash mobs pose no threat to someone more invested in the game like you, dear reader. The advantage of making such a build is that they genuinely deal more DPS. My testing with Assassin showed a ~25% reduction in TTK, and the combat experience was a lot more fun.
These effects aren’t suitable in boss fights because their effects last such a short time and can only trigger reliably when you are in a small group and are fighting enemies that have a small amount of HP.
These same deliberate limitations also prevent them from being effective in PvP because it’s so difficult to predict exactly when your opponent will die, and such buffs aren’t useful after the fact anyway. Furthermore, you often have to give up effects that are more useful in PvP to take these talents.
This build is super fun for solo content since it enables you to one-hit kill standard and weak enemies with Ambush autocrits, making you really feel like a Sniper. However, on higher-level planets, you will need to follow your autocrit Ambush up with Takedown or Followthrough since Ambush won’t quite be enough on its own.
Second Wind and Refraction Point offer additional sources of survivability and powerful AoE, respectively, and the former enables you to bring DPS companions without needing to stand around between fights channeling your regen ability.
Be careful about using Ambush against Strong (silver) enemies or higher. If they’re at full health, you’re better off firing off some Penetrating Blasts at them (and everyone around them) instead.
Marksmanship PvP Build
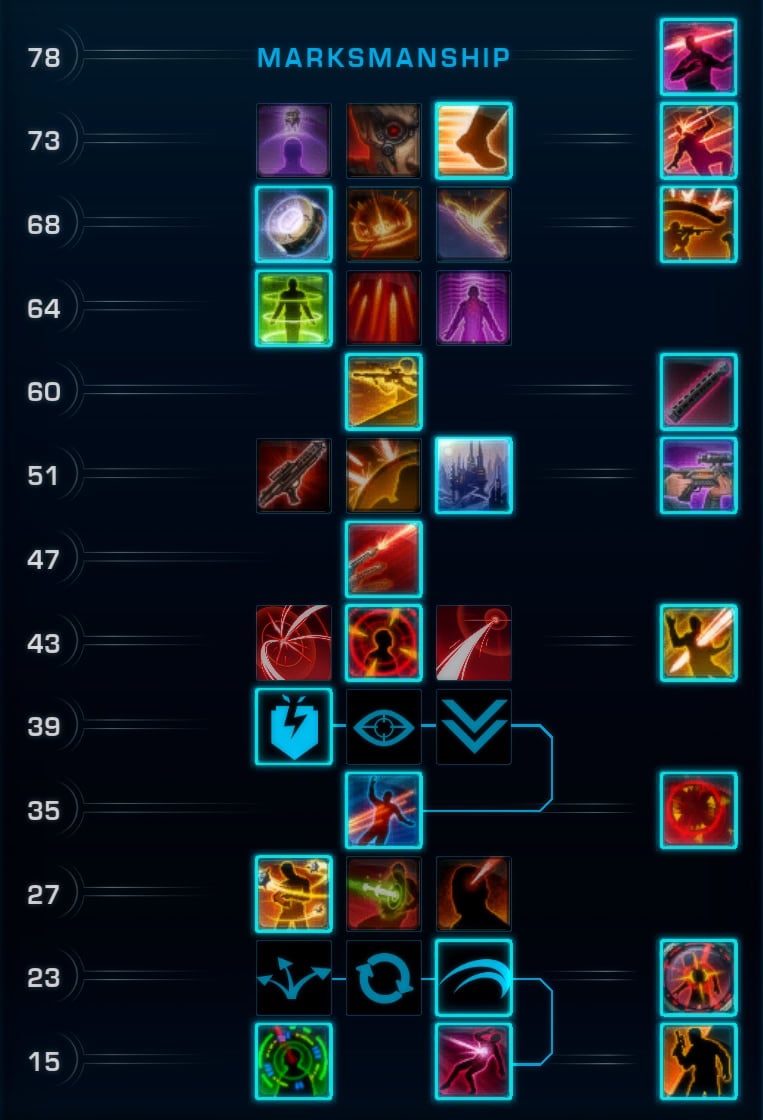
Build Essentials
Targeted Ambush Penetrating Rounds Target Acquired Pillbox Sniper Vital Regulators Seek Cover Second Wind Improved Targeting
This build is best suited for fighting against enemy players, where survival and control are the name of the game and fight duration is completely variable. You will be trading a huge chunk of sustained damage output in order to stack as much damage into a single instant as possible, making it harder for your opponent to mitigate at all.
Survivability is king because you secure objectives or win outright when you outlast your opponents, though it also means there is more time for help to arrive. Controlling effects help immensely with securing objective and improving the reliability of your spike damage landing, but they also improve your own survivability.
Time where the enemy can’t hit you is time where you aren’t taking damage, and CC is especially helpful to use against enemies that have some sort of OCD or DCD active because you don’t want to be taking more damage than your opponent or not hitting as hard against them.
The PvP build is far less effective in boss fights because most bosses are immune to CC and the ability order you use to set up your massive damage spikes requires you to break what would be a sustained rotation by delaying important abilities.
This often results in higher resource costs, but the downtime from CC helps to mitigate the inefficiency. Fillers often play a role in survivability as well, so it is as much of a waste to use them either.
The CC will be useful in solo content, but your burst is focused onto a single enemy and is often super duper overkill. It is better to spread that damage out a bit.
Your goal is to entrench yourself in strategically advantageous positions, out of range of the enemy as much as possible. The root and knockback on Penetrating Rounds will do wonders for this, with Cover Pulse as your backup.
Any of the 3 Marksmanship tacticals can work, though I think the spike damage offered and mobility offered by B-0 Differential Targeting System are a little light next to the still concentrated damage you can pump out with Agitating Energies or obscene AoE you can spurt out with Refraction Point.
Likewise, any of the options at level 27 can work. Play around with them, see which one you like best. I personally prefer Evasive Maneuvers.
Openers, Rotations, Priorities
Opener
This is the rotation you use at the very beginning of the fight and for burst DPS checks. It can be a little different than the standard rotation because everything is off cooldown, including your OCDs and relic procs. It’s important to get as much damage as possible while all of your damage boosts are available to maximize their impact.
- Laze Target
- Orbital Strike (pre-cast, if applicable)
- Enter Cover
- Adrenal
- Target Acquired (if applicable)
- Ambush (pre-cast)
- Laze Target (if you used Target Acquired)
- Corrosive Dart
- Followthrough
- Penetrating Blasts
- Followthrough
- Sniper Volley
- Penetrating Blasts
- Followthrough
- Countermeasures (threat drop)
- Snipe
- Snipe
- Followthrough
- Rotation
Laze Target is used before everything else because the buff lasts for 20 seconds and only affects the very next use of Ambush, so the earlier to activate Laze target, the earlier it will become available again, just be sure to not pop it so early that it falls off before you get to actually use Ambush.
It doesn’t really matter when you use your second charge of Laze Target so long as it’s after your first Ambush and before the next. Its cooldown won’t begin recharging until the cooldown on the first activation completes. Please note that properly timing subsequent Laze Targets can result in a slightly shorter cooldown duration. The only time that timing is irrelevant is when you already have a charge on cooldown.
Orbital Strike is used as your first pre-cast ability because it has a 3 second delay before it actually deals its first tick of damage, enabling you to precast another ability before pulling. Most tanks are already familiar with timing the countdown with Orbital Strike, but if yours isn’t, just tell them to wait to do the countdown until after your Orbital cast has completed. You won’t be using this too often anymore in group content.
Next up you have to enter cover. You should wait to enter cover until after you cast Orbital Strike though because you don’t want to proc your relics from the passive healing from your Vital Regulators utility before you actually enter combat.
Adrenal and Target Acquired are all up next, it doesn’t matter which order these get activated in, but you just want them to all be active for Ambush since it’s such a big hit. If you have super fast APM, you can activate one of them immediately after the cast finishes on Ambush during the travel time of the blaster bolt and it will still apply the damage boost. This gives you an extra GCD on your Adrenal which can help in tight checks.
Corrosive Dart is applied prior to your first Followthrough because you only need to use Followthrough before your next ability that procs it and Corrosive Dart does not proc Followthrough. This means you can cause your very first Followthrough to tick Corrosive Dart with the Agitating Energies tactical. It’s also ideal to apply Corrosive Dart as early as possible so you can benefit from the Ranged debuff on as many attacks as possible.
Unlike most other DoTs, it does not appear that you’ll get more ticks of Corrosive Dart if you apply it during a period of increased alacrity like you’d get during Sniper Volley. I’m not sure why this is.
It really doesn’t matter when exactly Sniper Volley gets used in relation to Followthrough and the next Penetrating Blasts, though it will probably help your sanity if you keep things consistent. Personally, I wait to activate Sniper Volley until after I’ve used Followthrough.
Countermeasures is used at this point because the tank’s AoE Taunt will likely be wearing off soon, so this is when you will cause your threat drop to reduce your threat by the greatest amount.
Now we’re basically transitioning into the normal rotation once we start doing Snipe. Since Corrosive Dart has to be applied and Sniper Volley was activated, the gap in your rotation has already been used and then some, so Ambush will likely be coming off cooldown partway through your Snipe x2 grouping, which is fine.
Single-Target Rotation
In Marksmanship, you use a rotation because it is possible to use all of your core abilities on cooldown without multiple high-damage abilities being available at the same time. Rotations are usually pretty consistent, though there can be some decision-making for a few GCDs. It’s important to practice your rotation on a dummy at least until you can execute it without having to constantly look at your bar.
If there is downtime during a fight, remember that you can precast things and often place your DoTs on shortly before the boss can actually take damage. You won’t get the full damage of your DoTs but you also won’t have to spend a GCD to apply them when the boss is vulnerable, so you will end up dealing more damage.
The key to being a great DPS is to always be DPSing. Using any damaging ability is better than just standing there not doing anything. Some DPS is better than zero DPS. Even if you mess up, keep doing the rotation! Unless there’s a mechanic that prevents you from dealing damage or forces you to stop DPSing, you should not stop DPSing.
If a tank is telling you to stop DPS or hold off for a few seconds because they can’t keep aggro, don’t listen to them, they’re the one that doesn’t know the proper way to keep aggro. Tell them to git gud and read a tank guide!
Marksmanship’s rotation is basically to just cycle through 3 main groupings of abilities, all of which include a single use of Followthrough, and then there’s a single GCD gap before Ambush tends to come off cooldown. Once the boss’s health goes below 30%, a 4th grouping will emerge to overfill the gap in the rotation, causing your other abilities to get delayed. Here are the groupings:
- Ambush (with
 Zeroing Shots x2) ▶ Followthrough
 - Penetrating Blasts ▶ Followthrough
- Snipe ▶ Snipe ▶ Followthrough
- Takedown (with Finish the Job, sub-30%)
Using the Ambush and Penetrating Blasts groupings on cooldown always take priority, and then you use the Snipe x2 grouping, and then you’ll have about a 1 GCD gap before Ambush comes off cooldown.
Due to the Followthrough ability and how all the different procs and damage boosts interact, it doesn’t really help to just use all your abilities on cooldown. The spec is designed such that you use the other two groupings of abilities once each before the third becomes available again. Trying to use abilities before you have all the procs just means you’ll end up having to do more Snipes later. The typical rotation will look like this:
- Ambush
- Followthrough
- Penetrating Blasts
- Followthrough OR Takedown (with Finish the Job, sub-30%)
- Snipe
- Snipe
- Followthrough
 Gap (if applicable)
- Repeat
Sometimes you have Sniper Volley available, so the first cycle will look like this:
- Ambush
- Followthrough
- Penetrating Blasts
- Followthrough OR Takedown (with Finish the Job, sub-30%)
- Sniper Volley
- Penetrating Blasts
- Followthrough
- Snipe
- Snipe
- Followthrough
You will not have a gap in the cycle following Sniper Volley, regardless of which talent you’re taking. The cooldown reduction from the third stack of Relentless Ambush is enough to make Ambush available again following the second Penetrating Blasts, though without Zeroing Shots or the additional critical damage, there’s not much value for that third stack.
Gap Priority
(not applicable with Relentless Ambush)
- Corrosive Dart (if not present)
- Takedown
- Rifle Shot (if below 85 Energy and Adrenaline Probe is unavailable)
- Orbital Strike (for funsies)
- Snipe
 Corrosive Dart (if not present)
 Orbital Strike (for funsies)
This gap is not present if you are taking the Relentless Ambush ability tree buff. When you do Sniper Volley ▶ Penetrating Blasts ▶ Followthrough, you can treat it as if the gap just doesn’t appear; if that makes more sense.
When Sniper Volley is available, you will not see a gap in that cycle since you’ll be using Sniper Volley before you would observe it. The increased alacrity makes it so you can fit the Penetrating Blasts channel and an additional Followthrough into a similarly sized window of time, even though the gap is normally only a GCD.
You will probably still see Ambush get delayed slightly and this is fine. You can also put Sniper Volley ▶ Penetrating Blasts ▶ Followthrough at the top of the Gap priority if that makes more sense to you.
If you’re taking Orbital Strike, you can cast it in AoE situations if at least 2 enemies will get hit by at least one tick and at least one enemy gets hit by every single tick. This needs to happen or you will deal less DPS than if you just casted one Snipe. Much like Sniper Volley, the gap will not appear when Orbital Strike is used. It’s the same situation if Corrosive Dart needs to be applied.
Much like what has to happen with Sniper Volley, you can leverage the existence of the gap to not delay your high priority abilities by using a non-rotational ability earlier than you would observe the gap.
You can use a non-rotational ability as soon as you finish channeling Penetrating Blasts even before using that accompanying Followthrough since you have a 5s window to use Followthrough. You can also use any non-damaging ability between the 2 Snipes, including ones on the GCD like Diversion.
You can still use non-rotational abilities that are on the GCD even before it’s time for the Snipe grouping, though it’s less ideal since the gap will get moved for the next cycle to before Penetrating Blasts instead. This will be fixed the next time you use Sniper Volley though.
Solo Content Combos
I think it makes the most sense to think about Marksmanship’s solo content capabilities in terms of the different ability sequences you can do since your most powerful abilities can have their cooldowns reset. Against stronger enemies on higher-level planets, you will need to chain these sequences together, meaning you have to put some thought into how to approach a given trash mob in order to maximize the amount of damage dealt.
Finishers: Ambush and Takedown Spam
- Enter Cover
- Laze Target ► Ambush
- Followthrough or Takedown (if necessary)
The cooldowns on Ambush and Laze Target are reset if you defeat whatever you hit with it within 3s (so 2 attacks if you’re fast) so long as Ambush critically hit, and it will autocrit if you use Laze Target.
Conversely, Takedown’s cooldown is only reset if your target is defeated specifically by Takedown, there’s no wiggle room. You will typically only need to use Takedown on max-level planets due to the absence of level sync. You can use Followthrough instead of Takedown as well, though Takedown hits harder and gives a damage boost, but Followthrough feels more fluid to use because you don’t need to wait for Ambush to land.
I recommend only using this combo if the enemy has less than ~100k HP. Otherwise, you won’t deal enough damage to finish them off and won’t get those juicy cooldown resets.
Sustained AoE: Penetrating Blasts and Followthrough
- Enter Cover
- Orbital Strike (pre-cast, if necessary)
- Penetrating Blasts
- Followthrough
- Takedown
- Sniper Volley (if necessary)
- Penetrating Blasts (if necessary)
- Followthrough (if necessary)
Against higher-HP enemies like you’ll find in heroics, you’ll need to use Penetrating Blasts and Followthrough to deal damage to multiple targets at the same time. These abilities deal AoE damage because of the Refraction Point tactical, though Followthrough only deals AoE damage if you manage to finish the channel on Penetrating Blasts and get the Refraction Point proc.
In other words, not every Followthrough will deal AoE damage. Keep in mind that a single channel of Penetrating Blasts + Followthrough is typically enough to defeat most normal enemies, with the damage being heavily weighted toward Penetrating Blasts
Be careful to fire both at the enemy with the highest HP that is located closest to the center of the group. If you hit an enemy towards the edge of the group, you won’t hit everything. If you hit an enemy with too little HP, the channel will get interrupted and you’ll miss out on dealing AoE damage with the final tick(s) of Penetrating Blasts and Followthrough.
If you’re using Orbital Strike, make sure you’re targeting a Strong or Elite (Silver or Gold) enemy or your target will die before the channel on Penetrating Blasts finishes.
Then, you spam Takedown to finish off stragglers and can also use Sniper Volley to reset the cooldown on Penetrating Blasts if multiple enemies still have a lot of HP left. Remember, Takedown only gets reset if you defeat your target with it, so if you aren’t sure if it’ll work, hit something else.
Fillers
If Ambush, Takedown, and/or Penetrating Blasts are unavailable or won’t be off cooldown in time for when you’d need to use them, you have some fillers at your disposal to help whittle down your opponents.
- Corrosive Dart (DoT)
- Snipe ► Snipe ► Followthrough
- Suppressive Fire
 Suppressive Fire
You shouldn’t need to use Suppressive Fire all that often unless you mess up, but you will need to incorporate Corrosive Dart, Snipe, and single-target Followthroughs against stronger enemies, particularly Elites (gold enemies).
Each Snipe makes your next Followthrough deal more damage and reduces the cast time on Ambush and 2 activations back-to-back will reset the cooldown on Followthrough and enable its use. If your target still has a lot of HP, you should be able to throw in an Ambush and Penetrating Shots as well, though only use Laze Target if you have a spare charge for the finisher.