Detailed guide to the final boss in Gods from the Machine Operation on Iokath in Veteran Mode. The fight is quite long and involves several phases with interesting and different mechanics
This guide is written by Rugles
It is posted here with the permission of the Author
PERSPECTIVE AND EXPLANATION
The strategies shown in this guide are the ones used by the Aeon team to get their week 1 kill of Izax HM. This fight is intricate and there are multiple ways to solve the puzzles presented to the team, so this document is not intended to be a comprehensive guide on all strategies that could be used on this fight. Some alternate strategies may be explained in the guide – but many others will likely be missed. Part of the problem with writing a guide week-1 of the boss is that many other strategies may come out that could make the fight much simpler. This guide is just one way to approach the fight, it is not intended to be a step-by-step path to get through. The most notable deficiency is a lack of debuff and buff screenshots with full descriptions. This guide is intended to help teams progress on Izax VM on the first month of his release (between 5.8 and 5.9), so some expediency was needed in releasing a guide.
If you have questions about the guide or questions about strategies in the guide, my main guild is Lightning Masters on Satele Shan and I go by the name “Rugles”. Feel free to contact myself or Process – an admin in Aeon on Satele Shan – with questions about mechanics throughout the fight. The Aeon prog team was Axomm, Yam, Process, Slice, Muha, Nox, Spooky, Iron, Tru, and Rugles.
It’s a great fight and we hope that this guide can serve to help various teams progress through the fight.
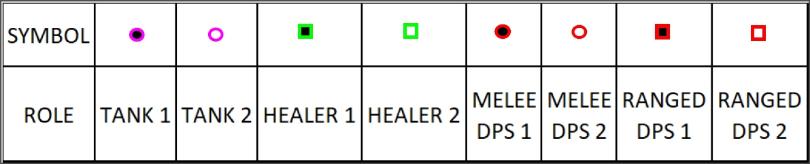
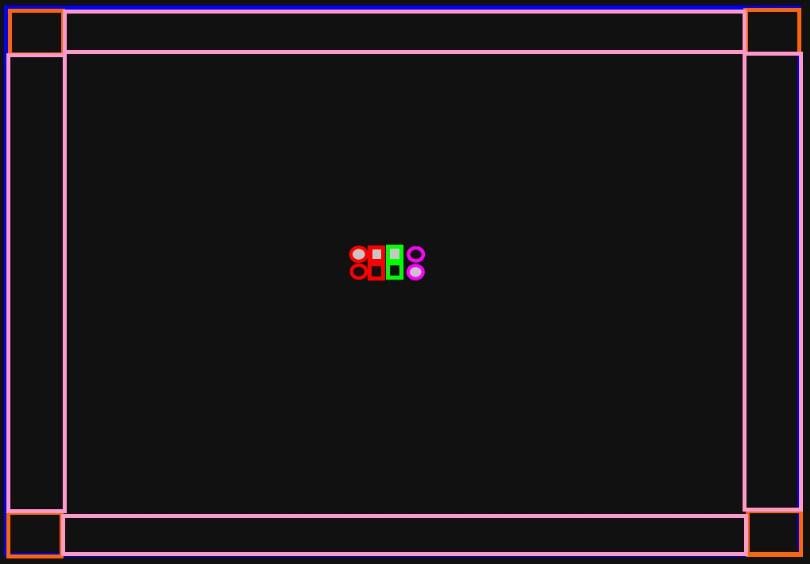
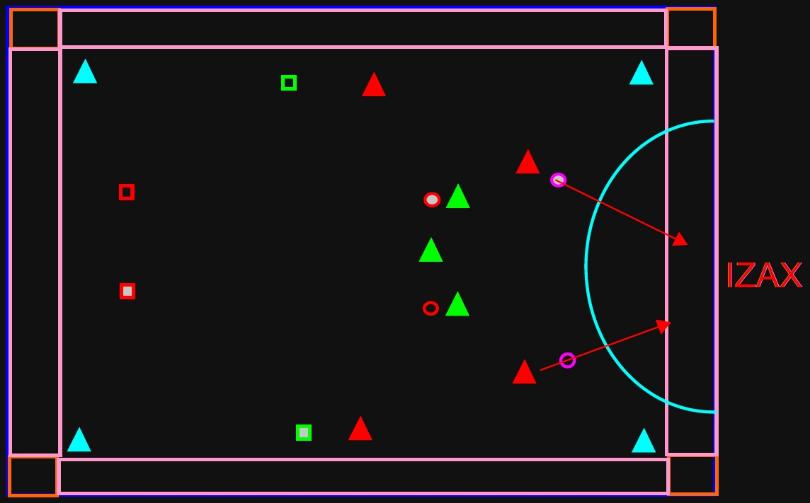
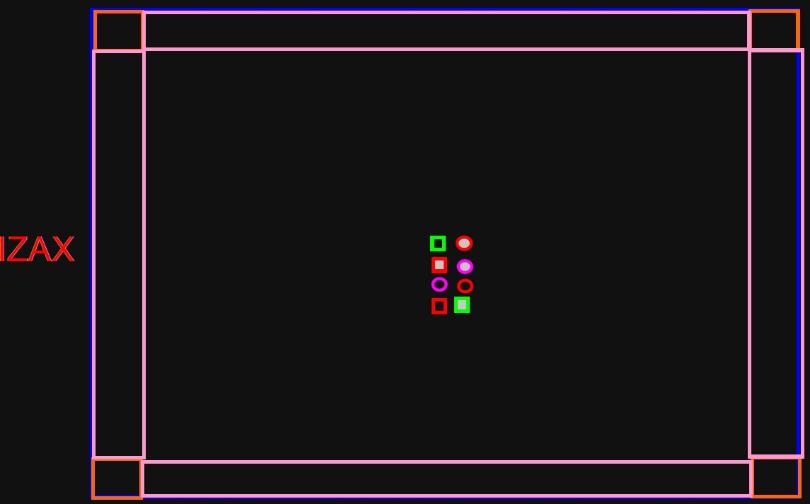
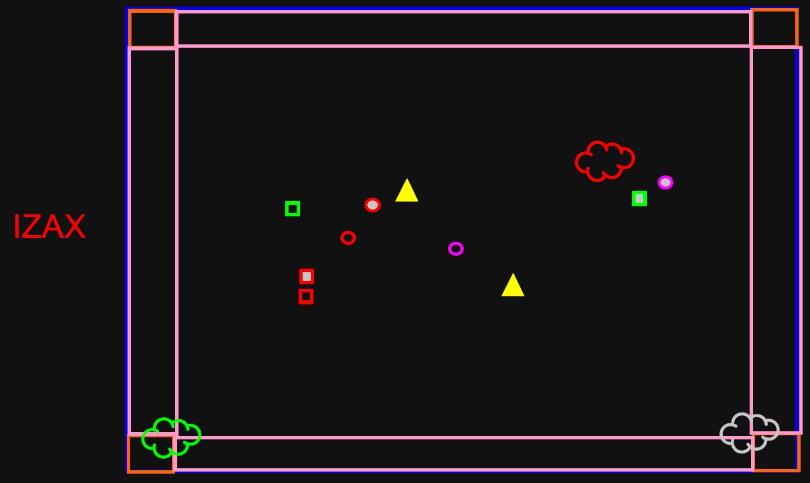
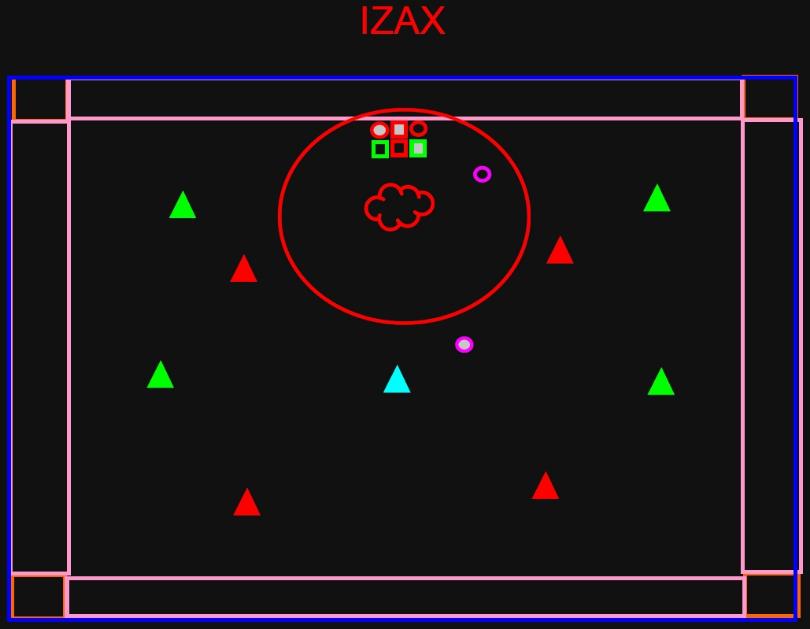
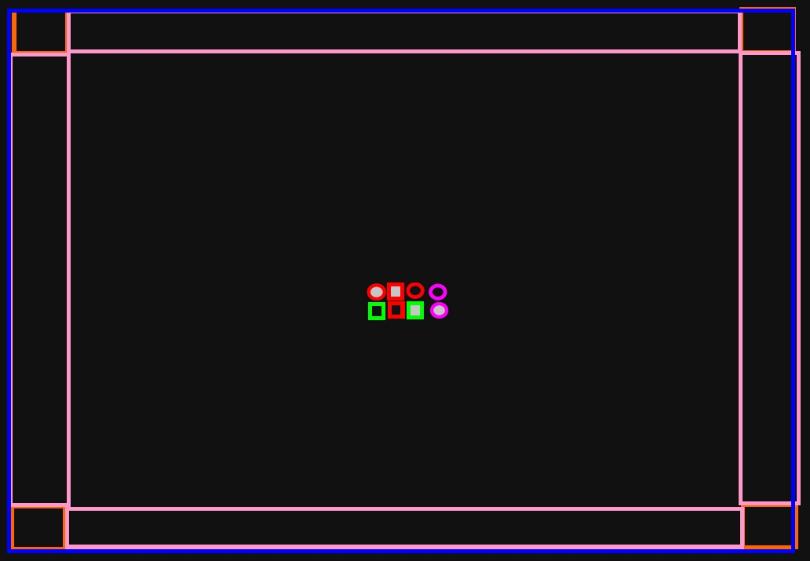
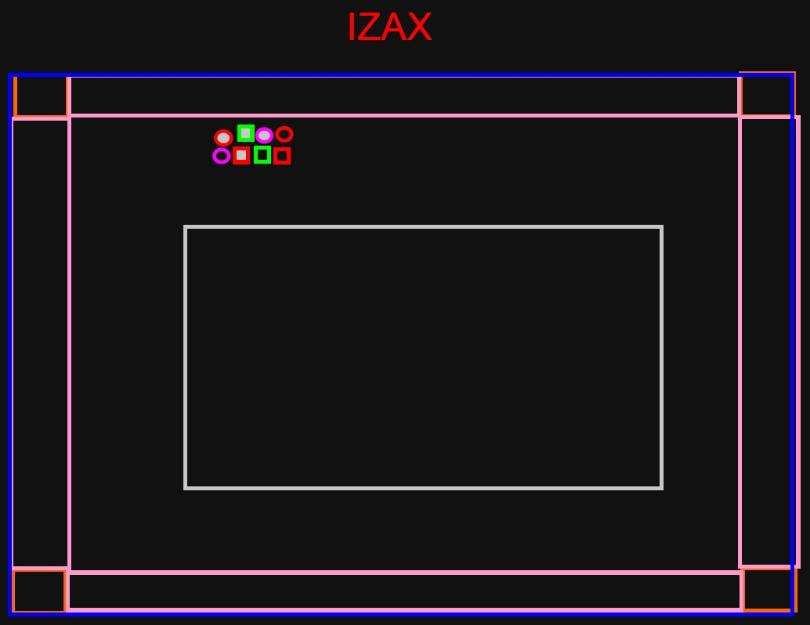
Symbols for player roles:
Symbols for NPCs:


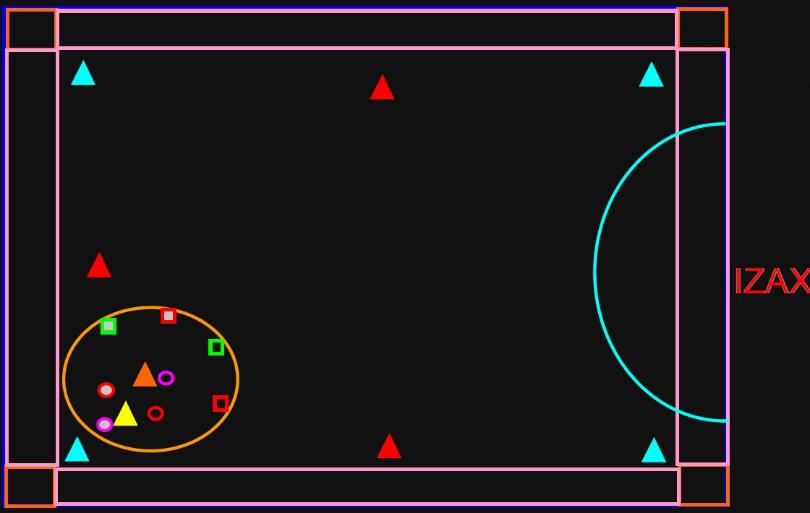
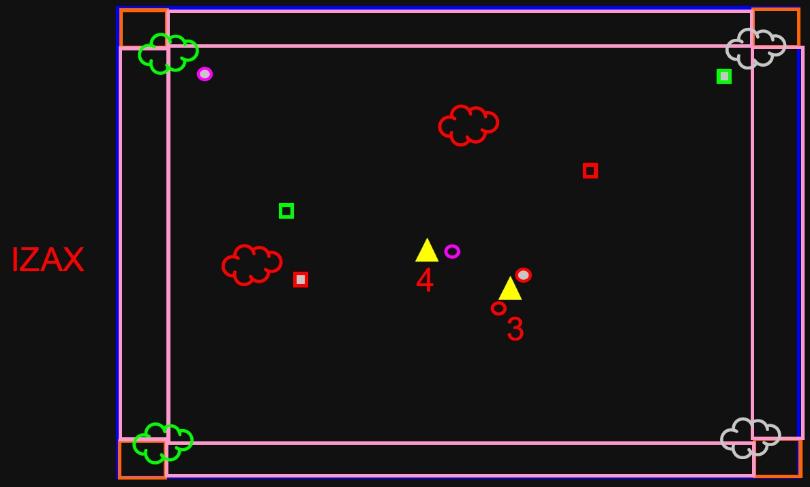
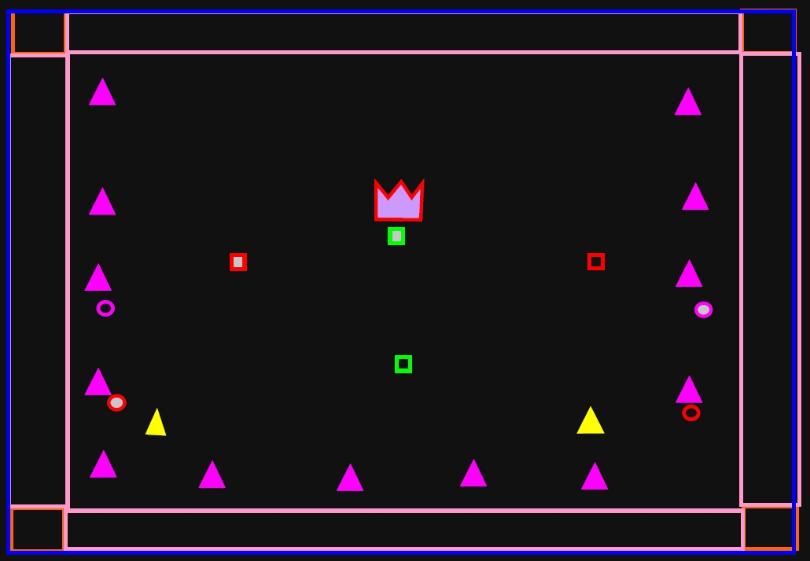
PHASE 1
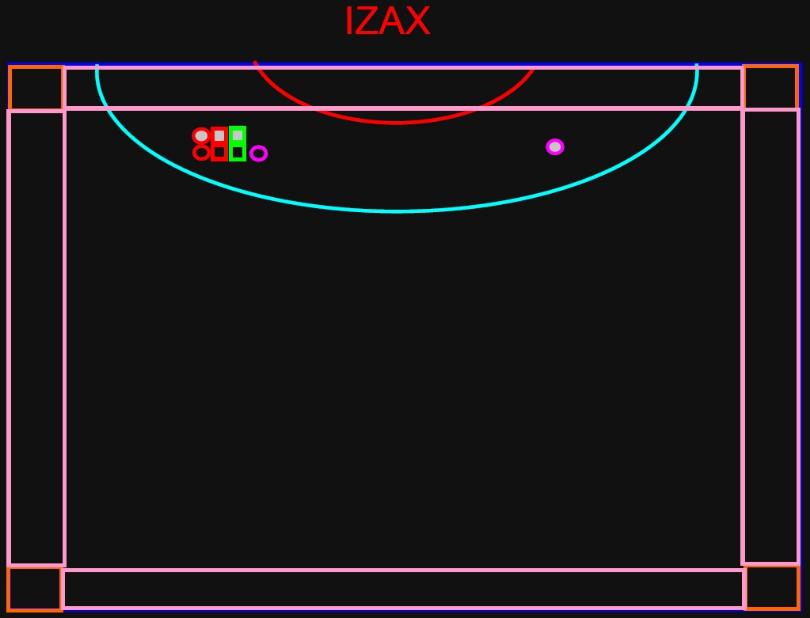
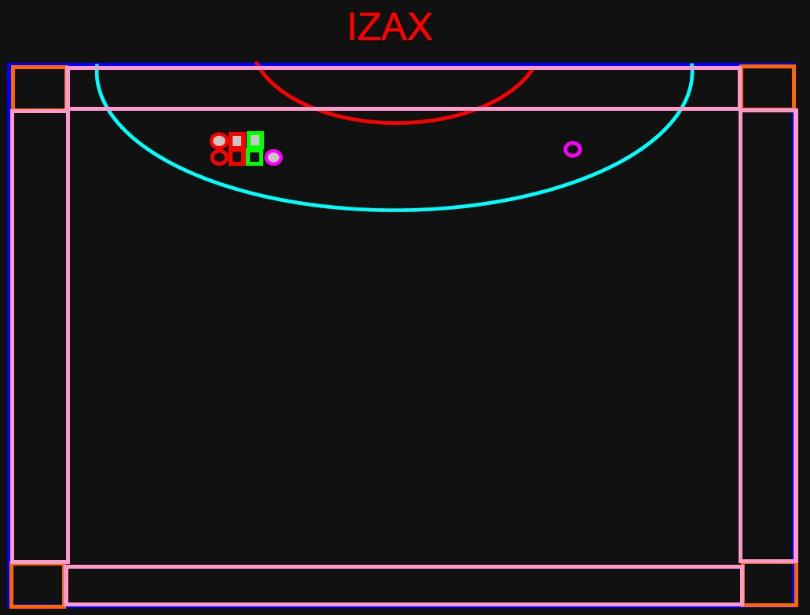
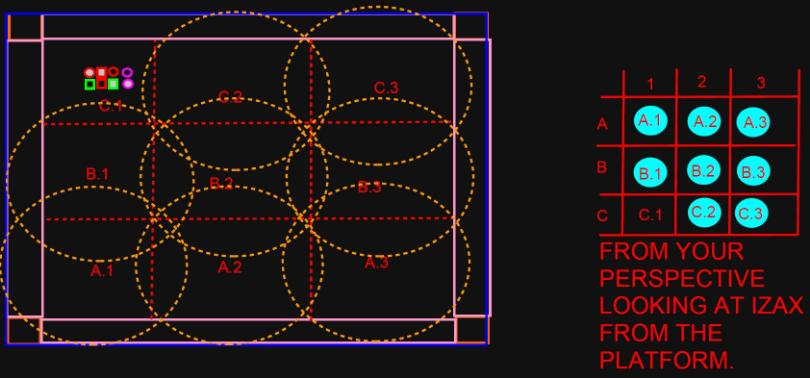
The fight begins with the group stacked except for one tank. The boss has an extremely small hitbox at the center of the ellipses shown above. The boss can be hit by melee attacks in normal range, but if the group is attempting to receive rebounders for the first swipe, they need to be within 5m of the center of the boss’ hitbox. This area is blocked off by the yellow aoe that is put down by the boss. This aoe stacks damage on the player, though it has no other effect than increasing damage from that puddle.
Tanks should swap positions in order to reduce the number of swipes on the entire group. He swipes the side that he is aggro’ed to. He does not alternate sides unless the two tanks are standing on opposite sides taunt swapping. There are a few strategies to alternating swipes in this phase:
- Static tank swapping – tanks simply taunt back and forth swapping stacks.We think this is a bad idea because the group takes ~70% damage and overstresses the healers and keeps them from being able to dps.
- Tanks develop a moving pattern that allows them to not receive more than one stack as well as minimizing swipes on the group. My team generally used this pattern: 2 right, 1 left (group), 1 right, pound, 2 right, induction, 1 left, return fire, 2 right, 1 left, 1 right.
- Tanks can “cheese” swipes by standing in the puddle in the middle. The swipe AOE is clearly outside of the puddle, so if a tank wants to cheese a stack, simply taunt the boss onto their side and walk into the puddle as the swipe is going out. This can be done so that tanks only take 1 stack of the debuff applied by the puddle.
As a side note for tanks: the boss will swipe on whichever side the tank taunts, so the tank must set up positioning before the taunt in order to achieve correct swipe placement. Reaching two stacks will kill the player regardless of defensives. This phase is a parse for DPS except for “induction”. induction is a pulsing AOE that lasts ~4 seconds and does similar damage to similar to the 3 stack swirlies from NiM TFB. this person will need to be focus healed as well as using a defensive to keep from dying. This is an energy-based AOE attack – some defensives that are useful for it are entrench, energy shield, kolto overload, force camouflage, force speed, undying. These types of defensives should be used every time. Sometimes (about 2 times in ~4.5 hours of progression) I would use a tank adrenal as a merc dps to mitigate damage if I was far away from healers and did not have any other defensives.
While induction is damaging you, you do no damage, but after the ability falls off, you receive a red buff that allows you to do 2x damage for 4 seconds, use this time for some burst. It is common to precast at the end of induction in order to get full uptime on the dps buff. I use the dps nerf time to offheal (merc / sorc), build stacks, or proc an autocrit. Do not be a potato and burst into the
boss’ DR.
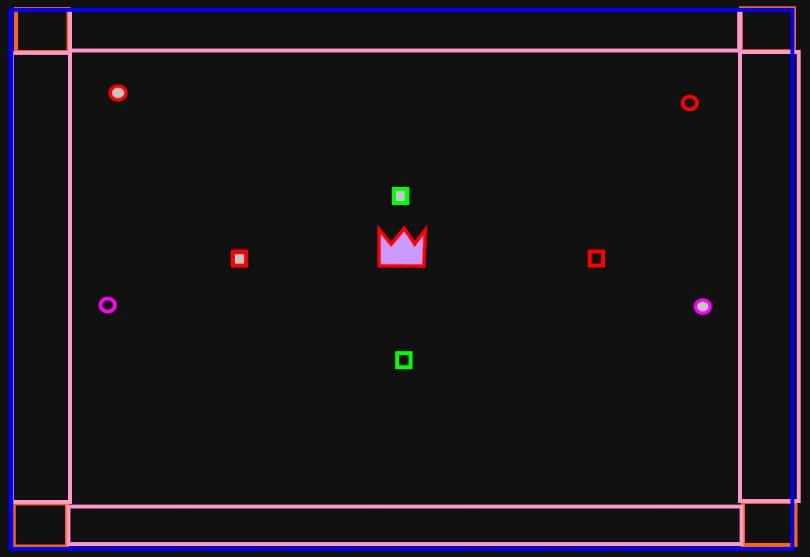
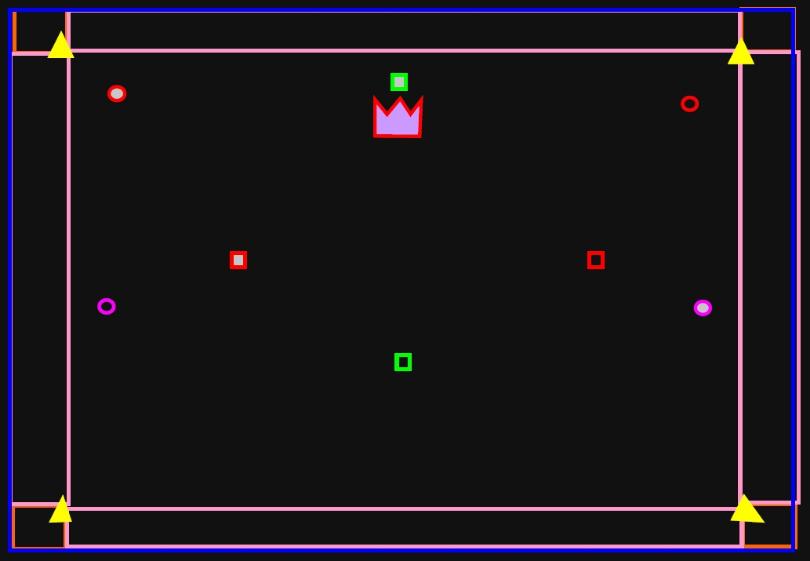
At the end of phase 1 the boss does a cast that kicks you out. If someone has induction, they should position themselves to get knocked into the pillar to the left (while facing the boss) from center of room. The group should be knocked into the room, and the other tank should be knocked into the room.
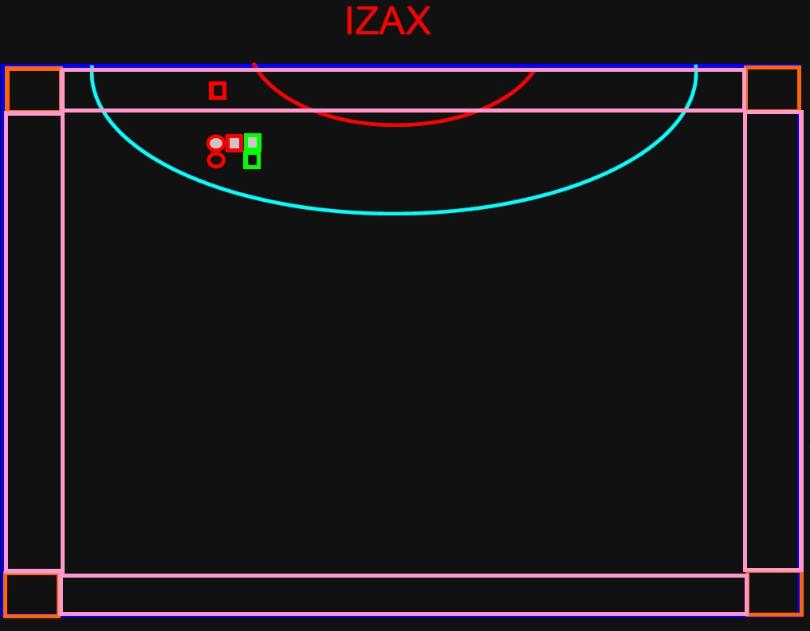
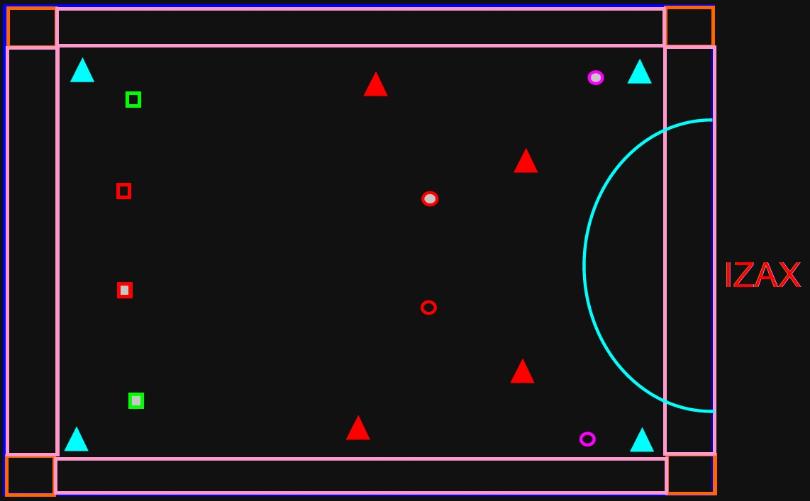
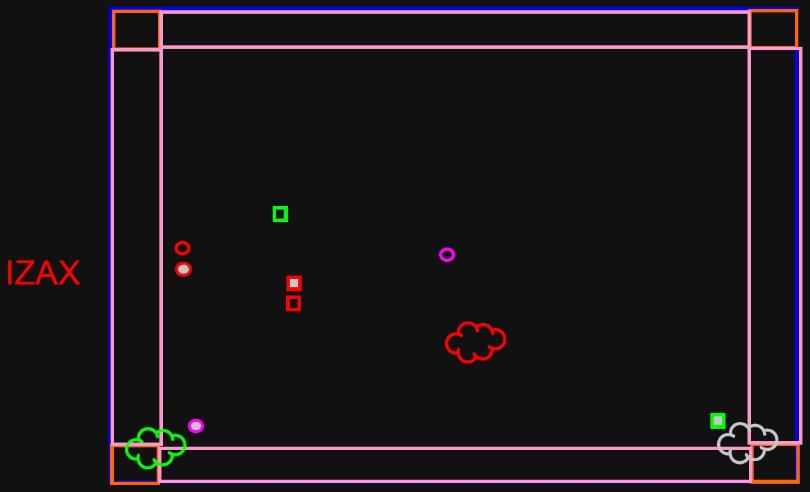
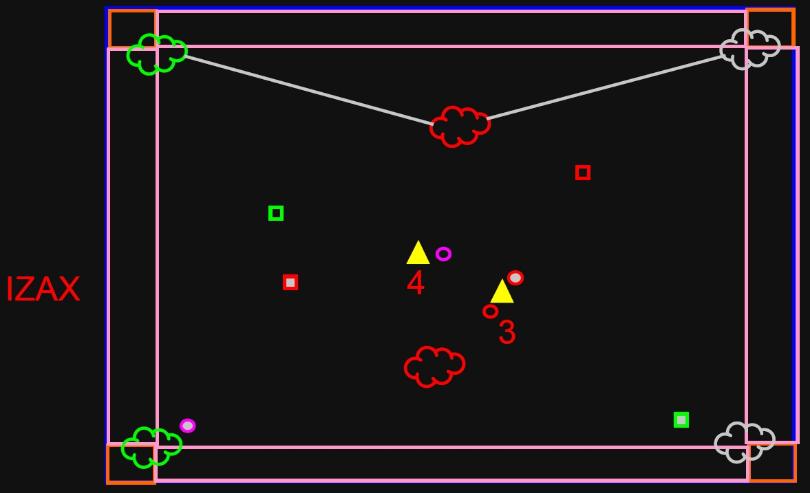
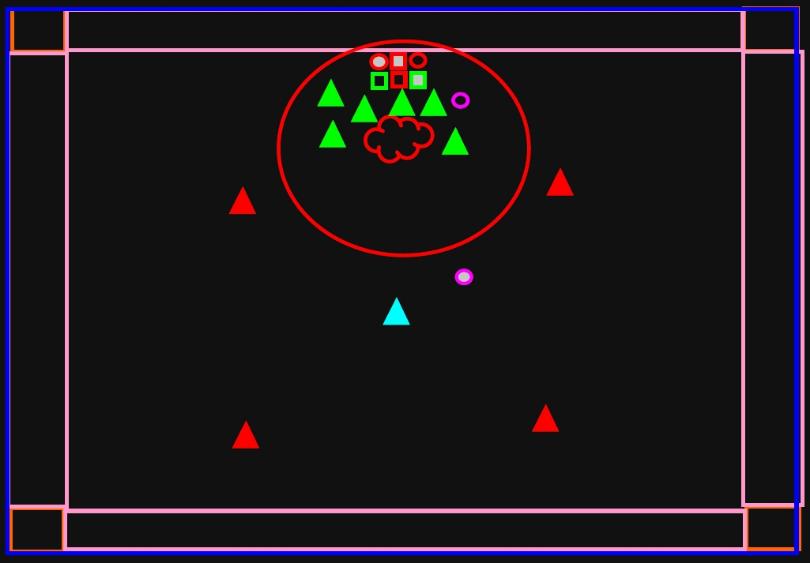
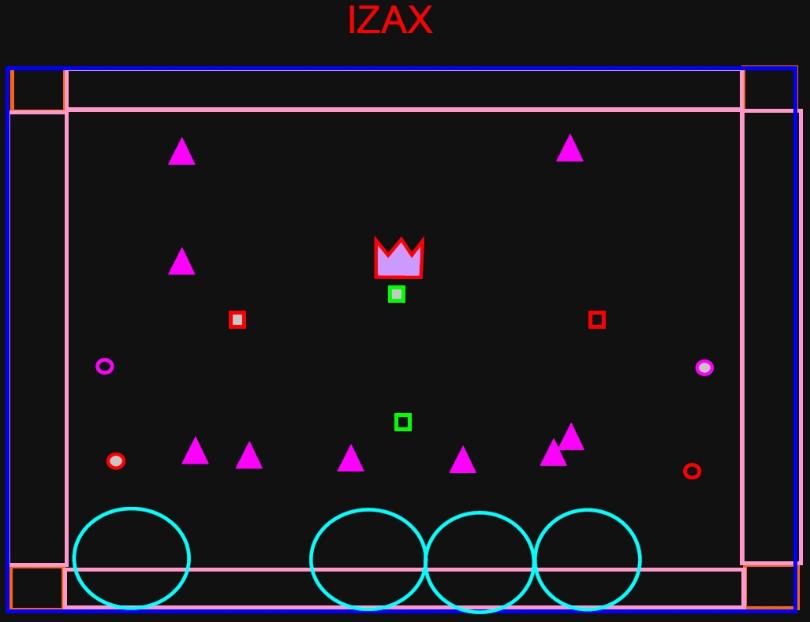
PHASE 2
First and foremost: Phase 2 is very difficult to heal even when it is being executed well, so do not be lazy about using defensives.

At first, you have about 5-10 seconds of downtime to heal, offheal, build stacks, etc. The boss will have dropped below the platform. Team should move towards center to position themselves to respond to circles.
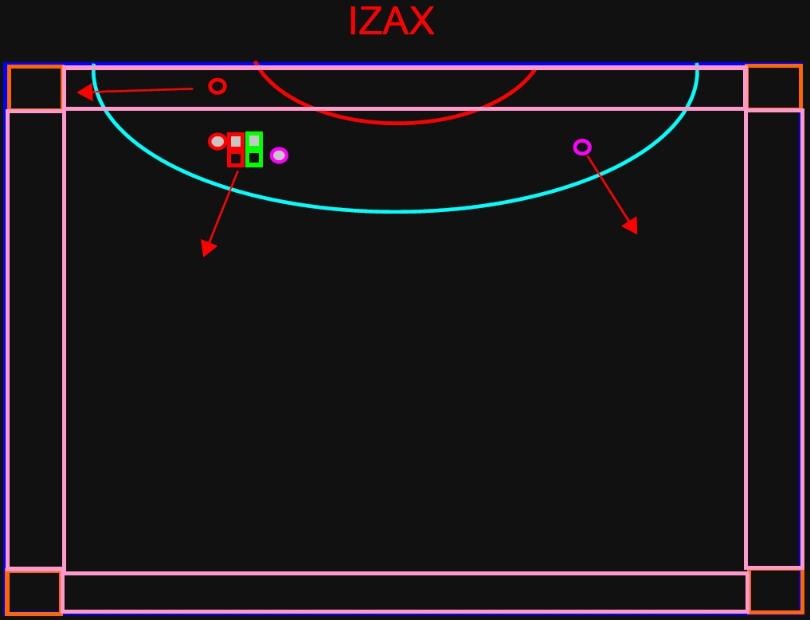
This phase repeats in the following order:
- Circles and Adds spawn
- Boss Shield drops down
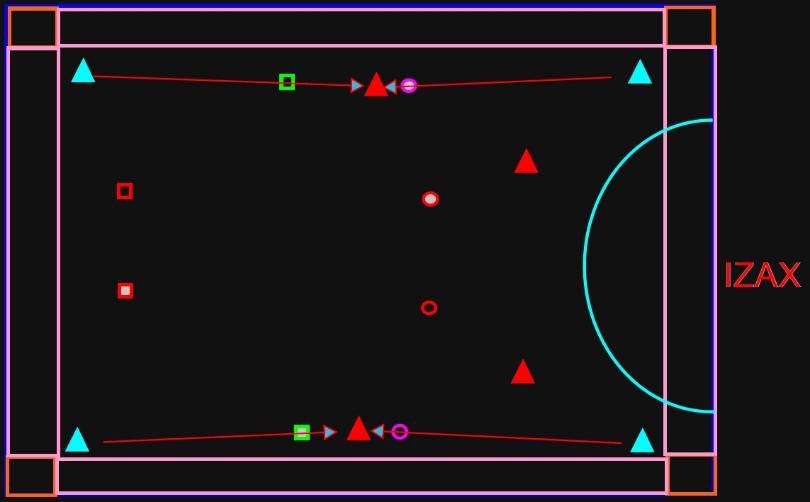
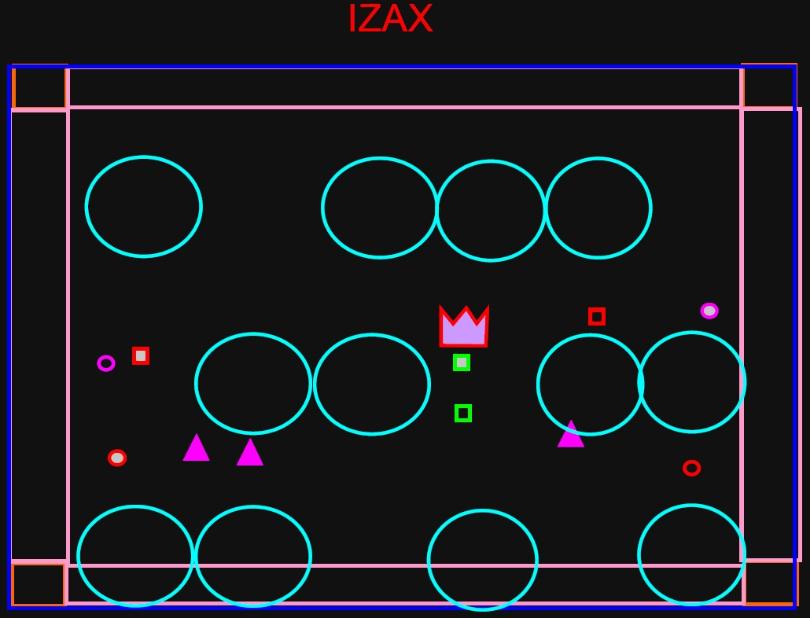
Two circles will show up and get progressively smaller. A lot of adds spawn in when the center circle converges. The team should spread in the following manner:
- Tank 1: Go to where the tether droid spawns, do any AOE attack as soon as it spawns, it is your job to take the stun.
- Tank 2: Attach the tether droid and the anchor droid with DPS.
- MDPS: Be close enough to damage the tether droid, but do not damage it before the tank gets the stun from the tether droid. Kill the tether droid and then move on to the anchor droid.
- RDPS: Position yourselves on the outer ring of the anchor droid, beams will be randomly aggro’d to you and you don’t want to cleave the group. Similarly wait for tank to get tethered.
- Healers: Similar to RDPS, stand on outside of the ring and heal / offDPS. As soon as the circle converges lots of adds spawn.
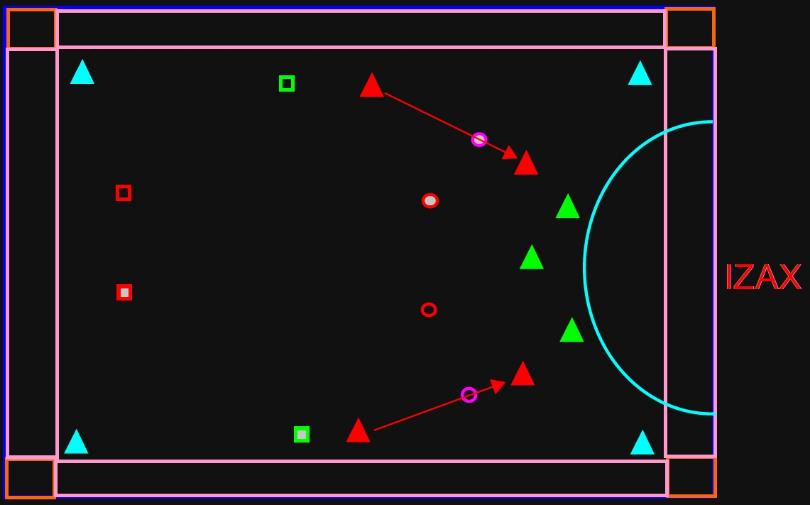
DPS priority:
- Burn tether droid (should take 3-4 gcds)
- Burn anchor anchor droid (should take ~10 gcds) When burning anchor, a large missile will begin to be fired on the group – it is imperative to be outside of this because it does ~60-80% damage. If the anchor is alive, it will pull you back inside of the missile radius. Once you kill the anchor, the missile does not explode on the area.
Rdps and healers: when burning anchor, look to see where the boss is at (he moves to different edges and you need to assign dps / heal locations based on the boss’ position) and position yourself so that you are ready to aggro your assigned energy sphere and aim it towards the center of the platform. It should take you ~3 gcds to pick up your add – healers may need less. Aim your energy sphere at the amplifier droid that the tank takes to the middle of the room. Dps hull cutter droids. The amplifier droid need 3 beams in quick succession to shoot the boss and break the shield.
The tank will need a tether – these are dropped by tether droids. If anyone other than the tank picks up the tether, you must pass it to the tank.
Once you beam the boss, the shield drops and all the adds except for the hull cutter droids. This is the only time you can dps the boss. You have about 10-15 seconds to dps the boss until he reshields. After the boss re-shields, he knocks the team out into the middle of the room and drops below the platform.
You now have 10 seconds to heal up, kill the remaining hull cutter droids, re-position for the next set of droids.
Rinse and repeat until you are able to dps the boss down to 79%, then you push into phase 3. Our team takes 3 shields to push the phase. Phase 2 is a moderately high healing check – similar to 1st floor of Revan HM. The tether droid and anchor droid dps is also a moderately high burst dps check comparable to Brontes manifestation burn during the end of NiM Council in DP.
ROLES IN THIS PHASE
Tank 1: Tether an amplifier droid and take it to middle. Adjust the other amplifier droid out of the way of the other healer’s energy sphere. You need to maintain aggro on the boss. You will be dropping blue circles that will put out damage similar to trail of agony in Revan HM. It is your job to count off how many beam hits you’re getting on the amplifier droid – these are displayed in the amplifier droid’s debuff bar. Position yourself between the amplifier droid and the boss. The tank must maintain aggro on the amplifier droid. this normally requires more than a simple taunt.
When you interrupt the cast of the amplifier droid, it forces the discharge from the amplifier droid to run linearly along the ground – allowing the tank to avoid damage from the amplifier droid. This attack (whether interrupted or not) discharges the stacks from the amplifier into one large beam. This beam breaks the boss’ shield at 3 or 4 stacks. If the amplifier receives 5 stacks, it explodes. 3 stacks breaks shield and damages boss, 4 stacks does additional damage to the boss.
MDPS: Kill hull cutter droids and avoid damage. Do not get too close to Tank 1.
Tank 2: Grab the other amplifier droids on the side of the map and from in front of the healer’s energy sphere. Direct this damage away from the group. You will need to maintain 1st or 2nd highest aggro on the boss so that you will also be kiting trail, keep it away from the group.
Everyone: Bear in mind that amplifiers can be charged by energy spheres and discharged into other amplifiers which continues to increase their stacks – 1 per amplifier. There will also be smaller missiles (similar to the missile at the anchor droid) that will show up on the map and allow you ~5 seconds to move. If you are damaged
by these, you will receive a debuff named “adaptive shrapnel” that will increase the amount of damage you take from all sources.


ADS DESCRIPTION
- Tether droids (yellow triangle) – these aggro to someone and chain stun them – when they spawn in groups, it is best to gang these all up on the offtank so that dps can focus them down. Note that when their cast ends they immediately begin another cast and target swap to person with highest aggro. These adds have a small amount of health and should die in ~15 total dps gcds. When the tether droid is killed, they drop a “tether” that can be picked up and used to execute mechanics throughout the rest of the fight.
- Anchor droids (orange triangle) – only really happens in phase 2 – they pull you into an area until they’re dead. Can be knocked around (particularly nice if you knock them off the platform).
- Energy sphere (light blue triangle) – emit a linear aoe along the ground that can be used to charge amplifier droids. If positioned correctly, only one player will be cleaved by each of these adds. The dtps from them is fairly low, they only fire every 8 seconds.
- Makeshift amplifier droids (red triangle) – amplify charges received from energy spheres. These guys can be interrupted to force their shot into whatever direction they are currently pointing. In Phase 4 they are used to charge the augment droid and remove armor from izax.
- Hull cutter droids (green triangle) – these droids do ~7k dps. They have a decent amount of health and have 90% damage reduction to aoe attacks. It is important to single target these adds down quickly.
ALTERNATIVE STRATEGIES
Phase 2 will likely be the phase with most variability between groups. It is possible to use an energy drone to shoot an amplifier droid (1st amplifier at 2-stacks) and shoot the 2-stack amplifier droid into another amplifier droid (3-stack) and then hit the boss with this. It is possible for one tank to do this mechanic alone. It is also possible to have both tanks attempt the mechanic on the front energy drones so if one of them makes a mistake, the other tank will likely succeed. Rdps or healers can be assigned to the back energy drones in order to amplify one of these amplifier droids in an attempt to get a 4-stack into the boss.
This strategy gives mdps much more room to work with because they do not have to avoid tank cleave from the circles dropping from Izax or the beams being fired from the amplifier droids.
There are likely other strategies you can come up with here – it’s a fun phase, experiment.
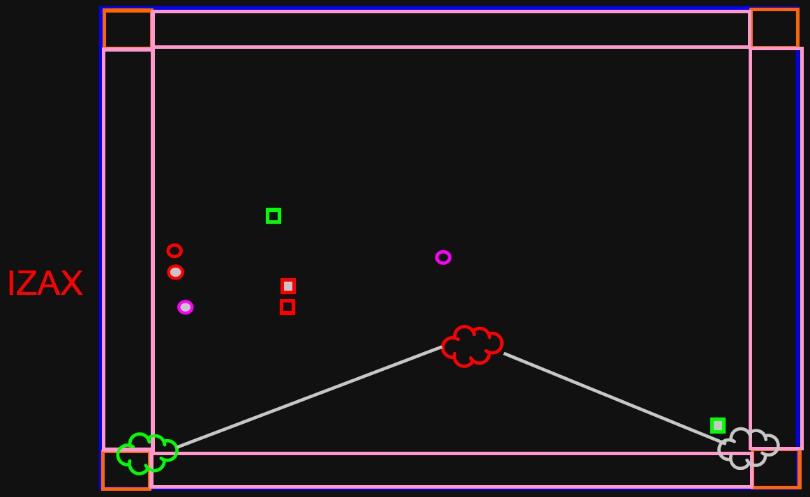
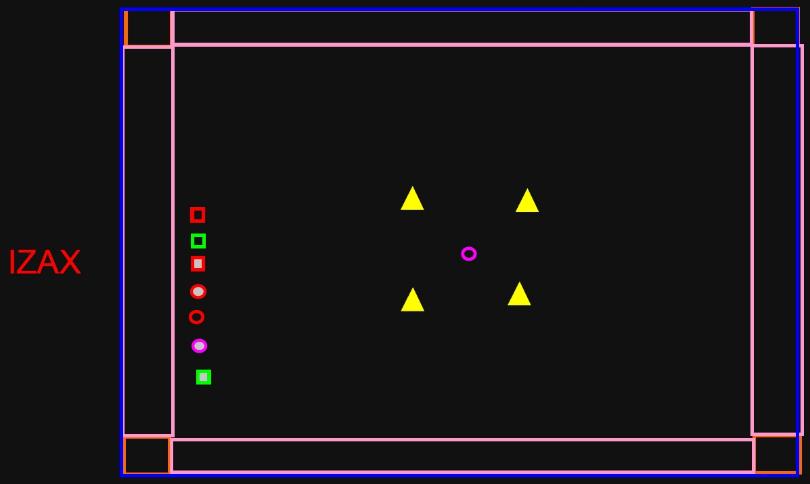
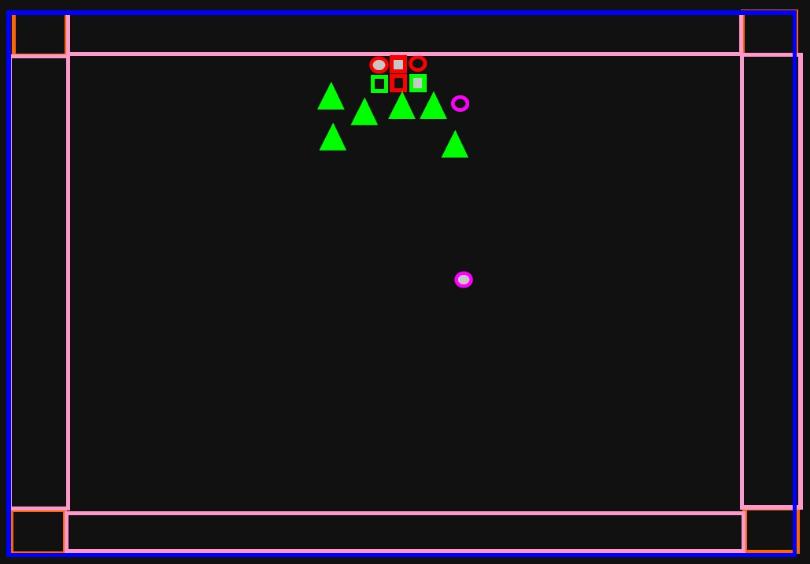
PHASE 3
When you push the boss to 79%, the boss does another knockback and drops below platform. There are no circles that spawn. You have about 10 seconds to prep for a large group-wide nuke. All players should be healed to full and should stack in the middle. The boss reappears and shoots an omni cannon at you – it’s a casted ability and does pure damage. Defensives will not mitigate any damage. He hits you with a series very large hits that take up a total of 70% of your health each. Dps and healers should move towards the boss and begin to dps his shield down. You will likely only get 3-5 gcds off before the tether droids spawn.
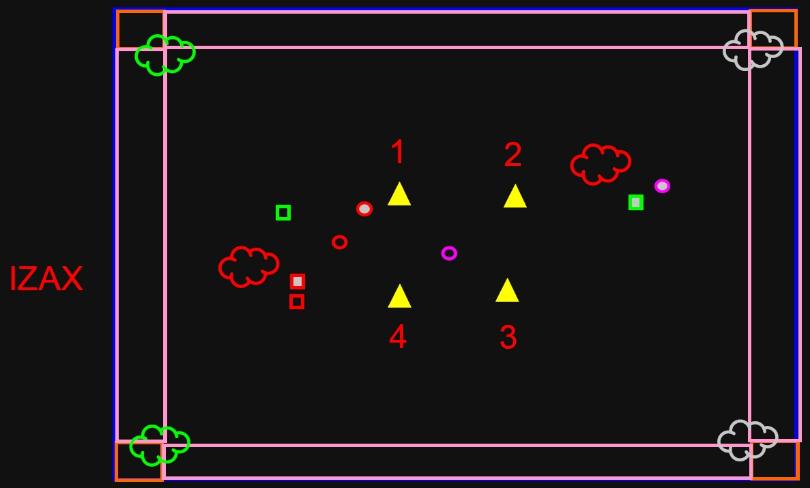
Immediately after the omni-cannon, two tether droids spawn. The off-tank can aoe taunt to receive the stuns.
All other players must be on the outside ring to avoid getting leashed. Dps should focus down the leashing sequentially. My group starts with the closest add and goes clockwise to clear the rest of them. The merc healer in our group likes to aggro these and use reflect – but this can become problematic if induction is going out and there is only one healer to keep that person alive.

Once the tether droids have been killed, the two people executing mechanics in next step of phase 3 will need to pick up the tethers dropped by the dead tether droids. This phase is a parse / interrupt phase similar to the ciphas shield in the dread guards fight in TFB.
- Dps Izax until his shield drops – you will know the shield has dropped by your ability to execute interrupts on his casts.
- Coordinate the dps and tanks to interrupt his “charge omnicannon” channels. In the first phase, each channel adds 2 stacks onto his omnicannon charge buff. Once this buff reaches 100, he will release the charges and wipe the group.
- Izax will reshield, but will not knock the team out – continue dpsing the boss until his shield breaks again. The team should keep an eye on omnicannon stacks.
- Repeat steps 1-3 until izax has ~80 stacks. At this point, one of the healers should channel the bomb on a pylon. This will zap the boss, do ~4% health damage to the boss, and reset his omnicannon stacks.
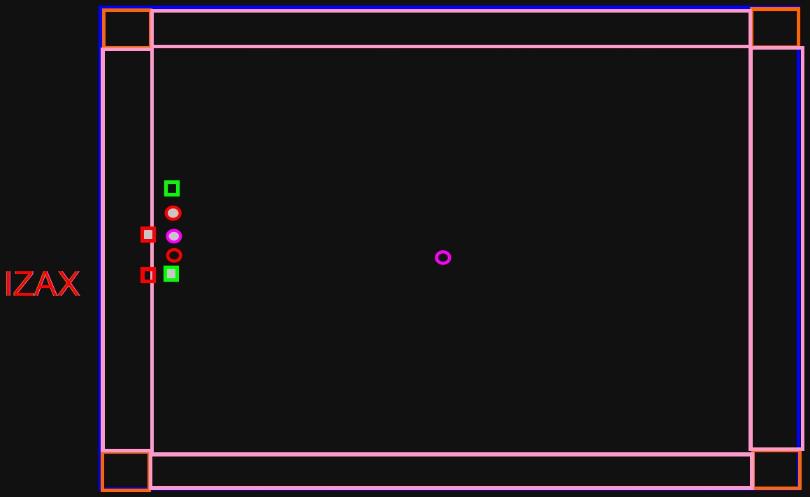
The second step of phase 3 is very similar to the first step for all dps, tank 2, and healer 2. Tank 1 and healer 1 will have to execute an additional mechanic. Three new “allied” adds spawn named “unpowered bypass conduit”, “connector droid”, and “bypass conduit”.
The unpowered bypass conduit will spawn on one of the pylons on the corner of the map. A bypass conduit will spawn on another pylon adjacent to the first. The connector droid will spawn somewhere in the room. Tank 1 and healer 1 will need to use the tethers dropped by the tether droids in the previous phase to line upthis connector droid between the two pylons and finally use their tether to bind the connector droid to a bypass conduit.
A word of caution: induction cascade will continue going out during this phase and dps must be aware of their debuffs and use defensives accordingly. Two team members should pick up the tethers dropped by the tether droids and hold them – they will be needed shortly.
After connecting the conduits via the connector droid, the tank and healer will lose their tethers and will need new tethers from the previous two tether droids the team killed while tank 1 and healer 1 were executing the conduit mechanic. The two team members that collected these should pass them to tank 1 and healer 1. The tank should jump into the interrupt / dps rotation on the boss.
A shiny button will appear on one of the pylons. This is the same bomb that showed up on the previous iteration of phase 1. It is important for healer 1 (we normally use a sorcerer healer to use their phase walk for this) to begin the channel on the bomb when the boss is at ~80 stacks.
The third step of phase 3 continues in the steps of the previous phases with adding one mechanic per step. Instead of 2 tether droids, now 4 spawn.
The tank is able to take the stun from all 4 tether droids if they use an aoe taunt. It is now actually important for dps to rotate through the tether droids to try to focus each one down individually. The chain will break from the offtank and instantly attach to the next highest threat.
Two sets of conduit adds spawn and must be taken care of by tank 1 and healer 1.

Two bombs will also become visible on the pylons. These do not have to be activated at the same time, you may activate them independently of one another. Channeling the second bomb will force the boss to push to the fourth step of phase 3.
Our group sometimes prefers to push the bomb once the boss is at 65% so that we can get another group of tethers for use in phase 4. If you use the bombs at 65% of the boss’ health, you will have the ability to push his health down to 59% at the next step.
After you use the bomb at step 3, the floor on the perimeter (between the pylons on the outer ring) becomes electrified. This will do ticks of ~20k damage and qualifies as “stupid”…do not stand in it. Four tether droids spawn, but no connector droids spawn. Kill the tether droids and dps the boss down to push to the next phase.

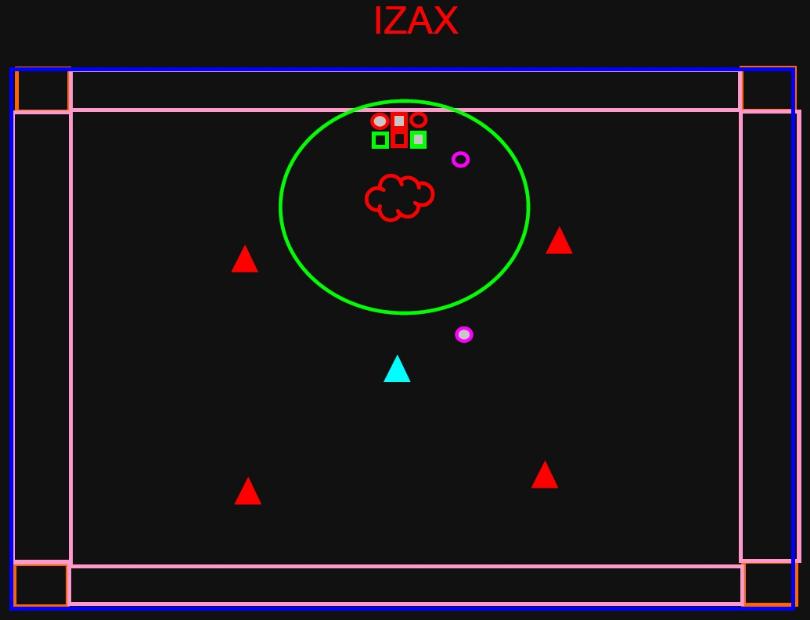
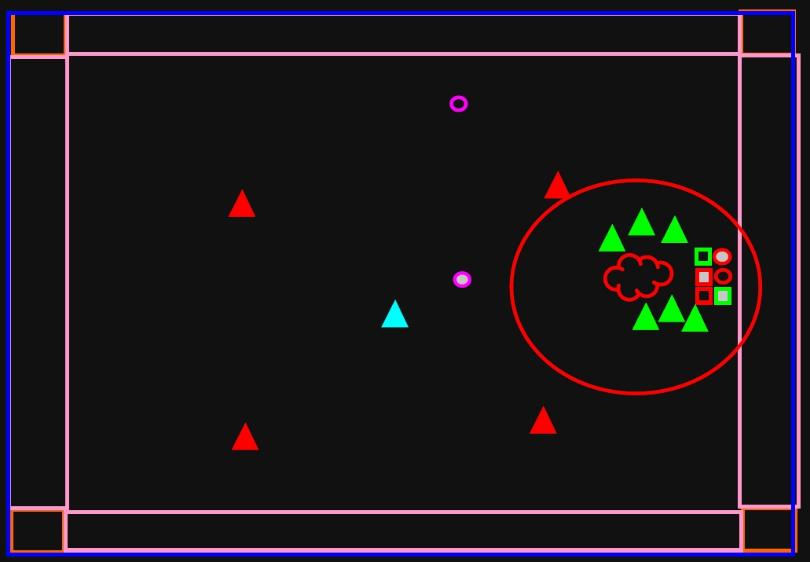
PHASE 4
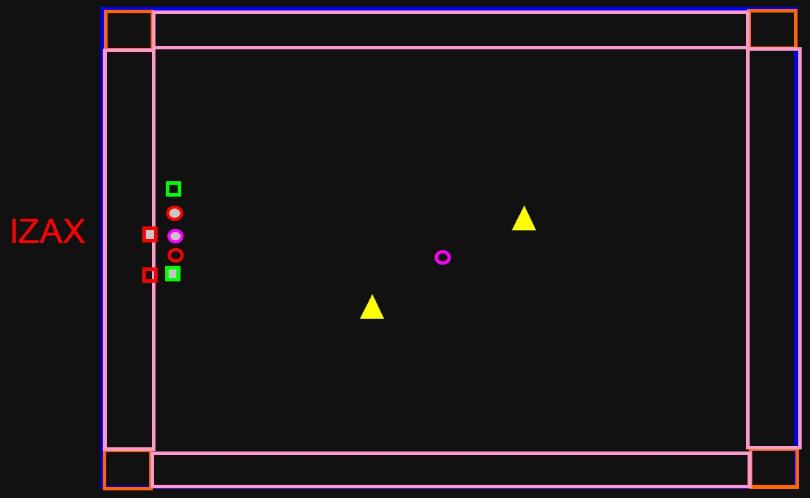
At the beginning of phase 4, 1 energy sphere spawns, 4 amplifier droids spawn, and 1 augment droid spawns i will give a recap of these adds and a description of the augment droid here.
- Energy sphere (light blue triangle) – emit a linear aoe along the ground that can be blocked with another add. If positioned correctly, only one player will be cleaved by each of these adds. The dtps from them is fairly low, they only fire every 8 seconds.
- Makeshift amplifier droids (red triangle) – amplify charges received from energy spheres. These guys can be interrupted to discharge their stacks into one enemy in phase 2, phase 4 they are used to charge the augment droid and remove armor from izax.
- Augment droid (red cloud) – this droid multiplies your damage done by the number of stacks applied to it by the energy sphere or makeshift amplifier droids. A green aura is around the droid when uncharged while a red/purple aura is around the droid when it is charged. This droid can have as many as 3 stacks – it consumes 1 stack in order to power it “on” for the first time, but will recharge freely afterwards. When the droid is charged, it provides a 300% buff to all damage done by people in the group. Additional stacks add duration onto the buff timer. Each stack adds six seconds to the buff timer. The stacks count down sequentially, for example:

- You apply a 4 stack to the droid
- The droid is turned “on” (consumes 1 stack)
- The droid receives 3 stacks (300% dps buff) six seconds later
- The droid’s stacks degrade to 2 stacks (still 300% dps buff)
- Six seconds later, the droid’s stacks degrade to 1 stack (still 300% dps buff)
- Within the next six seconds the droid receives 2 stacks
- The droid is now at 3 stacks and is refreshed to a full 18 second buff timer.
One of the dps should drag the augment droid towards the boss so that the mdps can hit the boss and remain fully in the circle. Different groups will execute these mechanics differently, but our group uses one tank to manage buffs on augment droid and Izax.
Izax can have his armor broken by charges from the amplifier droids. These debuffs function similarly to the buff mechanic on the augment droid. When applying debuffs in Izax, you lose 1 stack to applying the armor break, and ever additional stack you lengthen the duration of the armor debuff. All levels of debuff supply a 300% damage vulnerability to the boss.
These buffs maintain the same level of debuff strength until they have fully expired on their target. If Izax currently has no armor debuff and is hit with a 4-stack shot from an amplifier droid will receive the 3-stack, 300% additional damage taken from group. 12 seconds later, when the buff is at 1 stack, the armor debuff still supplies a 300% dps gain on all damage done to boss.
Dps should start off parsing on izax while the tank uses the energy sphere to shoot into an amplifier droid. The shot from the amplifier droid may be shot into another amplifier droid and chained sequentially until the charge is at 4 stacks. At this point, it should be discharged into the boss or the augment droid. Our group prefers to use it on the augment droid first.
During this phase, a large amount of hull cutter droids spawn throughout the room. Tank 2 should make sure these do not gather on tank 1 and should funnel them towards the dps. Dps should cleave these adds down primarily via dot spreading attacks. Burst classes should tunnel the boss during this phase while dot specs maintain dots on the boss and spread to adds that are gathered underneath or near the group. This may require the dot classes to disengage the boss, but dps should not leave the area buffed by the augment droid unless they are targeted by induction cascade.
Healer 1 and healer 2 should stand as close to dps as possible while maintaining healing on tank 1.
Tank 2 should remain as close to dps as possible while not kiting the circles from boss aggro into the group. Hull cutter droids will spawn in greater quantities (max 6 at a time) until the phase is pushed – you must take the boss’ health down to ~34% to push the phase.
The boss will relocate during phase 4 and the buff will need to move. During this time, the tank may need to discharge a stack of buffs into the augment droid it is important for dps and healers to not make the tank’s job difficult as aiming these beams is already fairly tricky – when tank 1 calls for you to be still, stay still for the 5 seconds he needs and just focus adds. The boss remains below the platform for ~10 seconds, you are not in a rush. This relocation period is also an easy place to wipe the group with induction cascade. Be very cautious to watch your debuffs during this transition.
When you push the boss in phase 4, the augment droid despawns along with the energy sphere and the amplifier droids. You are stuck with whatever hull cutter droids you have left. Kill them and gather to the middle of the room to prepare for phaes 5 transition.
Please note – using amplifier droids too often can lead to an explosion that damages the group and the adds – it is inadvisable to overuse any amplifier droids beyond its debuff timer.
More detail is needed to explain the pattern of amplifier droid management in phase 4 – a video should be posted with this guide to indicate reliable patterns.
The general gist is – the tank has the ability to maintain aggro on all amplifier droids amplifier droids shoot approximately every . The energy sphere in the middle of the platform will shoot at the amplifier droid with the lowest amount of previously stacks built at intervals of 8 seconds. It is the tank’s responsibility to respond and direct this beam through amplifiers in order to get maximum uptime on the dps buff on the augment droid as well as armor break on Izax. The top priority is the augment droid.
- Line up a 4-stack into the augment droid from whichever amplifier gets the buff, direct it into a 2nd and 3rd amplifier. Standing behind the amplifier keeps the tank from taking damage from the beam.
- Line up a 2-stack from the 2nd random shot into Izax
- Attempt to line up subsequent 3-stack shots from alternating groups of augment droids in order to keep buffs up on the boss.
- When the boss is moving, call for when you need the drone to be kept static in order to add stacks onto
the buff.
The goal is to have 100% uptime on buff on augmentation droid – beaming the boss and breaking his armor is necessary to keep from the soft enrage (missiles on the group from Izax) – but the fight isn’t tuned so you have to hit every single buff. This is a part of the fight where you will have to get comfortable with the role – there is a certain amount of RNG that comes into play – but it’s a mild form of RNG that you should be able to adapt to after a couple hours of progressing on the phase. During this time, dps will be wiping the raid with induction and healers will occasionally get deleted by hull cutter droids – you may have to experiment with dot spreading dps classes…either way, you will have plenty of time to progress in this phase of the fight and learn patterns.
PHASE 5
Phase 5 transition is a placement mechanic.
Izax drops below the floor and you have ~10-15 seconds to clean up the leftover droids and reposition in the middle of the platform. Turn your camera around in a circle and scan about 45 degrees off of the horizon in the air. You should see izax flying in a circle. It is helpful to turn off the option of “scale nameplates with distance” for this fight because of this phase. Be sure to have the boss’ name plate on and able to be read from far away.
Note that you must be in the middle of the grid you are running towards to take no damage, you take 55% damage from one missile hit and take a debuff that does not allow you to be healed for a certain period of time – therefore it is impossible to heal through this damage.
The boss will fire 8 missiles in what seems to be a grid of 9. These missles line up with a forced grid on the floor of the platform. For example:
Let’s assume izax is to the north. Izax fires 8 missiles. You see the shiny gap in the missiles in the bottom left of the grid moving towards you, the missiles will land on the corresponding area on the platform. You move to the front left of the platform. You don’t die.
The boss will do this 4 times. The first missile shot is from a random direction, but each shot comes from the right of where the last shot was by 90 degrees. Thus: if you are shot from the north, the next one will be from the east, then south, then west.
Once you fully transition into Phase 5 – a friendly droid spawns in the middle of the map. A tank or healer should tether Scyva close to Izax. Scyva is always facing the direction that Izax will spawn in at.
Shortly after Scyva spawns, Izax will spawn. Scyva will begin to jam Izax’s homing missiles. Once the jamming has begun, you may move Scyva around the platform to any location in order to keep her from being tethered by tether droids or damaged by Izax’s missiles, the mine droids, or the blue / green balls of energy that come in from the back of the room.
Scyva will begin a cast that is your “survival timer” in this phase. If Scyva is killed by damage from the boss or enemy adds, Izax will fire his omnicannon and will wipe the raid. It is important to keep Scyva from being damaged.
Izax will a couple different types of missiles onto Scyva and onto the group.
- Cluster of un-guided missiles on Scyva – When Scyva is untethered – Izax fires ~8 non-homing missiles at Scyva. It is possible to tether her out of these missiles. These missiles do a large amount of damage and apply the “adaptive shrapnel” debuff for each missile that hits her.
- Homing missiles on Scyva – When Scyva is tethered – Izax fires some number of homing missiles at Scyva. It is not possible to tether her out of these missiles. These have a slightly larger AOE so whoever is tethering Scyva around may be hurt by them.
- Homing missiles on group members – When Scyva is tethered – Izax fires 2 missiles on random group members – these apply “adaptive shrapnel” to whoever is inside of the aoe. These are similar to phase 2 missiles, but they follow you wherever you go. They do not do a large amount of damage, but the debuff you gain from being hit by these is extremely detrimental.
It is imperative to keep Scyva untethered. It is the job of the dps to kill the first wave of tethers as quickly as possible to keep Scyva alive. I use my adrenal on the first front tether – it will be up in time for burn.
In the transition between the front two tethers and the back two tethers, mine droids will spawn on the side. We assign tanks to tether these off the side of the platform.
As a note: the respawn timers on the tether droids seem to count down from when they were killed. Some groups prefer to assign one dps to each corner to maintain full uptime on each tether, but our group prefers to focus down one side, move scyva towards that side, and then focus down the tethers on the opposite side in order to allow the kiter a bit more freedom of mobility.
DPS should focus down the back tether droid and then stay out of stupid. Large 10m radius energy balls will spawn at the back. These balls can do ~10% damage to Scyva if she is left alone to have one drift over here, but will kill a dps, tank, or healer who attempts to walk through them. Play frogger and dodge the blue circles while still healing, dpsing, or shooting mines off the side of the platform. There are 4 subsequent spawns of tether droids after the initial spawn of tether droids. The dps should be totally dedicated to killing these droids and not standing in stupid. No dps on the boss is required in this phase – the goal is to keep Scyva alive.
Our group assigns a healer to kite Scyva around – if people are executing the mechanics appropriately, very little damage should be going out this phase. We call out to this healer where the next set of tether droids will spawn and the healer adjusts Scyva away from that location. 4 tether droids spawn initially, then 2 spawn in front and then 2 more in back. There is a period where dps need to just avoid damage, then 2 more spawn in front and 2 more in the back. The goal is to kill these as fast as possible. During this time, the healer should tether Scyva out of missiles, through the gaps in the blue energy orbs, and away from mine droids.
We also had two team members aggro tethers and keep them off of Scyva in our original kill. This allowed the kiting healer to pull Scyva out of a missile barrage and keep her from being damaged early on. This seems like a good strategy for the first set of tethers, but not for the subsequent tethers because large energy balls will be floating through the group and could kill a tethered team member.
Tanks should focus on using the tethers to slingshot the mine droids off the side of the platform.

This continues for ~2 minutes. The goal is to survive and avoid damage. Once phase is pushed, a large orange AOE shows up on platform, you have about 10 seconds for the group to get to the back. This attack will kill anyone within the AOE. We wait until the channel is almost finished on the boss and then step onto the corner of the pylon. Bear in mind, the pylon is still electrified and you will need to pop defensives, medpacs, tank adrenals, whatever you have in order to stay alive here. Healers may continue to heal and should precast aoe healing on the corner in order to help the group survive.

PHASE 6
Once the cast has gone out, your screen will go white and then you will be temporarily immobilized. The middle of the floor will be destroyed and you must run up the platform to get to Izax. He has about 2 million health and you have ~45 seconds to kill him. At first no damage goes out on the group. The boss will then put a damage debuff on you and you will begin to take damage from the boss up to ~80% of your health – thus if the healers can top everyone off to 100% before the damage goes out, they can go into full dps mode and not worry about anyone dying. Many people consider this to be a “token” burn, but dps still need to pull ~9,000 dps in order to clear.
There is a “safe” spot at the end of the yellow cataclysm attack right underneath the unpowered conduit utilized in phase 3.

CONCLUSIONS
I really enjoyed this fight – phase 2 is a real highlight for me as a MDPS and RDPS. I believe Izax is one of the most mechanically intensive and healing intensive fights. The developers delivered on a high quality fight and I am looking forward to what they put out next. After running the fight for about 12 hours on live I have only encountered one bug personally and it does not have the “memory loss” that other fights with large amounts of graphical issues have (like NiM DP).
It was a large effort and I appreciate Aeon giving me a shot to be on their teams. I also appreciate Kalizo in Hates You for helping me get PTS access at the same time as Aeon working to get me PTS access. I have never been able to be a part of a progression cycle like this before and am glad to be a fairly new NiM raider who is able to contribute to the development of this new fight and the growth of the raiding community.
I am also aware that there will be people who dislike that I have generated this guide. It was my idea and the team members provided critique and input for various tanking / healing mechanics. I put a lot of time into this guide and hope it is helpful for other NiM / HM raiding groups who want to kill Izax in the allotted time frame.
From Vulkk
I would like to thank Rugles for taking the time to create this extensive and detailed guide. Creating something like this requires an enormous amount of time and effort and deserves to be shared a lot, so more players would be able to see and use it.
PATCH CHANGES
CHANGES WITH GAME UPDATE 5.9
- The Deflection Droids’ “Blaster” ability now has the same line of sight as the Deflected Beams. Players will now be in line of sight of both of them, or neither.
- The Deflection Droids will now display an overhead icon when they do not have line of sight on their current target.
- Deflection Droids will no longer get marked with the “Displaced” effect in Story Mode.
- Lowered the number of Deflection Droids in Story Mode to 6 (down from 7).
- The icon for the Magnetic Tether pickup has been updated to be consistent in both the puzzle area and IZAX encounter.
- The player in possession of the Magnetic Tether will now display an overhead icon.
- Picking up the Magnetic Tether now grants a “Pass Magnetic Tether” ability that will pass the Magnetic Tether to another player.
- The IZAX encounter will now properly reset when the only players still in combat are not on the roof.
- The Anchor Drone’s Anchor Field now has a maximum range of 120m (down from infinity, sorry)
- Increased inbound flight delay on Missile Barrage in Phase 5 to 5.4 seconds (up from 5.0 seconds) to make the timing consistent with other phases.
- Fix various visual issues related to IZAX’s missile attacks.
- There is now a small chance of a Prestige Drop for the Wings of the Dragon Mount during the IZAX encounter which will not be a Legacy-based mount.
- Fixed an issue with Izax’s targeting logic where he would occasionally take swipes at dead players instead of doing more useful things.
SOURCE ► SWTOR Game Update 5.9 Patch Notes