This comprehensive guide written by CyborNik explains everything you need to know on how to tank well in SWTOR and compares the strengths and weaknesses of every tank discipline including Powertechs | Vanguards, Assassins | Shadows, and Juggernauts | Guardians.
Use the Table of Contents, located in the left panel (top left button on the mobile menu) to navigate through this long guide more easily and quickly.
Tank Skills
The way you control encounters will determine your reputation as a tank. It is in your hands alone to improve your reputation by improving your skills. The challenge for a good tank can be boiled down to four things:
Keep Aggro
Keep aggro and people will like you. Your job is to keep the boss and as many adds as possible aggro’d to you. This will keep your DPS and healers happy.
Survivability
Work actively on your survivability and you will be appreciated. Don’t lean on healers alone. You have tools to lower your damage taken per second (DTPS), so use them. You’re in a team; they do their job, you do yours.
Adaptability
Adaptability can lead near-wipes into victories. Some players have it naturally, others grow into it. If adaptability isn’t your strength yet, ask for quick calls and follow them. Or, accept a night of wipes, review after, adjust, and come back sharper. Make sure you’re on the same page with your raid lead for these approaches.
Awareness
Awareness ties everything together. Look beyond your abilities; watch timers, target of target, boss casts, adds, group health, positioning. Low awareness means others work harder to cover for your misses, and they’ll judge your tanking accordingly.
What players generally want from a good tank:
- They want you to hold threat;
- They want defensives used at the right times;
- They want you to accommodate to the group’s needs;
- They want you to execute tactics;
- They want you to adapt when something goes wrong;
- They want clear communication, likely in voice.
How Threat Works
Threat is a data output that translates to who the enemy will aggro to. It’s a combination of raw damage and threat multipliers. As a tank, you should always be on top of the threat list, barring specific mechanics. There are various factors that will guarantee you have aggro, meaning that the enemy is focusing on you.
This is how passive threat generation from damage and healing works:
- Tank specs have a passive that boosts threat by 200%. That equals 3.0 threat per 1 damage on normal hits, and more on anything marked “high threat.”
- DPS generate 1 threat per 1 damage.
- Whoever hits first gets a small head start, so ideally the tank pulls first;
- Use a countdown if your group has pre-casts and you’re on voice comms;
- Without voice, expect DPS to start as soon as the ready check goes green;
- You’ll often see Orbital Strike | Bombing Run pre-casts, so start your opener and proceed as soon as the cast finishes.
- Healers generate 50% of effective healing as threat.
- This equals a 0.50 healing-threat multiplier. However, healer specs receive a passive 10% threat reduction, making their personal threat modifier 0.9 instead of 1.0. This results in a final modifier of 0.45 threat per 1 effective healing;
- If a boss or add isn’t damaged by a tank or DPS, effective heals will aggro it instead as healers radiate threat through effective healing;
- Plan to damage those adds early and keep them entertained, or they’ll target your healers;
- Mercenaries I Commandos and their Kolto Shells | Trauma Probes can spike threat fast during raid-wide damage, as do Kolto Probes | Slow-release Medpacs from Operatives | Scoundrels. Static Barrier | Force Armor from a Sorcerer | Sage heals when it collapses, if many collapse at once, it will also spike threat.
Taunts
Aside from passive threat, a tank has taunts that both guarantee aggro for 6 seconds and a boost in threat. Each tank has a single-target taunt and a mass taunt. They do two things:
- The target is fixated on you for six seconds (you’ll notice a debuff on the boss);
- Your threat is set to 110% (at 4 meters or less) or 130% (at more than 4 meters) of the current highest threat.
- 4 meters are measured from the boss’ center, making it easier to be further than 4 meters;
- If you already have the highest threat, you’ll still get a +10% or +30% threat boost immediately when you taunt.
Taunt Proactively, Not Reactively
Like mentioned above, taunt gives a boost over the highest amount of threat. It doesn’t matter if the highest threat is you or someone else. However, you don’t want to be waiting for a DPS to overtake your threat before you use your first taunt. Using taunt reactively can be dangerous because of the following:
- If you’re not fast enough with your taunt; one or more players will receive damage or die, feel forced to waste a defensive in the process.
- If it happens early in the fight the amount of threat generated overall is not high, meaning that the +10/30% threat boost is minor. If the boost is small, it is easy for DPS to overtake again after 6 seconds, repeating point 1. Because you delayed your taunt, there is a chance you’ll start falling behind.
This can be avoided by following the correct opener unique to each Combat Style. If the opener can’t be fulfilled, make sure you put in your first taunt after approximately 3-4 high threat abilities followed by using taunt for at least 2-3 more times to dominate the threat table.
Always lead with the single-target taunt, not the AoE taunt, in your openers because the single-target taunt has a much shorter cooldown and will be almost ready again by the time the AoE taunt wears off.
How to Use AoE Taunts
Generally, AoE taunts are reserved for situations with multiple enemies (usually a wave of adds) to gain aggro on all of them. To avoid losing aggro after 6 seconds, it’s wise to use your AoE taunt after a couple of high-threat AoE attacks.
If the adds hit hard, it’s smart to use an appropriate defensive cooldown, usually one that significantly increases your Defense Chance.
Keep in mind that you can also use your AoE taunt in single-target situations to increase threat even further if you don’t need it for something specific, but it’s good to have a reserve in case something goes wrong, so don’t use it just because.
Avoid Dry Taunting
If you taunt at the very start with 0 threat on the table, we call it “dry taunting”, which will often result in you losing aggro after the 6-second debuff wears off. Build some threat first, then taunt. There are exceptions, use it when the fight forces your hand, but otherwise avoid dry taunts.
DPS with Taunt (DWT)
Some situations or boss fights can benefit from a DPS taunting something off you. Or maybe you have a Powertech | Vanguard that really wants 6 stacks of Power Yield. You can utilize their taunt to your benefit, or theirs, as long as you are sure they will use the appropriate defensive cooldown. It does help to know through communication when it happens, so you avoid accidentally taunting back too early.
DPS with taunts are also helpful when you’re trying to adapt and salvage an attempt after something goes wrong. For example, if you’re fighting the Dread Guards in TFB and a tank dies, you can have a DWT take Kel’sara right before or after Force Leech so you don’t lose the other tank.
Guard
All tanks have an ability called Guard, and it functions differently in PvE and PvP. Guard only redirects 50% of damage dealt by other players to you; it does not redirect damage dealt by NPCs, so damage redirection is exclusively a PvP thing. In PvE, Guard does two things:
- The guarded player will take 5% less damage, regardless of range;
- The guarded player will generate 25% less threat, regardless of range.
If you are unsure whom to Guard, you can use this as a guideline:
- If a healer is under predictable pressure from adds or mechanics, consider guarding the healer;
- Otherwise, I advise guarding the top DPS with the highest burst, as they usually generate the most threat at the beginning of the fight.
- Powertech | Vanguard and, to a much lesser extent, Sorcerer | Sage, have the highest opening burst
- Fights where boss positioning is paramount, it’s worthwhile to guard the top ranged DPS, so there is less chance of adds running away.
- In add-heavy fights, consider guarding whichever DPS is dealing the most AoE damage, with Hatred Assassin | Serenity Shadow, Vengeance Juggernaut | Vigilance Guardian, and Engineering Sniper | Saboteur Gunslinger having the highest potential
- It’s less necessary to guard stealth classes (Assassins | Shadows or Operatives | Scoundrels) because they can stealth out to erase all of their threat on top of reducing it with their regular threat drop ability
That said, use your judgment. If aggro is stable without it, you can always guard someone who keeps taking damage or has weaker survivability. Never guard your co-tank.
Accommodations
Take requests and advice from teammates as valid by default. Doubt yourself first, not them. They see other angles that you won’t from the tank perspective. Try their suggestions.
The only time to refuse is when a suggestion would break the strategy and lead to a worse outcome. Don’t use that as an excuse, though. Most suggestions are worth testing. They’ll broaden your view and grow your skill set.
Never assume what you’re doing is perfect; always assume there’s more to improve.
If you want to understand what your teammates deal with, play their roles. Run some ops as a healer. Do a few as a DPS. You’ll quickly see what actually helps them. Use that experience to improve your tanking.
These are some of the accommodations to fulfill:
- Always face bosses and adds away from the group to avoid cleave damage;
- Grant DPS uptime by holding the boss steady;
- Drag adds into AoE damage or close to the boss;
- Avoid unnecessary kiting;
- Stay in healing range;
- Stay in line of sight of the healers;
- Stack for AoE healing when appropriate.
Aim to give others the best experience you can by taking on as many responsibilities as you can handle. Use your toolkit to make the fight easier for everyone. If you struggle holding aggro, work on your opener and priority list execution.
Non-tank specs have a threat drop ability, and in many cases, it also doubles as a fairly powerful defensive cooldown. Because of that, tanks should not treat DPS threat drops as part of their own opener or threat plan.
As a tank, your goal should be to reach the point where you do not need to ask teammates to drop threat, regardless of how strong their opener is. Tanks have the tools to keep control, but using them well takes practice, fight knowledge, and sometimes gear.
That said, if you are still learning, are heavily outgeared, or are dealing with a particularly messy pull, asking DPS to use their threat drop can be a practical way to keep the raid moving. Just don’t use it as an excuse to stop improving.
If you feel it’s necessary for DPS to hold off for a few seconds so you can build threat, there is something wrong with your opener, rotation, gear, or APM.
If some DPS is running ahead and pulling trash, just do your best to get aggro when you get there, but expect them to understand that they placed you at a disadvantage by pulling first. They have many of the same DCDs as you do and can more readily afford to pop multiple at the same time. It’s on them not to bite off more than they can chew. Work together.
Damage Mitigation
Defensive cooldowns (DCDs) are your primary source of mitigation, and when to use them comes down to knowing how to apply your class to the fight in the following ways:
- Damage types
- Passive mitigation
- Proactive
- Reactive
- Sustain
- Stacking
Damage Types
Each boss ability has its own set of damage types, and every defensive cooldown lists the type of mitigation it provides, which in turn informs you which damage types it works against.
Use Parsely, a website affiliated with StarParse and processes uploaded Combat Logs, to check what damage type you’ll be taking in an upcoming fight.
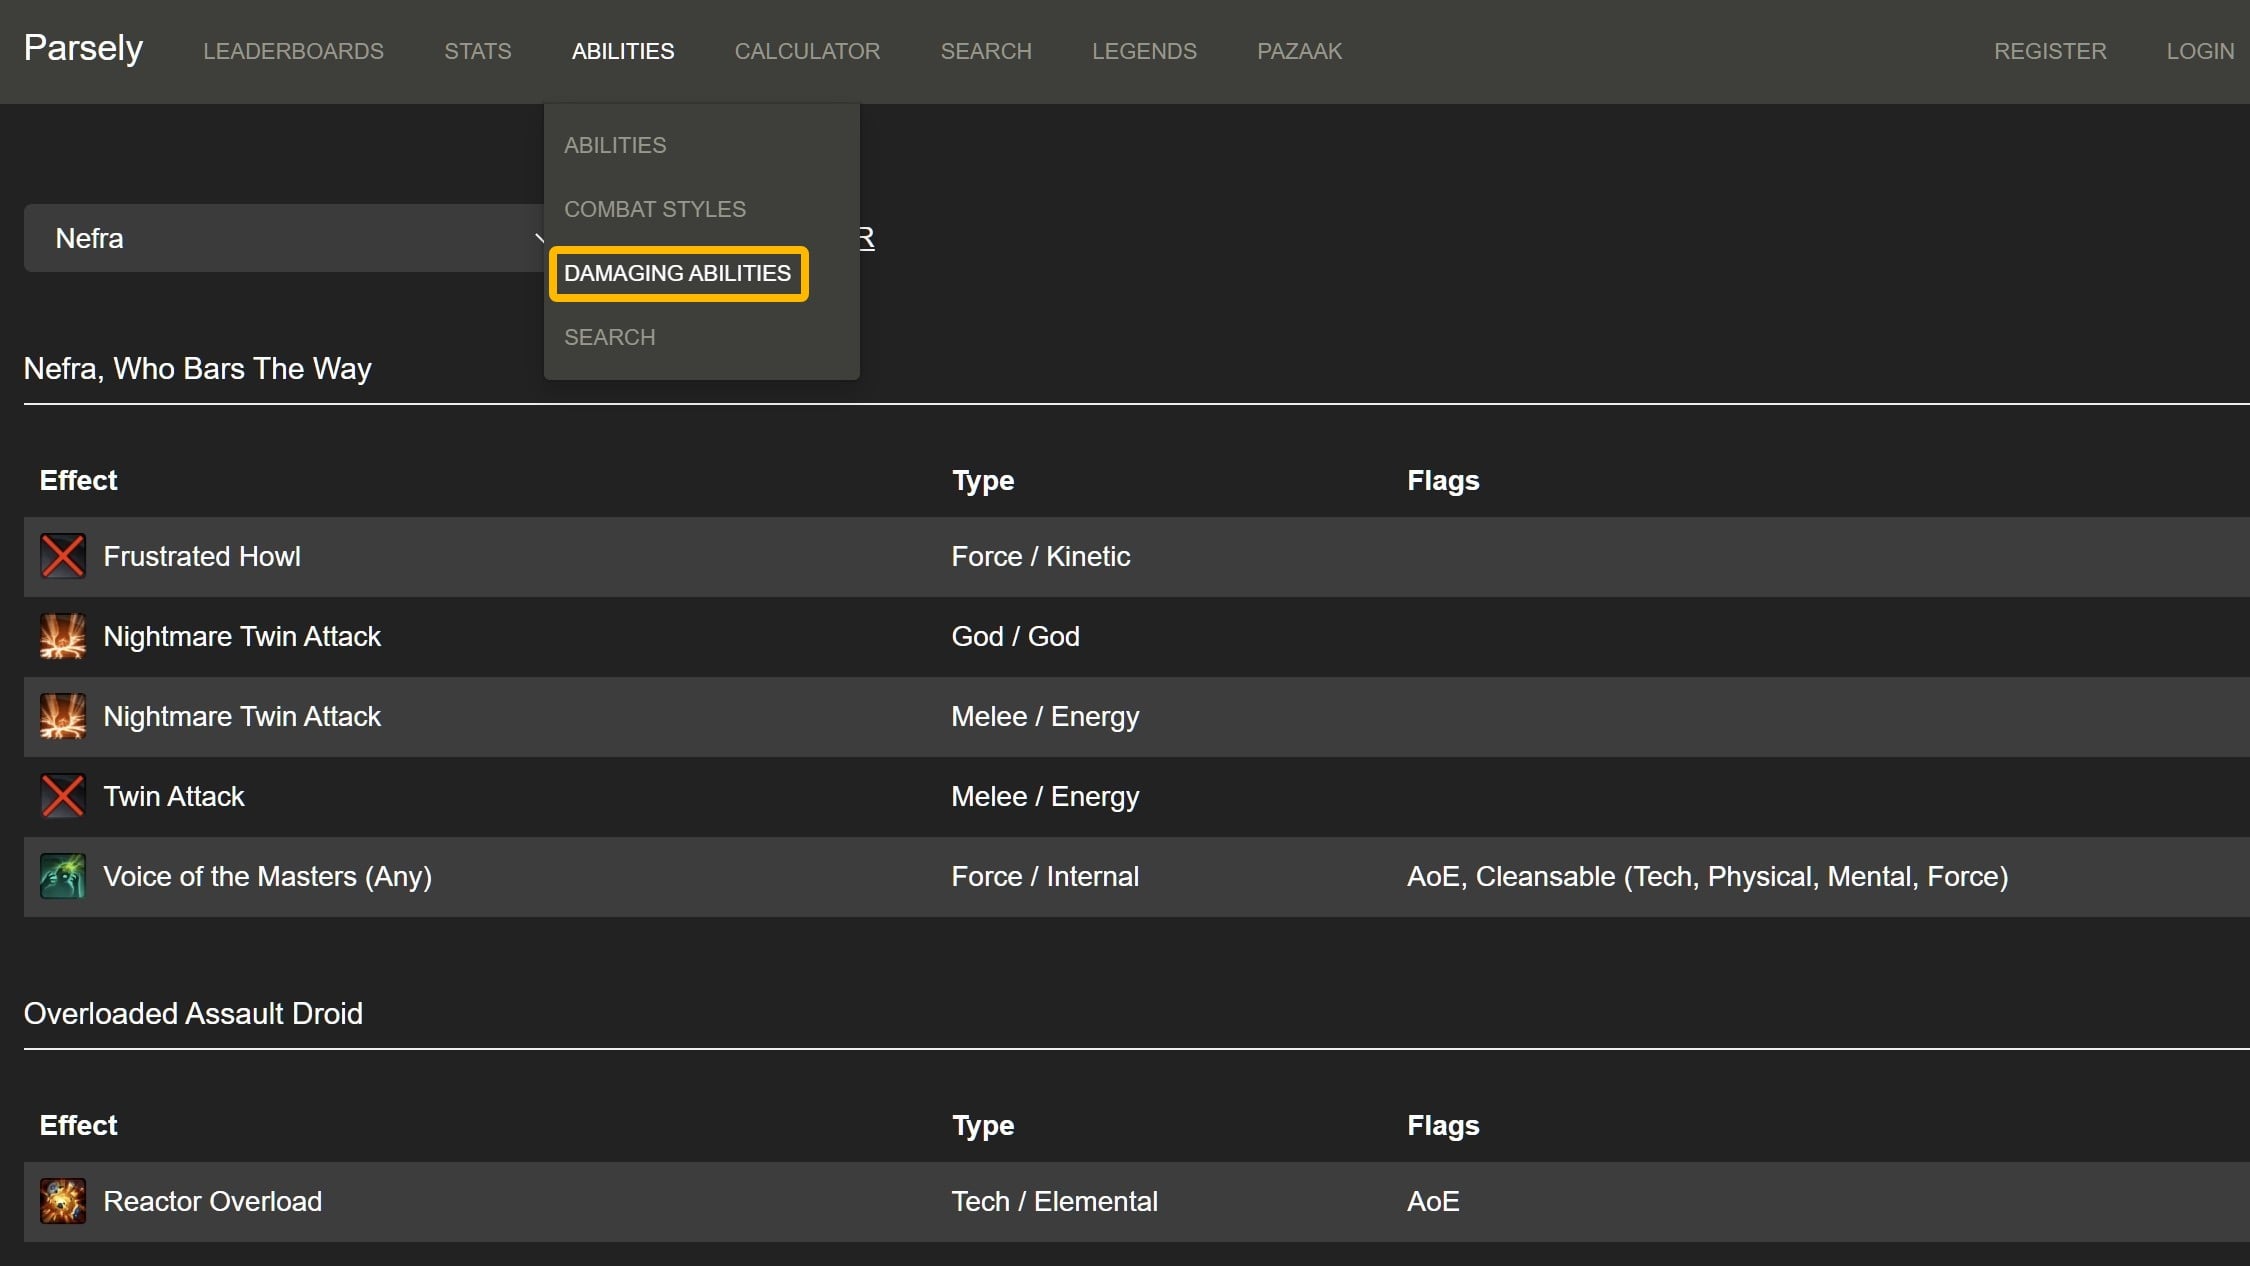
Pre-prep or post-prep depending on how your team progs. On Parsely, if a boss ability is tagged AoE, any defensive that explicitly says “single-target” won’t work on that attack, like Saber Reflect or Sonic Rebounders. Keep in mind that damage types don’t always match their in-game appearance.
| Defense / Resist Damage | Melee / Ranged | (God Damage) |
||
| Shield and Armor Damage | Kinetic / Energy | (God Damage) |
||
| Defense Chance | Effective | |||
| Resist Chance | ||||
| Shield Chance | Effective | |||
| Damage Reduction (Armor) | Effective | |||
| Damage Reduction | Effective | |||
| “Reduced Damage Taken” or “Absorption” | Effective | |||
| Healing | Effective |
If a boss mostly deals Internal/Elemental damage, that means most of its attacks will bypass your Shield Generator and Armor. DCDs that provide Damage Reduction, Resist, or Healing are the only thing that will help, so consider swapping in skank (damage-focused) gear.
SWTOR Damage Types and Damage Mitigation GuideAdditive vs Multiplicative
There are several different types of percentage reductions in the amount of damage you take, including Damage Reduction, “Reduced Damage Taken”, and Absorption.
All percentages that provide the same type of reduction get added together, so if you have 2 DCDs active that provide Damage Reduction (DR), their percentages will get added together and then shave off that portion of damage from an attack.
Absorption and Reduced Damage Taken are each separate multipliers, but it’s rare that you can get multiple sources active at the same time (and Shield Absorption is separate from DCD Absorption).
These sources get applied in sequence, so each subsequent multiplier takes smaller and smaller bites out of the incoming hit as less remains.
For example, if the initial hit deals 1,000 damage and you have 25% Damage Reduction, 25% Reduced Damage Taken, and 25% Absorption, the Damage Reduction will reduce the hit to 750 (mitigating 250 damage), then the Reduced Damage Taken takes 25% off 750, which is 187.5 damage, leaving only 562.5 for Absorption, which will only chomp off 140.63 points of damage because that’s 25% of 562.5.
Damage Reduction gets applied first (after Defense/Resist Chance), and Armor counts as a subtype of Damage Reduction that only works against Kinetic / Energy attacks. As a result, DCDs that improve Damage Reduction or Armor get a leg up against Kinetic / Energy attacks compared to singular sources of Absorption or Reduced Damage Taken.
Of course, some classes have sources of Internal / Elemental Damage Reduction or reduce damage taken against other types. The key secondary idea is that your DCD percentages aren’t always starting from zero, and Damage Reduction is most likely to be in that advantageous position.
Passive Mitigation Stats on Gear
Passive mitigation comes from gear stats and passive DR (Damage Reduction). The key gear stats for passive mitigation are:
- Defense Rating increases your Defense Chance, which is the chance to completely avoid the damage (parry or deflect), but it doesn’t increase your chance to Resist Force / Tech attacks;
- Shield Rating increases your Shield Chance, which is the percent chance for your offhand Personal Shield Generator to trigger (and the generator itself provides 20%);
- Absorb Rating, which determines the percentage of damage the Personal Shield Generator absorbs if it triggers.
Gear only ever increases your “Rating” stats, while your discipline passives and abilities only ever increase the actual percentages by adding them to the number created by your Rating stats.
We also consider procs and minor DCDs like Aegis Assault | Warding Strike, Spike | Spinning Kick, Dark Ward | Kinetic Ward, and Heat Blast | Energy Blast to be part of passive mitigation.
Being Proactive
Being proactive means staying ahead of the game. Bosses have rotational patterns and cooldowns on their abilities just like players do (though they can cheat).
If you know a big hit is coming, use the right defensive before it lands to mitigate the damage. Some fights require a regular rotation of defensives, start using them early so they are available more frequently.
Being Reactive
Being reactive means acting against unforeseen circumstances. If spike damage is worse than usual or the raid drops to low health because someone decided to let the boss cleave the group, pop a defensive cooldown reactively to give healers room to recover.
Proactive outweighs reactive however, so don’t use something reactively if you know you’ll need it soon on a timer and it won’t be back. Self-healing abilities lend themselves better to reactivity defensives, as they will heal what damage has been taken.
Sustained Damage
Sustained damage taken is measured in damage taken per second (DTPS) over longer periods. Unless the boss really hits like a truck or you’re only meant to hold them while you have a strong DCD up, you’ll typically want to let your passive mitigation, minor defensives, and healers take the brunt of it.
Stacking DCDs
Stacking means using more than one defensive cooldowns at a time. You can stack some defensives when you need extra mitigation, (e.g, Recklessness + Defense Adrenal) but avoid stacking DCDs with strong or conflicting effects.
Big defensives are strong enough alone making it better to spread them out. If a Ballistic Shield or other DPS mitigation is up, consider delaying big defensives until those pass. Small defensives stack nicely with DPS mitigation for a little extra padding.
Keep in mind that some DCDs will negate others, like if you have boosted Defense Chance from something like Deflection, that extra Damage Reduction from something like Overcharge Saber | Battle Readiness isn’t going to do anything because you didn’t end up getting hit in the first place.
If you feel like you have to stack DCDs because you don’t know what’s about to happen, that’s a clear signal that you need to ask questions and do more research about boss attacks.
Timers
Boss mechanics follow patterns. You can learn the tells over time, but you don’t need to count the enemy’s auto-attacks or memorize the patterns on day one. Use Baras, StarParse, or ORBS to put encounter timers on your screen. The timers will call out what’s coming so you can plan mitigation and taunts.
Game Settings
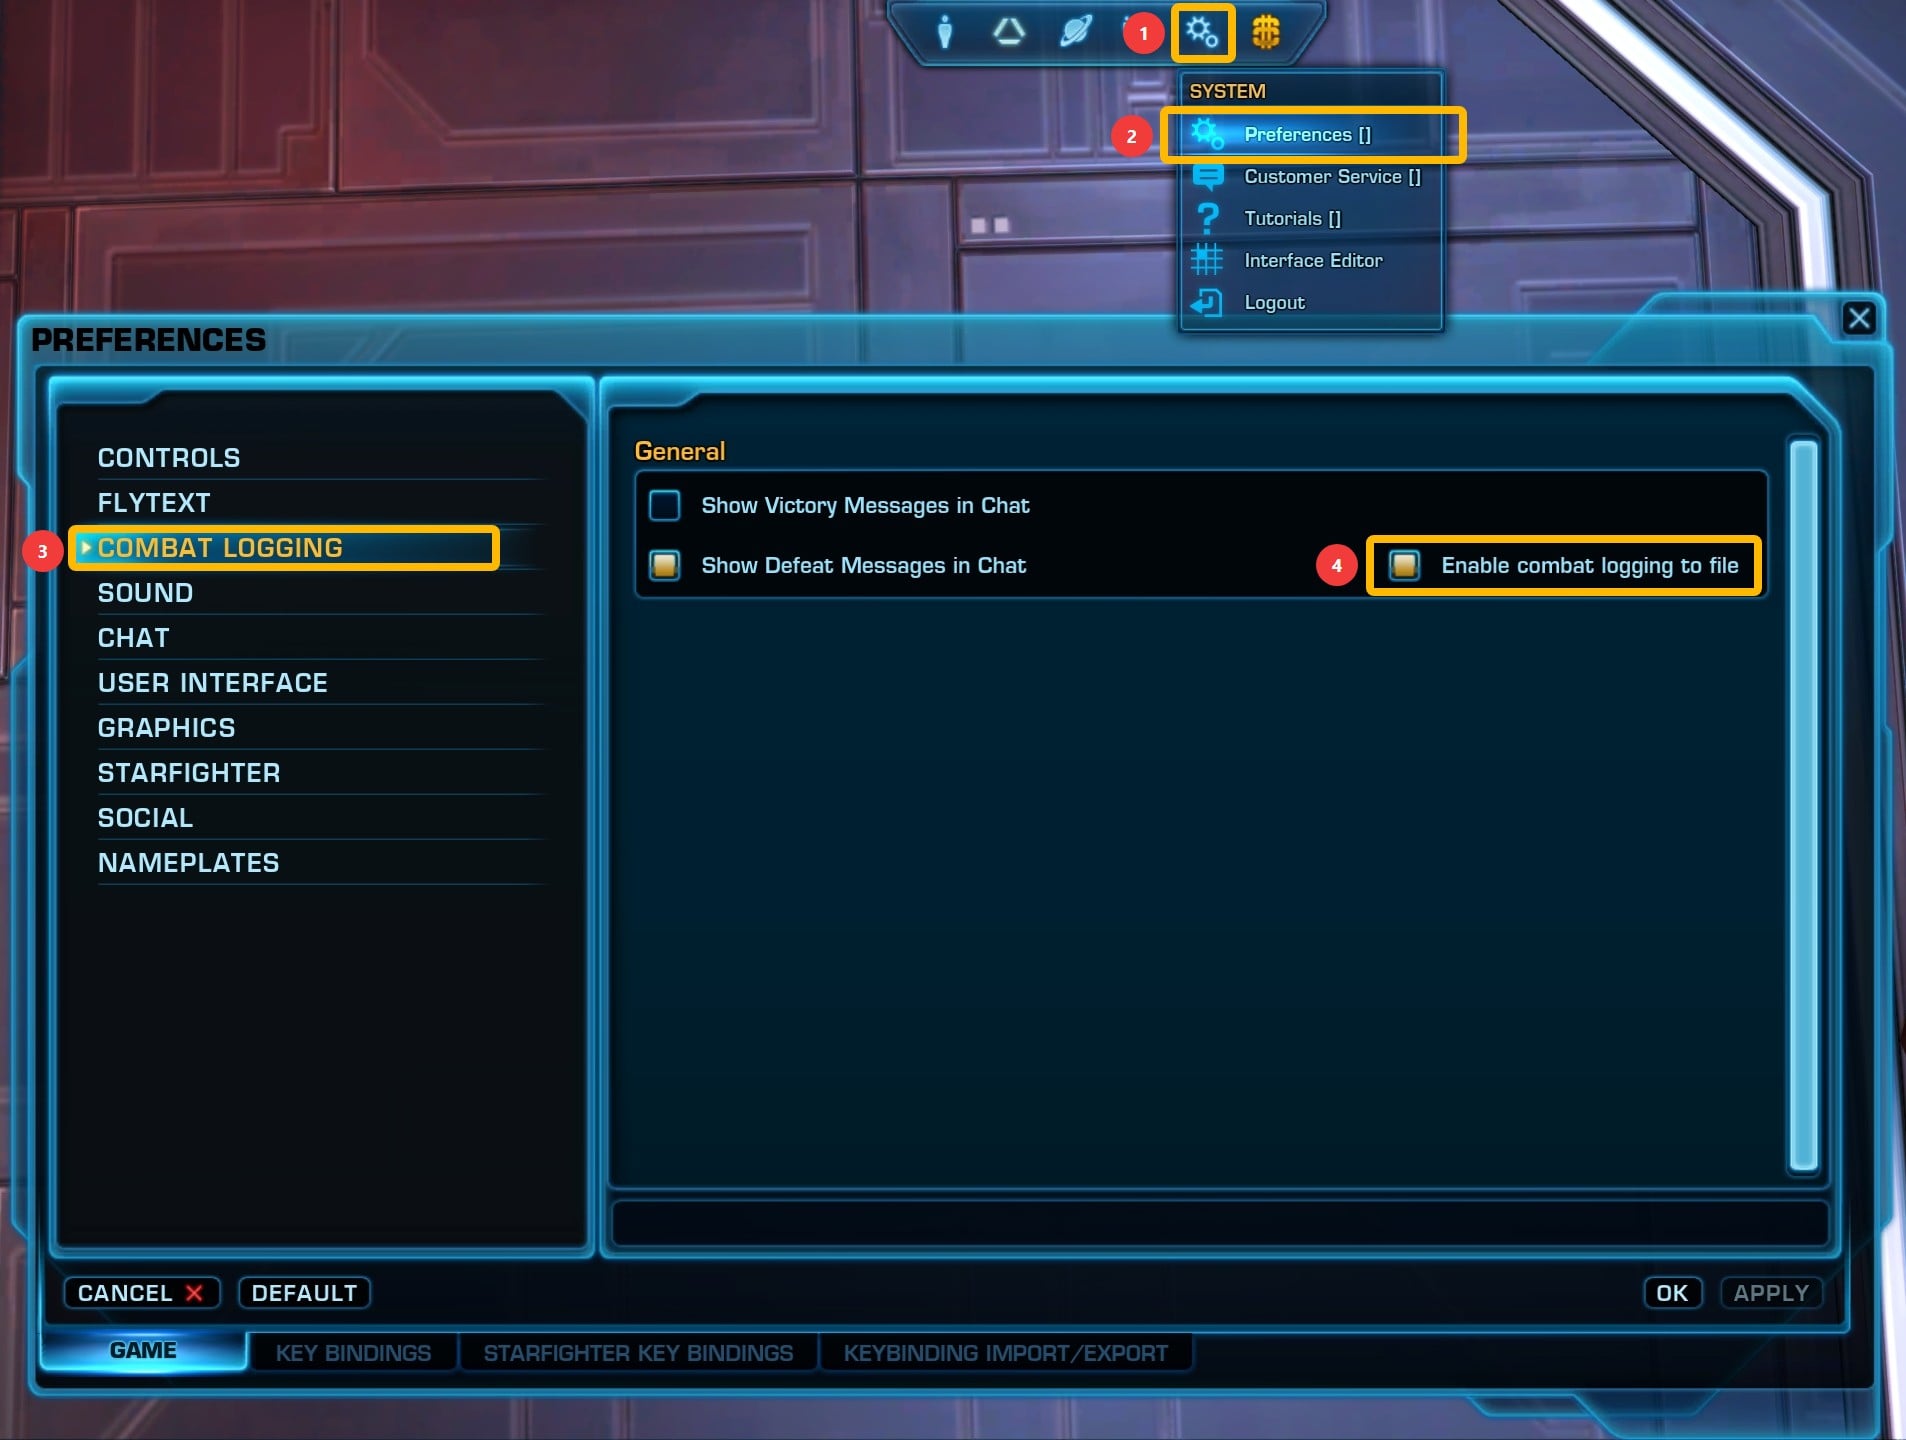
To make any parser work, enable combat logging in the game. The tool reads your log and draws a real-time overlay on your screen with the timers and overlays you’ve set.
Parsing
I personally prefer using BARAS, but Orbs, StarParse, and TOR HUD are all solid choices. Try them out, see which one you prefer.
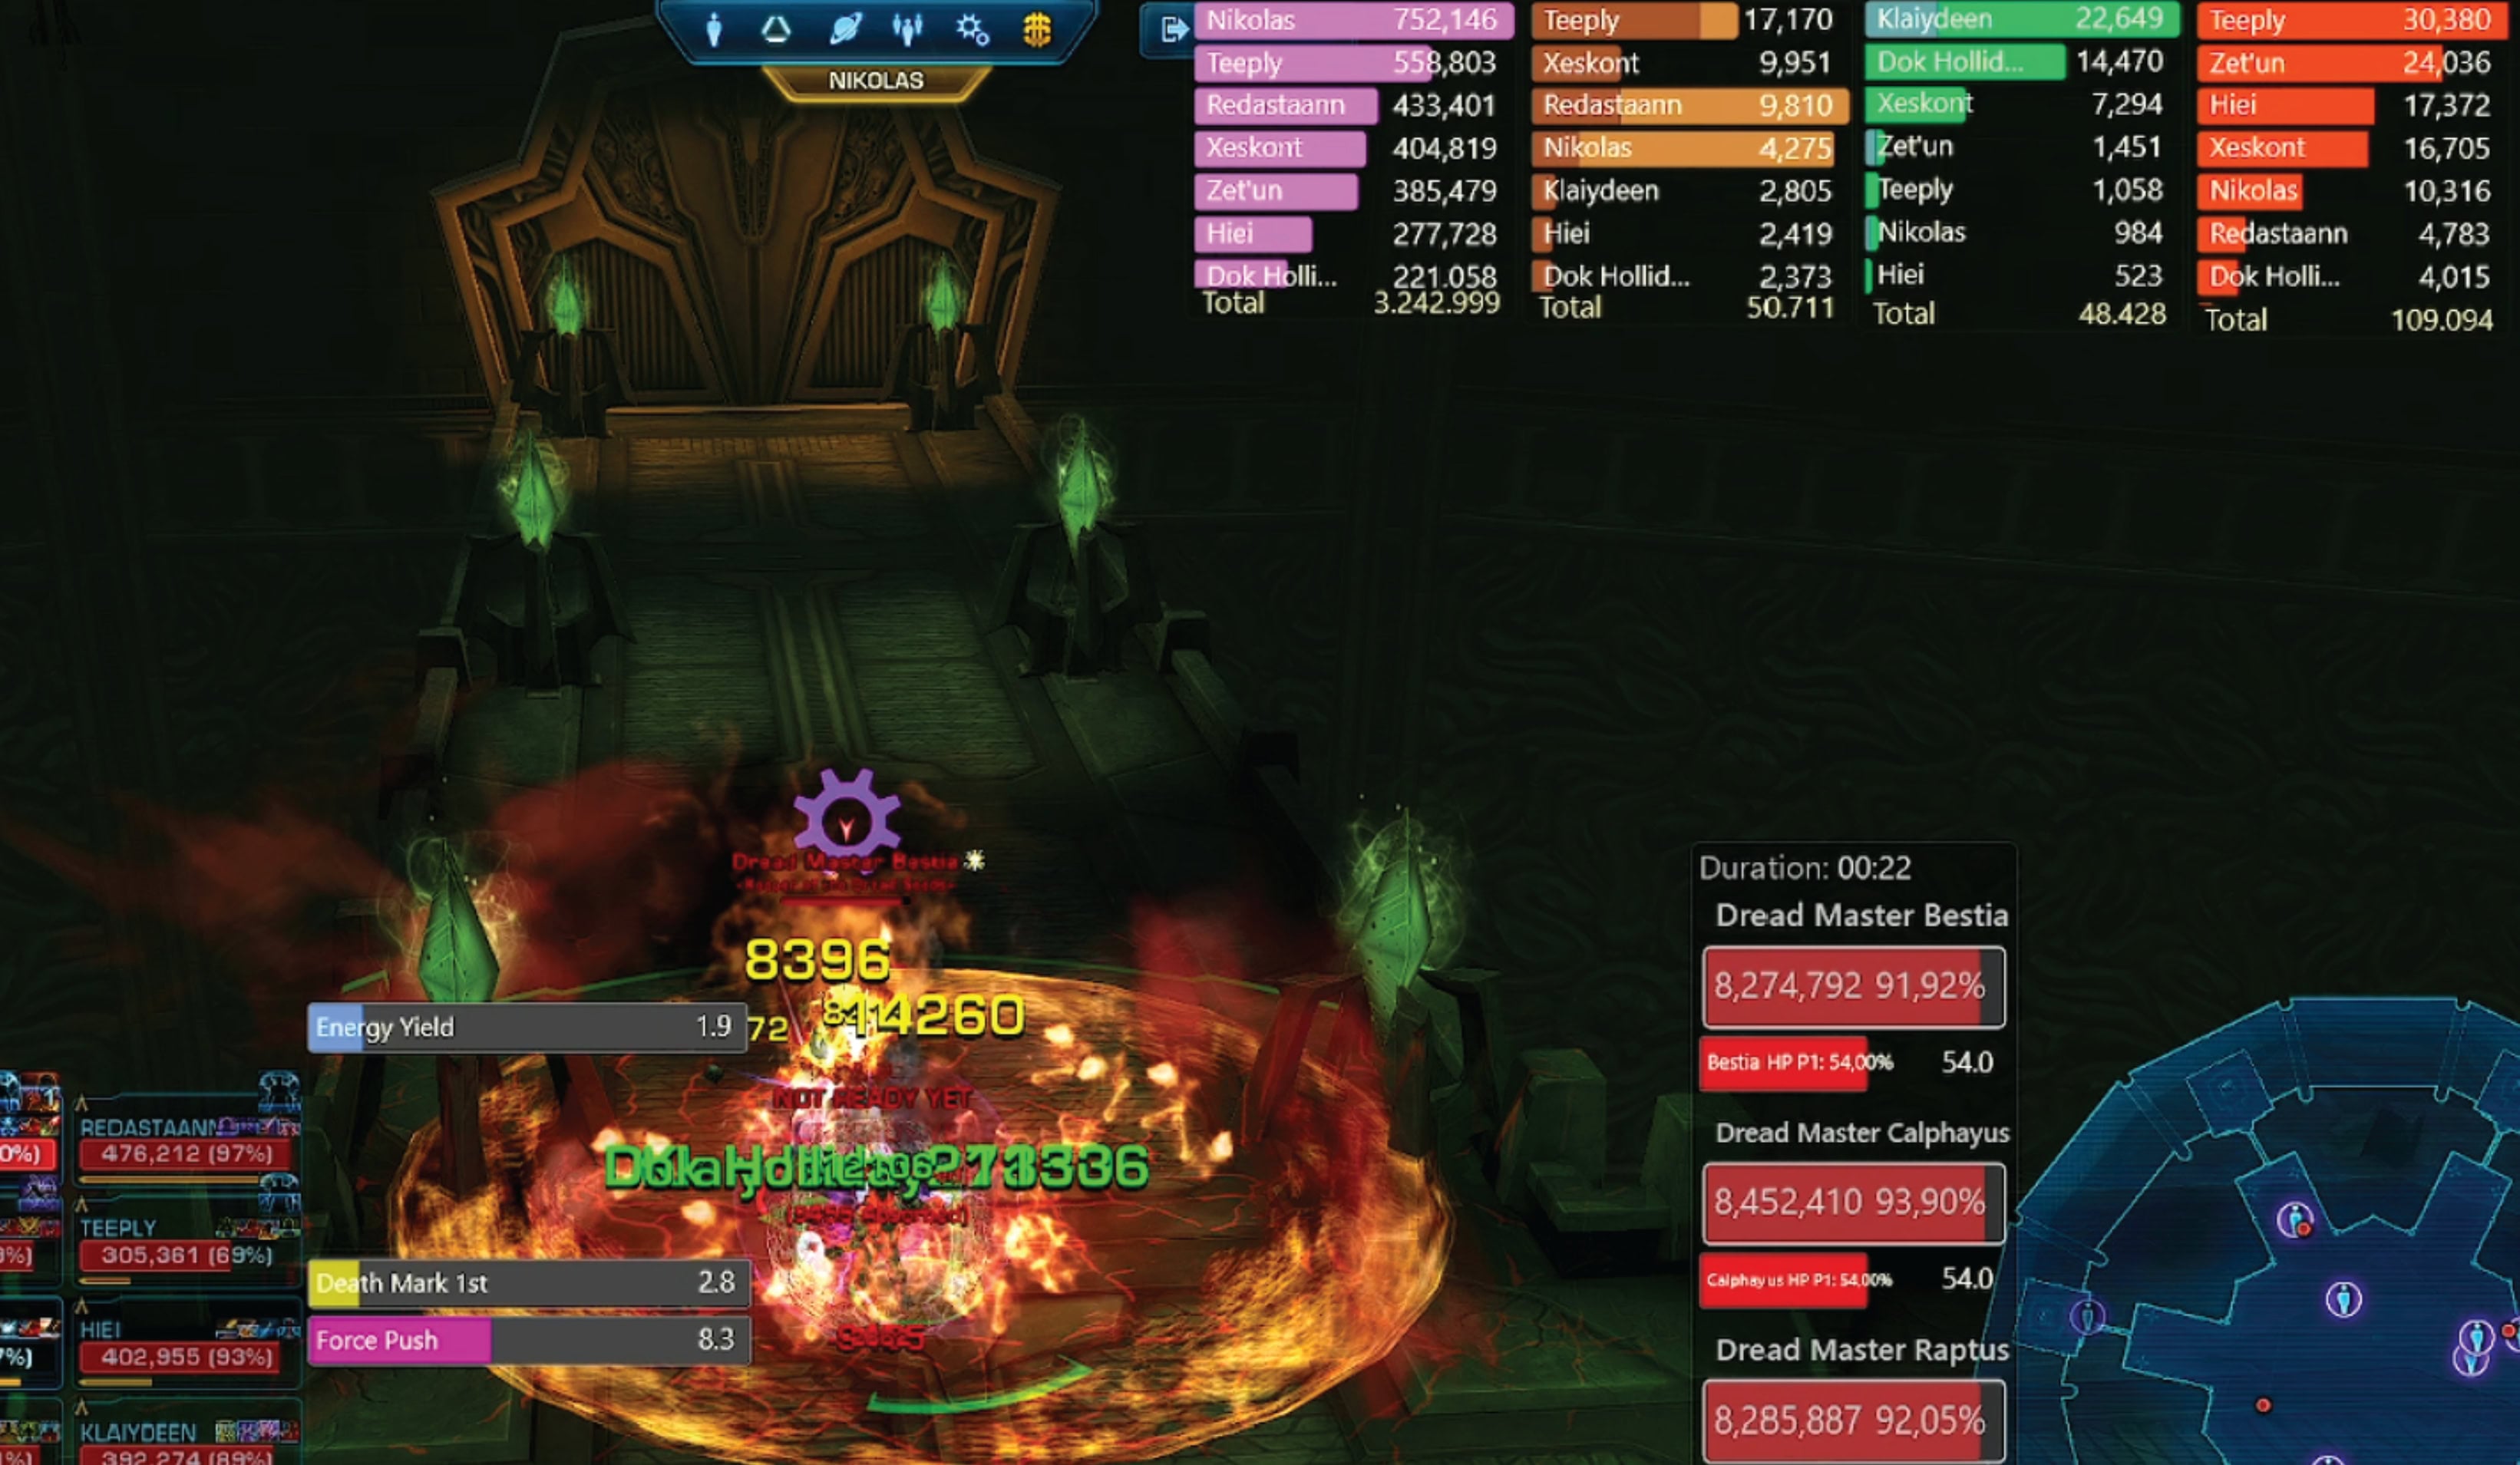
Some players use multiple because they like the timer of one but the layout of the other. Whichever you use, encounter timers make damage mitigation and tactics execution much easier.
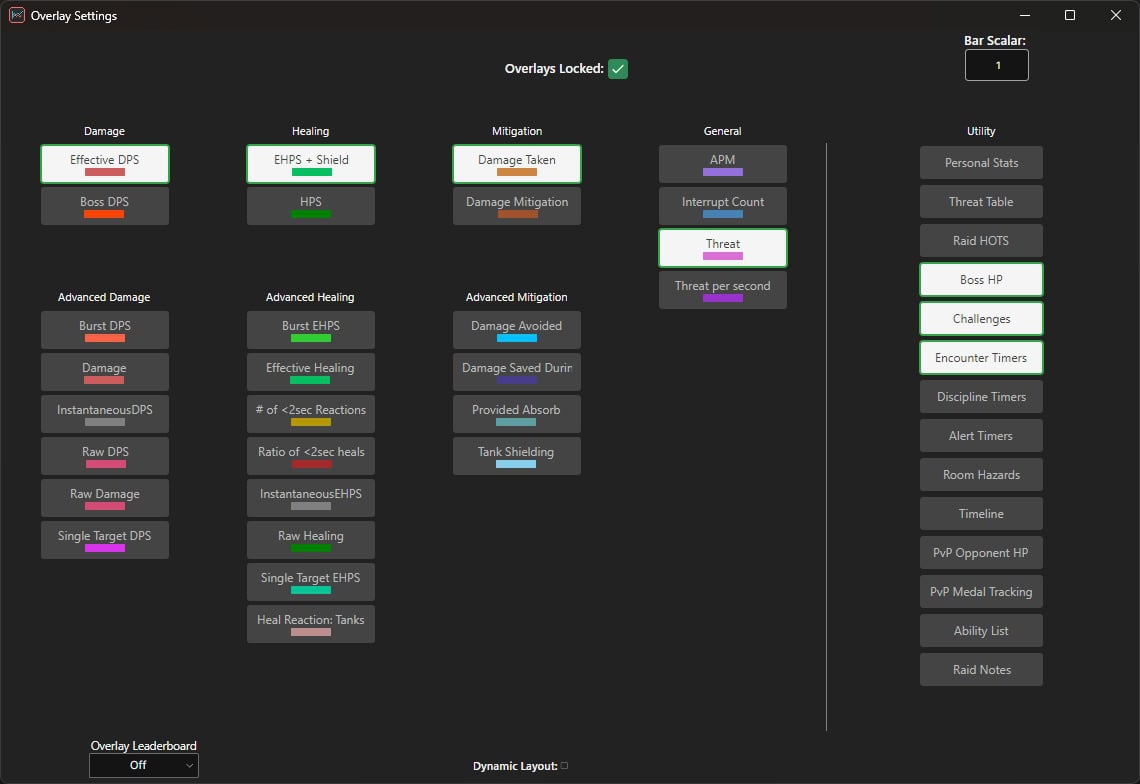
These are the overlays I use for analysis during or after combat:
- Discipline timers
- Encounter timers
- Boss HP
- Threat meter
- Damage taken per second
- Effective damage per second
- Effective healing per second + shield
Controls and User Interface
SWTOR lets you customize your user interface (UI). I consider keybinds, Target of Target, Focus Target, Buffs and Debuffs, and unused Quickbars to be essential to effective tank awareness.
Keybinds
Binding your abilities to keys will give you space to improve your situational awareness and improve your reaction speed when things go awry. Getting familiar with them will improve your skill in the game.
Target of Target
Want to know if you have aggro? Target of Target will tell you. Place it where your eyes naturally land on the screen.
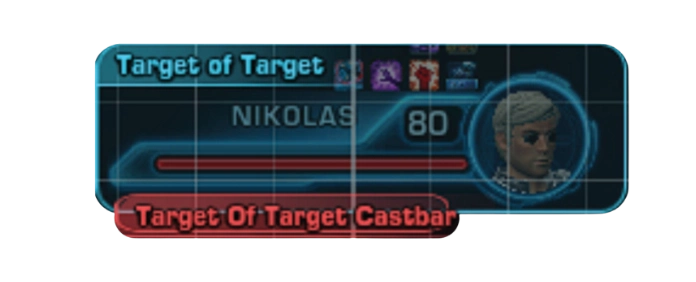
That said, some boss mechanics force a temporary target swap to cast an ability. That doesn’t mean you lost aggro, you still have the highest threat. Wait for the mechanic to finish and it’ll swap back. If Target of target disappears, reset the UI with CTRL+U to fix it.
Focus Target
Tabbing through add swarms before you have your wanted target? Need to watch your co-tank or a shroud-guarded player? Set a Focus Target.
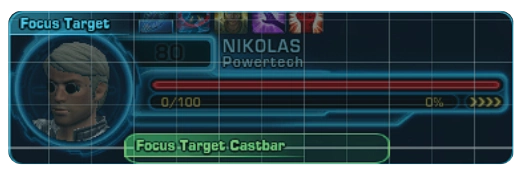
Additionally, you can quickly swap between two focus targets by focus targeting the other target and then focus targeting yours. It’s convenient on fights like Aivela & Esne where tab-targeting gets messy. For this to work you have to keybind Focus Target, as using that key will alternate between the two targets with Focus Target.
Buffs and Debuffs
Buffs and Debuffs are sources of information. Use them to time mitigation and execute tactics. On the operation frames, uncheck “Show Only Removable Debuffs” so you don’t miss key effects.
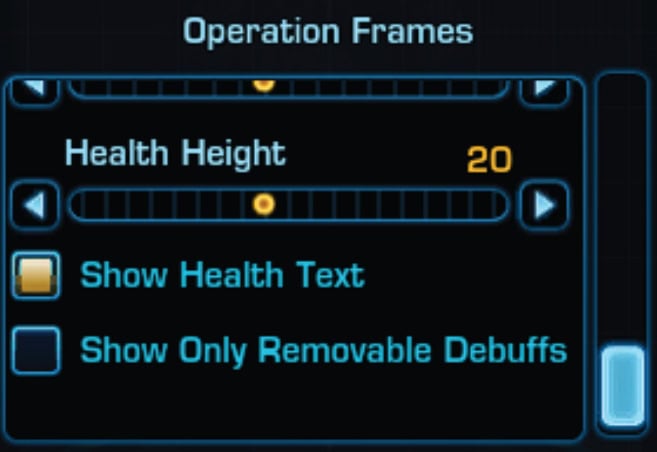
Place your debuffs where they’re obvious to you. Some people go huge and center; I prefer larger debuffs on the operation frames allowing me to scan effects on all team members. Buffs matter too, to see how long your damage boost or defensive lasts but consider tracking those with parsing timers so you don’t mix visuals.
Utilize Unused Ability Bars
This last trick is optional: You can employ unused ability bars as a cheat sheet. In total, players get six ability bars and most of them only use three or four, which means you can use the extra bars as a cheat sheet. Learning a new spec? Drop the rotation there.
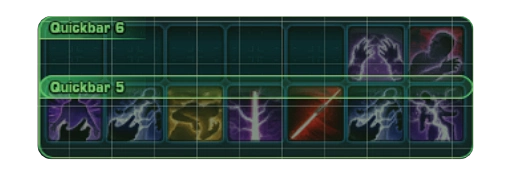
For tanking, you can place your opener or priority list until it’s muscle memory. Once you don’t need it anymore, you can always toggle the bars off in the UI editor.
Class Choices and Tier List
On paper, the tank classes are fairly well balanced. All have similar capabilities along with minor strengths and weaknesses that are packaged differently, enabling each to perform better in specific scenarios.
Which class to pick depends on what you’re aiming for. I’ll describe the playstyles, complexity, and how they hold up in Master Mode, but remember that all specs can clear content; some just make it easier. I’ll go from most beginner-friendly to least.
These descriptions are followed by a table (class overview) that compares the overlapping and unique attributes of each tanking class.
Shield Tech Powertech | Shield Specialist Vanguard
Shield Tech | Shield Specialist tanks rely more heavily on shielding attacks (go figure) and offer the most versatility and unique utility. Their long range and higher burst mean PT | VG tanks can more readily maintain high uptime and contribute more significantly to burst DPS checks.
They also have multiple cooldowns that boost Damage Reduction, offering a high degree of flexibility, except for cleansing. They need others to be flexible when cleansing is required because they can’t do it themselves.
PT | VG tanks have far less protections against attacks that bypass armor and the spec is far less reliable when it comes to avoiding attacks outright, making them less suited to fights where tank gear isn’t useful or if you want to use cheese strats. Still, their DCDS and utility make them a formidable option.
Darkness Assassin | Kinetic Combat Shadow
Darkness | Kinetic Combat offers solid passive mitigation that comes from both their Force-imbued shield and passive damage reduction. They also have the gift of exceptional mobility thanks to Force Speed, enabling a high degree of controlled movement.
The spec excels at mitigating internal/elemental damage and has the greatest potential to avoid attacks outright, allowing you to cheese many mechanics. It also has a high capacity to gather and control large groups of enemies, though it doesn’t necessarily survive better against them.
Darkness | Kinetic Combat struggles the most during sustained periods of high DTPS without a real pause. This is mainly because its two major defensives have long cooldown times.
Once those are unavailable, its smaller rotational defensives, of which it has fewer than the other tank specs, have to do most of the work until the bigger cooldowns come back.
It also does not help that meaningful CC immunity for Assassin | Shadow is tied to one of those major defensive cooldowns. This means that when you need the CC immunity, you are also spending one of your big defensives, which can make subsequent spikes harder to cover.
Assassins | Shadows tend to get assigned extra responsibilities because they can use their abilities to cheese many mechanics. This need for prior arcane knowledge raises the required skill level but makes them a standard pick on progression raid teams.
Immortal Juggernaut | Defense Guardian
Immortal | Defense relies on its armor and defense chance to mitigate damage. It leans more heavily on its higher number of DCDs to survive since it doesn’t benefit as much from the shield generator compared to the other tank specs.
In general, it’s more important to pick the right tool for the job as a Juggernaut | Guardian tank. While it has similar capabilities to other tank specs, many of them are a little harder to use or not accessible by default, particularly when it comes to mobility.
For example, if you want CC immunity, you have to run 10m away from the boss and leap back in. The other classes just have it on a cooldown.
None of their big defensives are Damage Reduction-based, and are instead Reduced Damage Taken or Absorption, making them relatively weaker as they become separate multipliers in the calculation for received damage, making stacking DCDs more important.
For most content, playing this class without having mastered it works fine. However, for Master Mode content, you’ll be holding the team back more often than not, which raises the required skill level and makes it the most difficult tank class to master.
Assassin | Shadow and Juggernaut | Guardian complement each other, which is good since you can get both on the same toon and switch between the two as needed.
Tank Classes Tier List
The tier list gives a quick comparison of how strong or useful each class is in each main category.
| Tier Letter | Meaning | Score |
|---|---|---|
| S | Supreme, Overpowered | 5 |
| A | Great, Excellent | 4 |
| B | Solid, Decent | 3 |
| C | Usable but low quality | 2 |
| D | Technically exists | 1 |
| F | Missing | 0 |
| Tier Scoring |
|---|
| S =5.00 S- >=4.51 A+ <=4.50 A =4.00 A- >=3.51 B+ <=3.50 B =3.00 B- >=2.51 C+ <=2.50 C =2.00 C- >=1.51 D+ >=1.50 D =1.0 D- >=0.51 F+ <=0.50 F =0.00 F- =50 DKP MINUS |
| Category | Category | Powertech Vanguard | Assassin Shadow | Juggernaut Guardian | Powertech | Vanguard: | Assassin | Shadow: | Juggernaut | Guardian: |
|---|---|---|---|---|---|---|---|
| Passive Mitigation | Passive Mitigation Stats Average Tier | B- | A | B+ | 2.75 | 4.00 | 3.50 |
| Passive Mitigation | Shield x Absorb | A | A | C | 11.8% | 11.0% | 5.5% |
| Passive Mitigation | Defense Chance | C | A | B | 10.6% | =>16.0% | 15.0% |
| Passive Mitigation | Armor Damage Reduction | B | B | S | 47.5% | 46.3% | 55.9% |
| Passive Mitigation | Internal / Elemental Damage Reduction | C | S | A | 19.0% | 34.0% | 32.0% |
| Cooldowns | Cooldowns Average Tier | A+ | A- | A- | 4.40 | 3.60 | 3.80 |
| Cooldowns | Cheese(s) | A | S | B | Supercommando Package | Force Shroud and Shroud of Madness | Resilience and Cloak of Resilience | Saber Reflect or Mad Dash | Blade Blitz |
| Cooldowns | Melee/Range DCD | A | A | S | Explosive Fuel + Oil Slick | Battle Focus + Riot Gas; Advanced Terminator Droid | Suppression Droid; Energy Yield | Infused Kolto Packs | Deflection | Saber Ward + Grit Teeth |
| Cooldowns | Damage Reduction DCDs | S | A | C | Energy Shield | Reactive Shield; Energy Yield|nfused Kolto Packs | Overcharge Saber | Battle Readiness; Spike | Spinning Kick | Saber Ward; Invincible | Warding Call |
| Cooldowns | Healing DCDs | S | C | A | Energy Yield | Infused Kolto Packs; Kolto Overload | Adrenaline Rush; Close and Personal | Into the Fray | Overcharge Saber | Battle Readiness | Enraged Defense | Focused Defense; Endure Pain | Enure; Sonic Barrier | Blade Barrier |
| Cooldowns | Total DCD Number (low uptime only) | A | B | S | 5 DCDs | 5 DCDs | 6 DCDs |
| Mobility | Mobility Average Tier | A+ | B+ | B- | 4.25 | 3.25 | 2.75 |
| Mobility | Leaps | A | B | S | Rising Phoenix | Impact Charge (15s) | Phantom Stride | Shadow Stride (30s) | Force Charge, Intercede | Force Leap, Guardian Leap |
| Mobility | Speed Boosts | B | S | C | Hydraulic Overrides | Hold the Line (40s) | Force Speed (13-20s); Obfuscating Speed | Kinetic Surge (9s); Phantom Stride | Shadow Stride (30s) | Rule of Two | Expeditious Protector (unreliable), Nimble Master Implant |
| Mobility | CC Immunities | S | C | B | Hydraulic Overrides | Hold the Line (40s) | Emersion | Egress (13-20s); Ballast Point Package + Dark Stability | Sturdiness (120s) | Unstoppable | Unremitting (<15s), Threatening Rage | Threatening Focus (45s) |
| Mobility | Range and Uptime | S | B | D | 17% 4m abilities, 83% 10m abilities, 30m basic attack | 40% 4m abilities, 60% 10m abilities, 0% 30m abilities | 77% 4m abilities, 5% 10m abilties, 18% 30m abilities |
| Control, Threat, and Utility | CC, Threat, Utility Average Tier | B+ | A- | A- | 3.33 | 3.83 | 3.66 |
| Control, Threat, and Utility | Interrupt | A | C | S | Quell | Riot Strike (4m, 16-18s); Rising Phoenix | Impact Charge (15s) | Jolt | Mind Snap (10m, 15-18s) | Disruption | Force Kick (4m, 12s), Force Charge | Force Leap (<15s) |
| Control, Threat, and Utility | CC | B | S | C | Carbonize | Neural Surge; Electro Dart | Cryo Grenade; Grapple | Harpoon | Force Pull; Force Slow; Overload | Force Wave; Whirlwind | Force Lift; Electrocute | Force Stun; Spike | Spinning Kick | Force Push; Backhand | Pommel Strike; Force Choke | Force Stasis |
| Control, Threat, and Utility | ST Threat | A | B | S | Shoulder Cannons; Explosive Fuel | Battle Focus; Energy Yield | Infused Kolto Packs; Heat Blast | Energy Blast | Force Pull or Shadowcraft + Recklessness | Force Potency + Long wind-up to Depredating Volts | Cascading Debris | Aegis Assault → Crushing Blow → Retaliate, Threatening Rage | Warding Strike → Guardian Slash → Riposte, Threatening Focus |
| Control, Threat, and Utility | AoE Threat | A | S | A | Firestorm | Ion Storm; Flame Sweep | Explosive Surge; Heat Blast | Energy Blast | Wither, Discharge, Lacerate, Chained Volts | Slow Time, Force Breach, Chained Cascade | Crushing Blow, Smash, Sweeping Slash, Projected Scream | Guardian Slash, Force Sweep, Cyclone Slash, Blade Burst |
| Control, Threat, and Utility | Unique Utilities | S | A | B | Sonic Rebounder, Extraction Plan; Carbonize | Neural Surge; Advanced Terminator Droid | Suppression Droid; Squad Leader Package | Friend of the Force; Mind Trap | Mind Maze | Intercede | Guardian Leap; Aegis Shield | Warding Shield |
| Control, Threat, and Utility | Self-Cleanse(s) | F | A | B | None | Force Cloak; Force Shroud | Resilience | Endure Pain | Enure |
| Overall | Overall Average Tier | A- | A- | B+ | 3.68 | 3.67 | 3.43 |
Solo-Tanking
Solo-tanking mostly shows up in flashpoints and story-mode ops, but there are higher-difficulty fights—and even specific bosses—where solo-tanking is actually preferred.
Because boss kills are mostly tactics-bound, I’m focusing on the one thing that trips most tanks up, which is how to handle groups of adds without leaning on mass taunt or forgetting your healer and DPS.
Regular Pulls
When you are solo-tanking, your job is to damage every add so they don’t swap to healers or DPS, with healers as the priority. If your healer is forced to heal themselves through a slowed cast bar, things go south fast.
DPS can usually survive longer. Unsure who to Guard? Guard the healer. Confident you’ll keep everything under control? Guard a DPS.
If some adds aren’t in your AoE, target-swap and hit the outliers with single-target abilities. Use pulls or knockbacks to group them for AoE when you can. Save mass taunt as a last resort for when it genuinely gets messy. You won’t have it for every pack, so learn to control adds without it.
Use your single-target taunt to take an add off a DPS who topped your threat while you were working on the rest.
Corner Pulls
An alternative is corner pulling. Damage one, then everyone line-of-sight around a corner so the pack runs to you. It stacks them up, easy tanking, easy AoE. Just don’t run through the pack to get there.
If your healer lands an effective heal while you’ve built no threat, they’ll get melted as you walk through. Corner pulls are require less skill, but if you want to improve, don’t lean on them all the time, especially because DPS tend to hate waiting around.
Boss Tanking
For bosses, ask for tactics if you don’t know. If you hear “tank and spank,” face the boss away and hold threat. If there are mechanics, do them.
If adds spawn mid-fight and your healer starts taking heat, break off, damage the adds, and get their attention. Sometimes adds are a DPS job, so clarify that before you pull and know your role in the plan.
How to Survive
Survivability often comes down to whether you’re standing in visualized damage. The rule is simple: don’t stand in stupid. On top of that, learn your defensives. Big group of adds? Boss damage you know hits hard? Use the effective defensive cooldown that mitigates it.
Skanking
Flashpoints and operation story modes are also a great playground for skanking. In SM and VM Flashpoints, or SM Operations, it’s usually safe to wear Crit and Alacrity.
In Master Mode Flashpoints or VM/MM Ops, you need to know your defensives and when to use them before you go skank, and it’s not a good idea to skank through everything.
Companions in Flashpoints
If someone leaves the group and you’re using a companion instead, ask a ranged player to summon a ranged DPS companion. Companions hug their owner and since you live in the danger zone, they will too.
A ranged companion stands back next to the ranged player, thus, in most fights, it will stay alive longer and keeps steady damage rolling while you hold the pack.
Co-tanking: Starting Points
Operations are 8- or 16-player runs. In higher difficulties, you’ll start working with a Co-tank. Co-tanking is its own skill, and most tanks don’t immediately start out with perfect teamwork.
A lot of players go through different development stages while learning how to share responsibility, divide pressure, and communicate during pulls. The earlier you recognize the stage they are in, the easier it is to adapt.
A tank can be in different stage depending on the situation. Someone can have a DPS mindset on add packs, a solo-tank mindset during messy pulls, and still be perfectly fine with teamwork on bosses.
You won’t always know until you clear the first boss or see how the first add pack goes. Stay flexible, communicate early, and set simple rules like who’s left, who’s right, and who pulls the boss.
Stage 1: DPS Mindset
This is usually the first stage for developing tanks, especially DPS players trying tanking for the first time. The tank is mostly focused on one target. They tunnel one add, maybe clip some others with AoE, and after the group has already taken a bunch of damage, they finally mass taunt.
You’ll recognize a tank in stage 1 when they leap into the middle of a pack and then stops moving.
This usually happens because they are still thinking like a DPS. They see enemies as targets to damage, not as pressure that needs to be controlled and distributed. If they’re new, they may not know tactics well. If they’re DPS-turned-tank, they might know the tactics, but still execute them poorly from a tanking perspective.
When your co-tank is in this stage, be ready to adapt, pick up mechanics, and bring some solo-tank energy to keep the group safe and salvage pulls. Don’t expect clean add control yet. Keep things simple, communicate basic rules, and help stabilize the run.
The goal for players in this stage is learning that tanking is not only about surviving the boss; it’s also about controlling the room, protecting the group, and making the pull predictable.
Stage 2: Solo-Tank Mindset
Stage 2 tanks have learned how to take control, but not yet how to share control. With add packs, they either corner-pull frequently or bounce from one end to the other, and they won’t hesitate to single-target taunt an add off you. They are often trying to solve the pull by themselves.
Sometimes this comes from confidence. Sometimes it comes from habit. Sometimes it comes from not trusting the other tank yet. Regardless, it can turn co-tanking into a silent taunt war if you fight them for every add.
The best way to work with a tank at this stage is usually to let them do their thing. Consider swapping to skank and picking up any stray adds on the sides. Don’t burn energy trying to “win” control back unless the group is actually in danger.
In boss fights, some tanks at this stage have a tendency to drift away from the agreed upon strategy, taunting at unpredictable times, or making defensive decisions without a heads-up. Their reasons may vary; maybe they’ve got a defensive ready, maybe they think you’re in trouble, maybe they’re used to doing it that way, but without communication, you’re guessing.
The goal for tanks in this stage is learning that strong tanking is not the same as doing everything yourself. A good co-tank does not only take pressure; they also leave room for the other tank to do their job.
Stage 3: Teamwork Mindset
The tank understands shared responsibility. In the ops frames, you’re usually left or right (or top or bottom); if you’re in one group, just ask which side they prefer. Eyeball each add pack, split it down the middle, and commit: you take your side, they take theirs.
Pressure is distributed, and mass taunts are only for when someone feels their side slipping, but it also works pretty well just to alternate AoE taunts for each trash pull.
They also tend to know tactics, communicate when mechanics differ per tank, and plan defensives around the script. They don’t randomly taunt off-plan, and if they do, they tell you first. This is the smoothest co-tanking dynamic to work with.
Return that teamwork mentality. Don’t focus adds your co-tank is already managing. The only exception is when you’ve lost control of your side and need a mass taunt to stabilize.
Otherwise, there’s no reason to peel or taunt off your co-tank unless they’re on the brink of dying. And if you do anything outside the strategy, say out loud what you’re doing and why, so your co-tank doesn’t reactively counter it.
About the Author
I go by CyborNik and play on Darth Malgus, EU. I have played SWTOR since release, though I took a couple of years away from the game after KotET. I returned about two and a half years ago and started raiding more seriously around two years ago.
My main role is tanking. I raid with the Monkey-Lizards, my main 8-man progression group, where I also help co-lead raids. I mainly play Powertech | Vanguard tank, with Assassin | Shadow tank as my second choice, but I am also comfortable on Juggernaut | Guardian.
With the Monkey-Lizards, I have cleared legacy Nightmare Operations, Ravagers VM, Temple of Sacrifice VM, and R4 VM. At the time of writing, we have started Dxun Master Mode.
I have also tanked and cleared Hateful Entity, earned Deathless and timed runs for all legacy Nightmare operations where applicable, and co-tanked in a Darth Malgus Raid Race where my team ended in 4th place.
That said, I don’t think tanking is something you ever really finish learning. There is always more to understand, whether that comes from researching mechanics, digging through Jedipedia data, reviewing parses, or talking to other like-minded players.
A lot of this guide was shaped by that same process: testing things, questioning assumptions, and improving the information where possible.
I’d like to thank everyone who gave valuable feedback while this guide was being written. Their comments, corrections, and discussions contributed a lot to improving the final version.
I also want to thank our Monki-Sensei for teaching me valuable things about tanking, progression, and the game in general. And of course, thank you to Vulkk for giving me the opportunity to publish this guide.
You can find Bossfight clear videos and SWTOR livestream VODs on my YouTube:
https://www.youtube.com/@Cybornik
I stream on Twitch and YouTube simultaneously:
https://www.twitch.tv/cybornik