This Operator IX Guide for Veteran Mode will help you defeat one of the most challenging fights in the Terror From Beyond Operation. The fight is much more forgiving than its version in Master Mode and also quite a step up from Story Mode!
Much like with my previous guide about Styrak Hard Mode, but a bit more simple and short, today I want to show you the tactics my team uses for easy and smooth defeat of Operator IX Hard Mode, the 3rd boss in Terror From Beyond SWTOR Operation.
Split the team into pairs before the fight. Each pair will go through a different colored “portal” and accept the attached to them color-marks. The fight is structured roughly into 2 main phases.
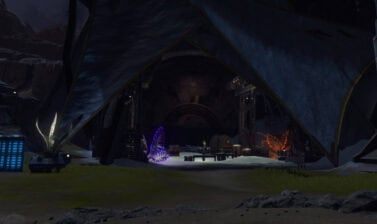
Phase 1 – the Cores
Without going into deep details, because it is described all in the video attached below, here are the basics: Blue terminal should be 2 DPS, the 2 strongest DPS and with the most bursty disciplines. DPS is usually not an issue, but taking down enemies (esp the big droids) and cores fast and easy helps speed everything up. DoT-Specs are not the most useful here. In fact, they may be a real issue for NiM and HM is a part of the preparations for NiM.
For ease, designate 1st group to go to the middle, 2nd to channel. What classes go well for each of these 2 roles, I explain in the video with visual demonstrations. We let the 2 DPS and 2 Healers stay in the middle (they are not allowed to leave the circle), just to make it easy for keeping the players alive. Other combinations are also available. If you find that adds don’t die as fast and are annoying, use 2 Tanks instead of having 1 channeling. The duration of each color cycle is long enough, taking the cores down should not be an issue for a relatively well geared team with 216+. Beware, the adds may go for the channeling players and interrupt them, which brings the shields on the Cores back up.
The terminals with the 4 colors are always on the same pillars and the colors always go in the same order. First is Blue, after that is Orange, third comes Purple and last is Yellow. There’s no need to kill the cores synchronized in HM. Usually 1 DPS is enough to take a core on their own.
During each color cycle, 2 spheres will spawn and roam around. At first they are yellow, which means they are neutral and will not aggro. Once tagged, they go red and start stunning random members. Each of the 2 players with the appropriate color for the phase needs to kill one of these 2 spheres. There are 8 spheres in total, spawning 2 in the beginning of each color phase.
Phase 2 – Boss and Color Circles
After Yellow phase ends, there’s a transition. Team members should save a defensive CD for that moment and drop aggro. The boss spawns and hits hard for the first few seconds. Priority is to clear the big remaining droids. 1 Tank focuses on the Boss, the other one tanks the adds while brining them towards the middle, ready for Phase 2.
The 2nd phase is simple. Designate Group 1 (DPS and Healers) to be on cleansing duty first, so once they do their color, they are “free” for the rest of the fight. The boss will mark a target every now and then with a special color, the player having that same color buff will have to go next to (or on top) of the marked for deletion player.
Once that’s done, the buff from the first player is gone and they cannot cleanse the circles any more. There can be upto 2 deletion protocols with the same color only – for the 2 players having that same color buff from killing the spheres in Phase 1.
Boss goes into shield from time to time and is invincible to damage. During that, the circles around him light up with 2 of each colors (Blue, Orange, Purple, Yellow). Players must quickly deactivate them by stepping into the circles, again, according to their own buffs and marks from Phase 1. Example: 1 Blue person can step into both Blue circles and cleanse them, but a Blue marked player cannot delete a circle with a different color.
This continues until the boss is dead. The whole fight takes ~8 minutes, depending on DPS and gear.
I hope you enjoyed the read and video and found my Operator IX Guide useful! Good luck in clearing out the whole Terror From Beyond Operation!
Related SWTOR guides you might like: