We’ll show you how to max out Attack Speed, Critical Rate, Movement Speed, and an Elemental Resistance at the same time with a few Abyss Gear sockets left over.
Use the Table of Contents, located in the left panel (top left button on the mobile menu) to navigate through this long guide more easily and quickly.
Stat Caps and Thresholds
Most stats that can be increased with Abyss Gears have caps and/or don’t have any effect unless you pass specific thresholds.
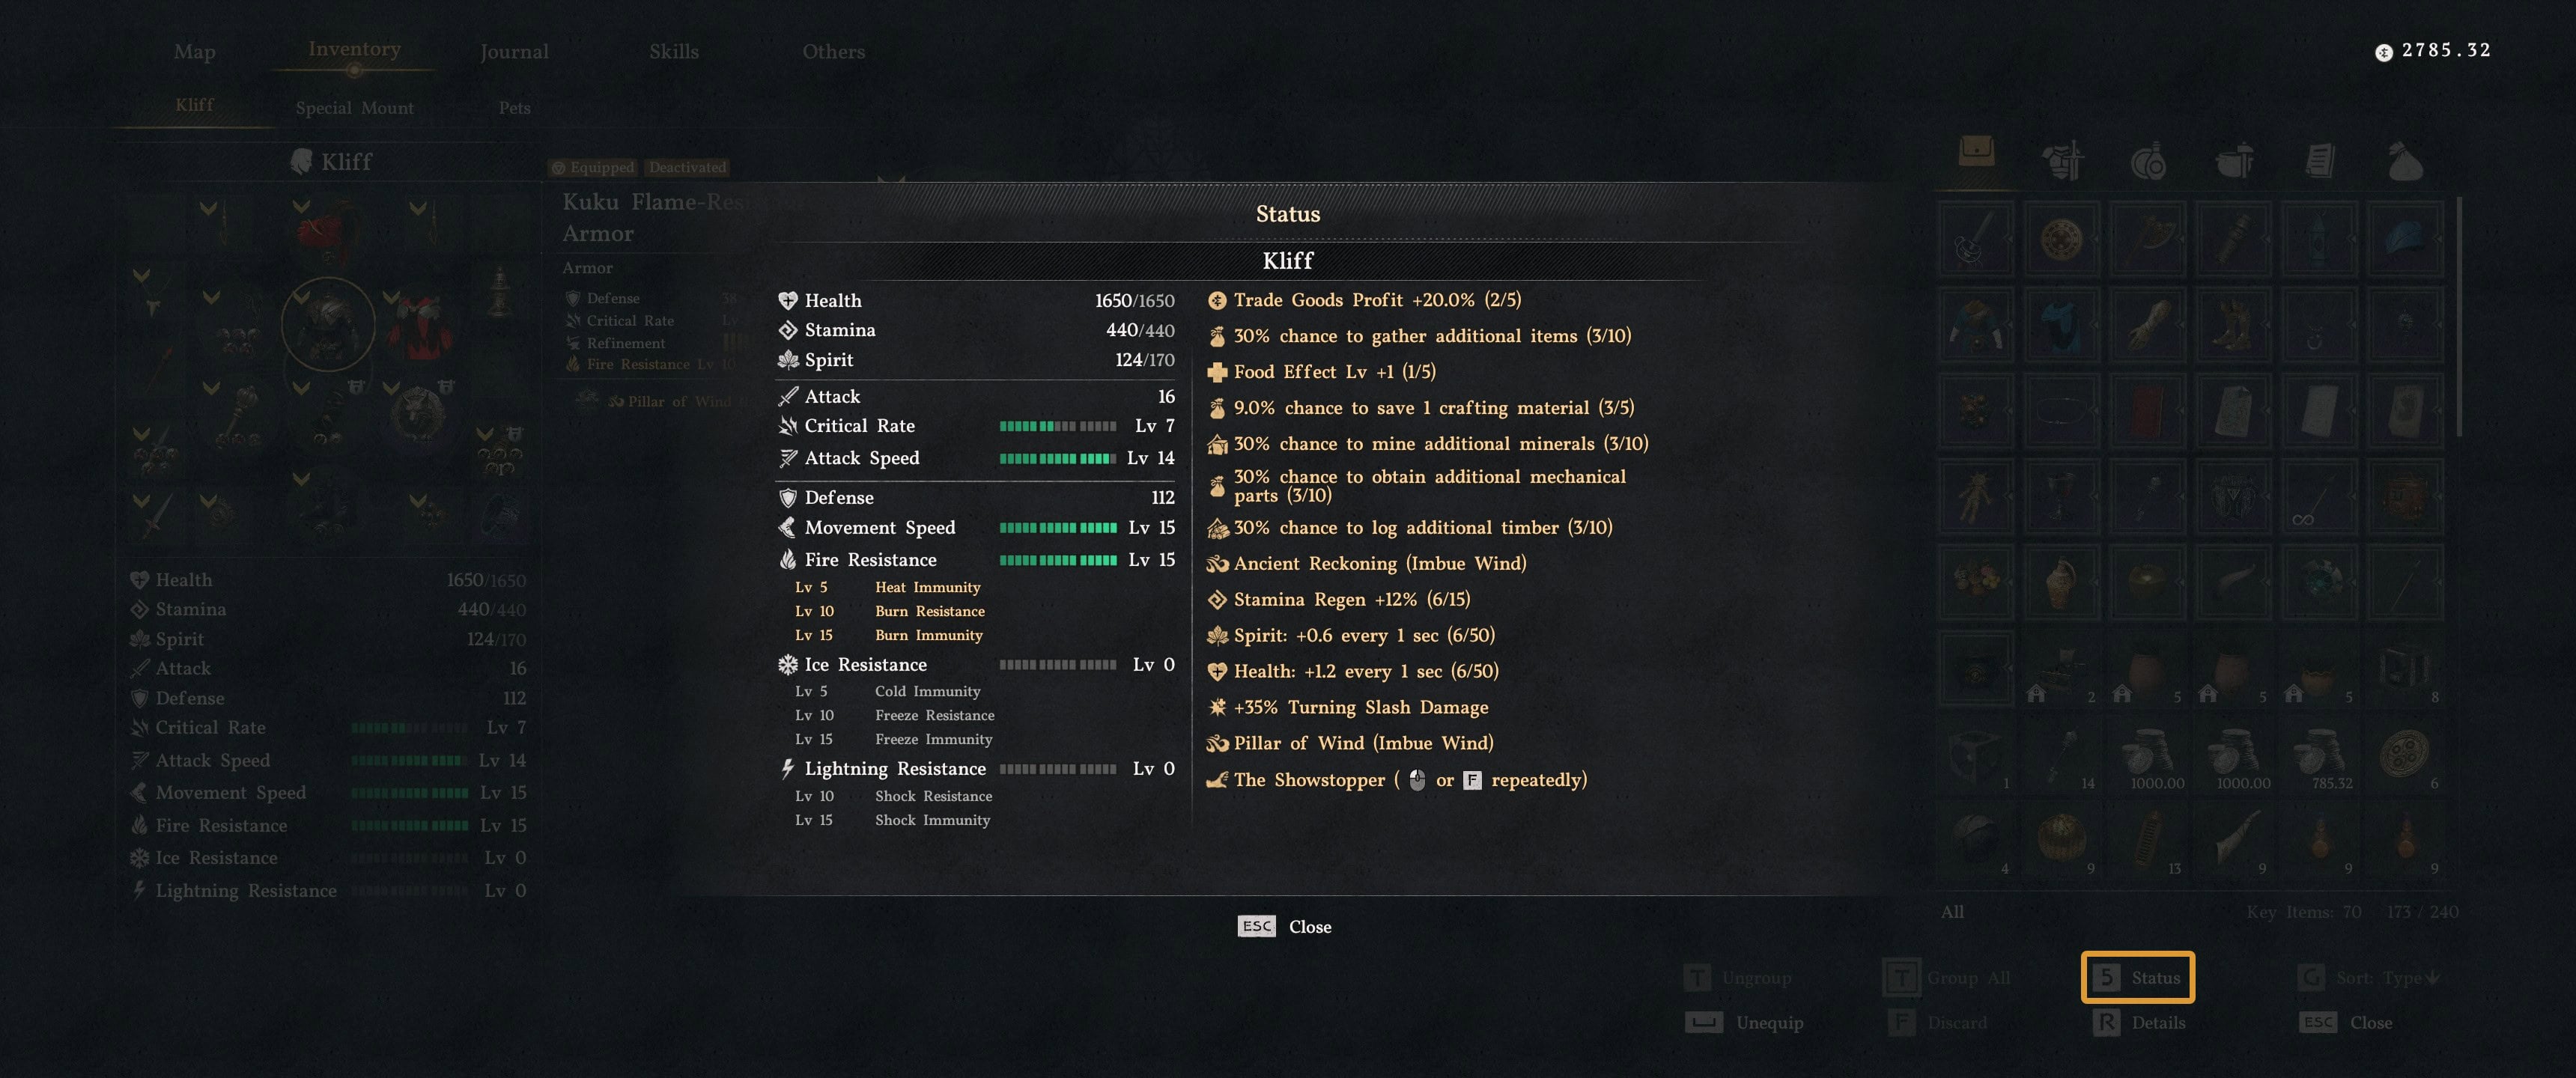
You can see these caps most prominently with Critical Rate, Attack Speed, Movement Speed, and Elemental Resistance, but if you pull up the Status menu on the Inventory screen, you can see that many other stats have caps as well.
It’s worth noting that the caps count the total amount of stat, not the number of sources, so in terms of min-maxing, the Tier III Abyss Gears just let you reach the caps faster and make more efficient use of your sockets. They don’t necessarily let you climb higher.
There are too many types of Abyss Gears to benefit from all of them, let alone max them out, but it is possible to get Level 15 Critical Rate, Attack Speed, Movement Speed, and get at least Tier I or II (Lv 5 or 10) Elemental Immunity at the same time.
Since Kliff has access to the greatest variety of equipment and Kuku [Element]-Resistant Armors, it’s much easier to max out these stats with him compared to Damiane and Oongka.
How Stats Work
Without flytext or combat logging or even just in-game tutorial explanations, it’s ridiculously impractical to test exactly what these stats do. Some have tried, but there’s a ton of guesswork involved, creating substantial room for human error.
The game is not so challenging that there is any need to optimize to this degree, so the focus here is just on cranking all those bars up to their maximum.
 Attack
Weapons and unarmed attacks deal damage based on the Attack stat listed on the weapon used for the attack, or gloves, or boots, respectively if it’s a punch or kick, plus the Attack provided by the necklace and rings.
 Critical Rate
Critical Rate governs the chance each hit has to deal double damage. The consensus seems to be that you have a base Critical Rate of 5% and then each subsequent level increases your critical chance by 2%, resulting in a maximum of 35% critical chance at Critical Rate Lv 15.
 Attack Speed
Attack Speed governs the animation speed of your attacks, though it does not seem to offer compensatory reductions or increases to Stamina and Spirit costs, regen rate, or cooldowns on skills with charges.
 Movement Speed
Movement Speed is just how fast your character moves around. It’s nice if you’re impatient like me but the stat has little impact on combat.
 Defense
Defense stat mitigates the damage you take and is the sum of the number listed on your armor pieces, equipped shield, and earrings, regardless of whether you’re holding them or not. There is no segmentation based on body part in the damage calculation.
It seems like the formula is more complicated than (Attack – Defense) x Damage Reduction = Damage Taken, but you have options if you want to take less damage. The only way to get Damage Reduction is with the Aegis Abyss Gear.


 Elemental Resistances
Elemental Resistances have thresholds before they apply any immunities. These thresholds exist at Lv 5, 10, and 15. For example, being at Level 6 Ice Resistance is no better than being at Level 5 Ice Resistance, and you get nothing for being at Level 4 or below.
Fire and Ice Resistance each have 3 tiers of protection. The Level 5 tier offers immunity to hot or cold weather, respectively, meaning your Stamina Regen Rate isn’t reduced by 50% in the hot sun of the Crimson Desert or the frosty mountains in Hernand and Pailune.
The Level 10 threshold makes it take longer for you to catch fire or freeze if exposed to fire or ice damage from things like Spitter packs, explosives, and blizzards, and the Level 15 threshold makes you completely immune to the effects of that element.
Since lightning strikes aren’t a part of any region’s local climate, there is no Level 5 threshold for Lightning Resistance. You get resistance to being shocked at Level 10 and complete immunity to electricity at Level 15.
Cloaks provide the lion’s share of Elemental Resistance, offering Level 3, 5, or 7 Resistance against a single element. The higher the level, the lower the Stamina Cost Reduction and Defense offered.
If you’re using a Cloak that offers Level 3 or 7 Elemental Resistance, it’s worthwhile to embed a single Frost/Flame/Shockward II or III Abyss Gear to reach that next threshold.
Cloth, Leather, and Plate Armor Stat Differences
Each type of armor weight offers a different amount of Defense and is affiliated with a specific Elemental Resistance.
If you want to max out your main offensive stats (and care about Movement Speed), you’ll need to rely on cloth Armor because it sacrifices Defense (and unarmed Attack) for Attack Speed (gloves only) or Movement Speed.
Leather armor trades some Defense for Lightning Resistance and can trade Attack for aboost to Critical Rate for unarmed attacks, though not every pair of leather gloves or leather boots offers Critical Chance, and the Attack trade means it isn’t profitable to use leather over plate.
You also need a full set of leather armor to reach Lightning Resistance Lv 10 with a single Shockward III, so it’s really hard to recommend using leather armor at all.
Plate Armor offers the highest raw Defense and Attack stats, so it’s better for if you want to avoid this min-maxing kerfuffle and focus entirely on the basics.
Stat Application and Distribution
Some stats apply universally so long as you have the piece equipped. Others are distributed and may only apply to specific attacks or weapons, depending on where the stat comes from.
| Abyss Gear | Stat (Socket Restriction) | Application |
|---|---|---|
| [Element]ward | Elemental Resistance (Armor) | Universal |
| Haste | Movement Speed (Armor) | Universal |
| Fortification | Defense (Armor, Shield) | Universal |
| Aegis | Damage Reduction (Armor, Shields) | Distributed |
| Swift | Attack Speed (Armor, Weapons) | Distributed |
| Destruction | Attack (Gloves, Boots, Weapons) | Weapon-dependent |
| Insight | Critical Rate (Gloves, Boots, Weapons) | Weapon-dependent |
In essence, the Attack and Critical Rate are weapon-dependent, so if you swing your sword or punch/kick someone, it’s going to deal the damage and have the critical chance stated on that specific piece of equipment only.
Attack Speed and Aegis only apply while whatever they’re on is being “held”, so Attack Speed on a Weapon (or Shield) will only apply while you’re using those weapons, but these stats will get distributed to whatever attack you’re doing if they come from another source.
More broadly, any weapon-dependent stat that comes from a non-weapon source will get distributed to all attacks, so they’re just like all the other stats that apply universally, including if the equiment is put away.
The system is physically logical but also super overcomplicated and poorly unexplained.
Abyss Gear Socketing
Critical Rate, Attack Speed, and Movement Speed are the 3 stats with achievable caps. Your top priority is maxing those out and you will need to use a combination of Insight, Swift, and Haste Abyss Gears to get there.
Since these tier III Abyss Gears offer 3 levels of their associated stat and you need to get to 15, your main challenge is managing multiples of 3 (6, 9, 12, 15).
Accessories
Accessories are your foundation because they can provide Critical Rate, Attack Speed, and Movement Speed. You can get 3-4 Critical Rate from your Necklace, 6-8 Movement Speed from your pair of Earrings, and 6-8 Attack Speed from a pair of Rings.
Whenever Critical Rate, Attack Speed, and Movement Speed are offered on a piece of equipment, you’re always trading the same amount of Attack to get there, and the 4-point versions also trade 0.1-0.2/s on the regeneration stat, but we aren’t considering those here.
Shields also provide either 2 Movement Speed, 2 Attack Speed, or 1 of both, and while Movement Speed is always active on shields, Attack Speed only applies while you’re using it.
The 4 Critical Rate on Necklaces and 4 Movement Speed Earrings are readily available in craftable forms, but only two Rings offer 4 Attack Speed, and neither is craftable.
Whether you go for 3 or 4 stat version depends on your access to multiples. It’s not just a more stat = more better situation. You need to find a way to reach the next multiple of 3, or you’ll end up at an agonizing Lv 13 or Lv 14 that are difficult to make up.
Weapon Selection
No weapon is objectively better than any other. Each weapon type offers 3 different distributions of Attack, Attack Speed, and Critical Rate that can be converted to each other with a single tier III Destruction, Swift, or Insight Abyss Gear.
The pointy-stabby weapons leaning towards Attack Speed and the swingy-slashy weapons leaning towards Critical Rate.
Weapons that don’t have a tipped point will use the Dagger for stabbing. Their baseline attack is a little higher, but you have to upgrade an extra piece of equipment.
Icons used in the table:![]() Attack
Attack![]() Attack Speed
Attack Speed![]() Critical Rate
Critical Rate
| Weapon Type | Pure Attack | Variant 1 | Variant 2 | Variant 3 | Usable By | ||||
|---|---|---|---|---|---|---|---|---|---|
| Sword Kliff, Oongka | 12 → 34 | 12 → 30 Lv 1 → 2 | 12 → 30 Lv 1 → 2 | Kliff,Oongka | |||||
| Axe* Kliff, Oongka | 12 → 34 Lv 1 | 10 → 30 Lv 2 → 3 | 10 → 30 Lv 1 Lv 1 → 2 | Kliff,Oongka | |||||
| Mace* Kliff | 13 → 37 | 11 → 33 Lv 1 → 2 | 11 → 33 1 → 2 | Kliff | |||||
| Rapier Damiane | 11 → 31 Lv 1 | 9 → 27 Lv 2 → 3 | 9 → 27 Lv 1 Lv 1 → 2 | Damiane | |||||
| Spear Kliff, Damiane | 26 → 40* | 13 → 38 Lv 1 | 12 → 35 Lv 2 → 3 | 12 → 34 Lv 1 Lv 1 → 2 | Kliff,Damiane | ||||
| Halberd Kliff | 14 → 39 Lv 1 | 13 → 36 Lv 2 → 3 | 12 → 35 Lv 3 → 4 | Kliff | |||||
| Longsword Kliff, Oongka | 16 → 43 | 15 → 40 Lv 1 → 2 | 14 → 39 Lv 2 → 3 | Kliff,Oongka | |||||
| Greatsword Damiane | 17 → 45 | 16 → 42 Lv 1 → 2 | 15 → 41 Lv 2 → 3 | Damiane | |||||
| Greataxe* Oongka | 16 → 43 Lv 1 | 15 → 40 Lv 2 → 3 | 14 → 39 Lv 3 → 4 | Oongka | |||||
| Greathammer* Oongka | 17 → 45 | 16 → 42 Lv 1 → 2 | 15 → 41 Lv 2 → 3 | Oongka | |||||
| Bow Kliff | 11 → 33 | 10 → 30 Lv 1 → 2 | 10 → 30 Lv 1 → 2 | Kliff | |||||
| Pistol Damiane | 12 → 36 Lv 1 | 11 → 33 Lv 2 → 3 | 11 → 33 Lv 1 Lv 1 → 2 | Damiane | |||||
| Musket Damiane | 13 → 38 Lv 1 | 12 → 35 Lv 2 → 3 | 12 → 35 Lv 1 Lv 1 → 2 | Damiane | |||||
| Shotgun Damiane | 15 → 41 | 14 → 38 Lv 1 → 2 | 13 → 37 Lv 2 → 3 | Damiane | |||||
| Blaster Oongka | 12 → 34 | 10 → 30 Lv 1 → 2 | 10 → 30 Lv 1 → 2 | Oongka | |||||
| Dagger Kliff, Oongka, Damiane | 12 → 34 Lv 5 → 8 | 10 → 30 Lv 6 → 10 | 10 → 30 Lv 1 Lv 5 → 9 | Kliff,Oongka,Damiane | |||||
Make sure you’re picking a weapon that offers Lv 2 or 3 in either Critical Rate or Attack Speed.
Since you can put Swift Abyss Gears on your Armor, the weapons that offer Critical Rate Lv 2 or 3 are more valuable with this approach, assuming you don’t run out of sockets you want to use for other things.
Weapons that can reach Critical Rate Lv 4 are much harder to work with because you have to scrounge around for a single point of Critical Rate on a piece that doesn’t normally offer it or give up those gains with the Rainstorm Necklace which has Critical Rate Lv 2.
Valid Combos
Not all combinations of weapons and accessories work equally well. It’s more efficient if you can derive at least 3 points of Attack Speed + Critical Rate from your weapons, though this does restrict your weapon choices considerably.
| Total Ring Attack Speed | Weapon Attack Speed | Weapon Critical Rate | Necklace Critical Rate |
|---|---|---|---|
| 8 | 1 | 2 | 4 |
| 8 | 1 | 0 | 3 |
| 6 | 0 | 2 | 4 |
| 6 | 0 | 3 | 3 |
| 7 | 2 | 0 | 3 |
The table is a lot to process and very boring to look at, so here are the key conclusions:
- Critical Rate Lv 4 Necklaces need to be paired with Critical Rate Lv 2 weapons.
- Attack Speed Lv 6 combined on Rings needs to be paired with Attack Speed Lv 3 or Critical Rate Lv 3 weapons.
- You’re leaving too many points on the table if you don’t use both of the Attack Speed Lv 4 Rings on the same character
- You ought to pair Attack Speed Lv 8 with a Critical Rate Lv 4 Necklace.
In general, since Insight (Critical Rate) has to be applied per weapon, it makes the most sense to lean into Critical Rate Lv 3 weapons.
Abyss Gears
You’ll need the following numbers of Tier III Abyss Gears to max out your stats. Suggested placements are primarily for organization based on required quantity. For instance, if I need exactly 2 of a specific Abyss Gear, I like to put them on the same piece.
| Abyss Gear | Required Quantity | Suggested Placement |
|---|---|---|
| [Element]ward | 0-1 | Helm |
| Haste | 0-3 | Gloves |
| Swift | 2-3 | Boots |
| Insight | 9 | Weapons |
| Composure | 1 | Chest |
You should have a few remaining sockets in your armor and 1 in each Two-Handed Weapon that can be used for whatever you want. I prefer to embed the unique Abyss Gears there, but you can use something like Destruction or Fortification if you aren’t interested in flashy effects.
Composure technically falls into the same optional category, but I hate running out of Spirit, so I always embed one.
Best Equipment
Practically all of the best equipment is only usable by Kliff, save for the Pororin Petal Hat and Kuku Lightning Spear, though both have more severe trade-offs that make them harder to justify using.
| Icon | Item Name | Effect | Source | Region | Item Slot | Important |
|---|---|---|---|---|---|---|
| Pororin Petal Hat | Forest’s Breath | Quest | Hernand | HelmetBest | Yes | |
| Kuku Lightning Spear Spear | Lightning Weapon Attack (Kuku Edition) | Kilnden Workshop | Hernand | WeaponBest | ||
| Mark of Darkness Ring | Attack Speed | Exploration | Demeniss | AccessoryBest | ||
| Witch’s Ring Ring | Attack Speed | Quest | The Abyss | AccessoryBest | ||
| Tariv Cloth Boots | Movement Speed | Purchase | Demeniss | BootsBest | Yes | |
| Rabbit Cloth Boots | Movement Speed | Purchase | Demeniss | BootsBest | Yes | |
| Champion’s Plate Gloves (Combat God) | Lightning Affinity | Quest | Crimson Desert | GlovesBest | ||
| Tariv Cloth Gloves | Attack Speed | Purchase | Demeniss | GlovesBest | Yes | |
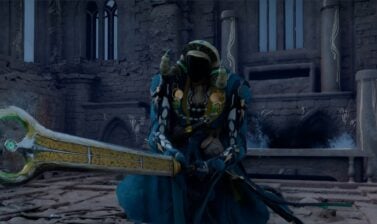
| Kuku Ice-Resistant Armor | Ice Resistance | Kilnden Workshop | Hernand | ArmorBest | ||
| Kuku Lightning-Resistant Armor | Lightning Resistance | Kilnden Workshop | Hernand | ArmorBest | ||
| Kuku Flame-Resistant Armor | Fire Resistance | Kilnden Workshop | Hernand | ArmorBest | ||
| Scorchflame Plate Cloak | Fire Resistance | Exploration | Hernand | ArmorBest | ||
| Frostcursed Plate Cloak | Ice Resistance | Exploration | Hernand | ArmorBest | ||
 | Honorary Greymane Cloth Gloves | Attack Speed | Purchase | Hernand | ArmorBest |
The Kuku Lightning Spear is special because it offers Movement Speed Lv 2 and is usable by both Kliff and Damiane. Since Damiane can use Spears and Oongka can’t, you’re better off saving the Pororin Petal Hat for Oongka.
Since the Kuku armors offer Lv 10 Resistance for their element, there is no need to use the Lv 7 Resistance Cloaks for Kliff, and Damiane and Oongka don’t have access to any of those, or even the Lv 5 ones.
We have a full build guide showing you how to min-max Kliff’s gear with instructions how and where to get every piece of gear required for this build that offers you 15 Attack Speed, Movement Speed, Critical Rate and strong Elemental Resistance.
How to min-max Kliff’s Equipment: Crimson Desert Build Guide