
Charting the Unknown introduced many new mechanics to Crimson Desert. One of them is the Facility Management system, which lets you earn millions of Camp Funds on a daily basis. This guide covers everything you need to get started.
Use the Table of Contents, located in the left panel (top left button on the mobile menu) to navigate through this long guide more easily and quickly.
Key Points
- Unlock: Finish Chapter III, the Expanding the Camp quest and Renewed Vitality.
- Cost: Every facility costs 15,000 Copper to lease + upkeep + wages.
- Facilities: 18 in total in four types: Sawmill, Restaurant, Smithy and Tailor’s Shop.
- Facility Tier: Place Installables that match your facility type to earn Installable Pts. Superior, the top tier, needs 220 pts.
- Skilled staff: Comrades with matching skills boost Installable Pts. by up to 100%.
- Popularity: Keep prices low while leveling. Raise them once you reach Lv. Max.
- Passive income: You don’t need to stay at the facility.
- Rewards: Leveling up facilities awards you with equipment and blueprints.
How to unlock Facility Management
Make sure you’ve completed these quests first to unlock Facility Management:
- Unlock the Greymane Camp by completing Chapter III of the Main Story.
- Complete the Expanding the Camp Faction Quest, which is part of the Gathered Will questline.
- Complete the Renewed Vitality questline, which is part of the Charting the Unknown Greymane Faction quest.
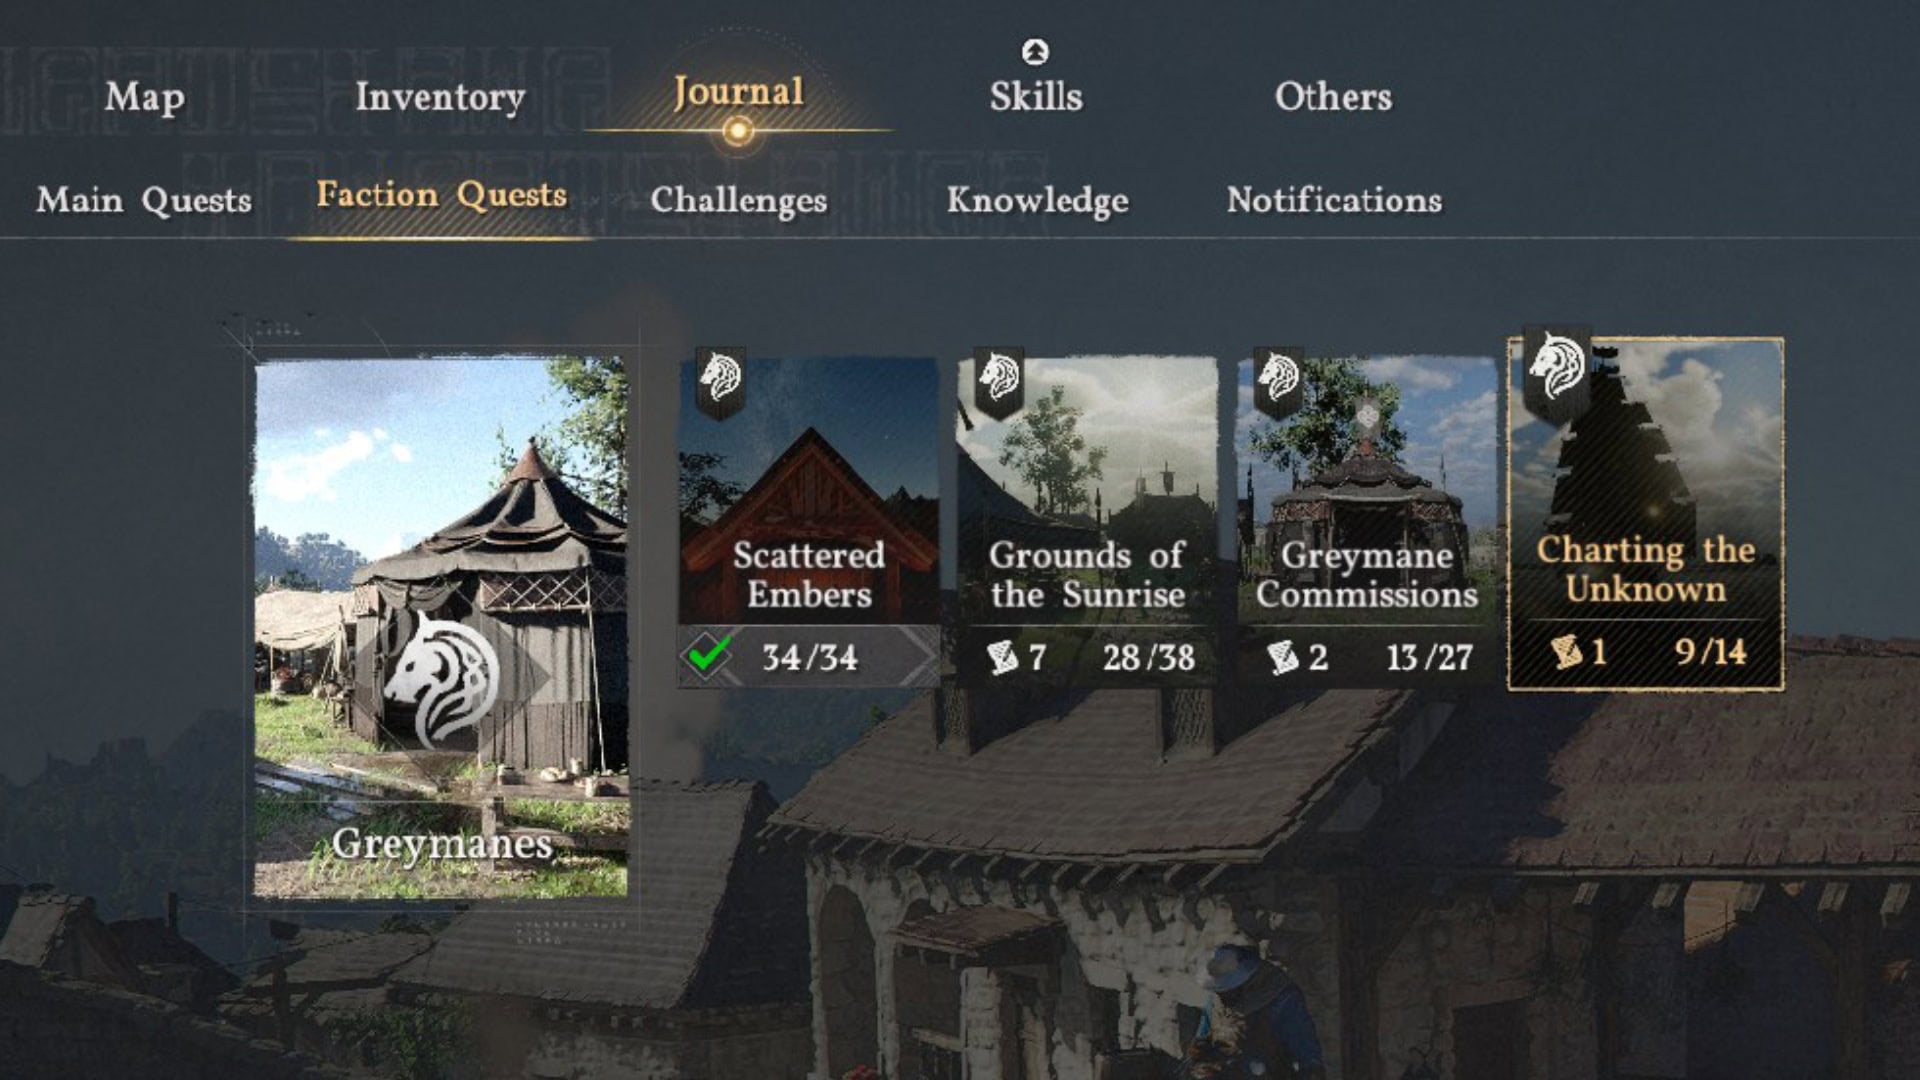
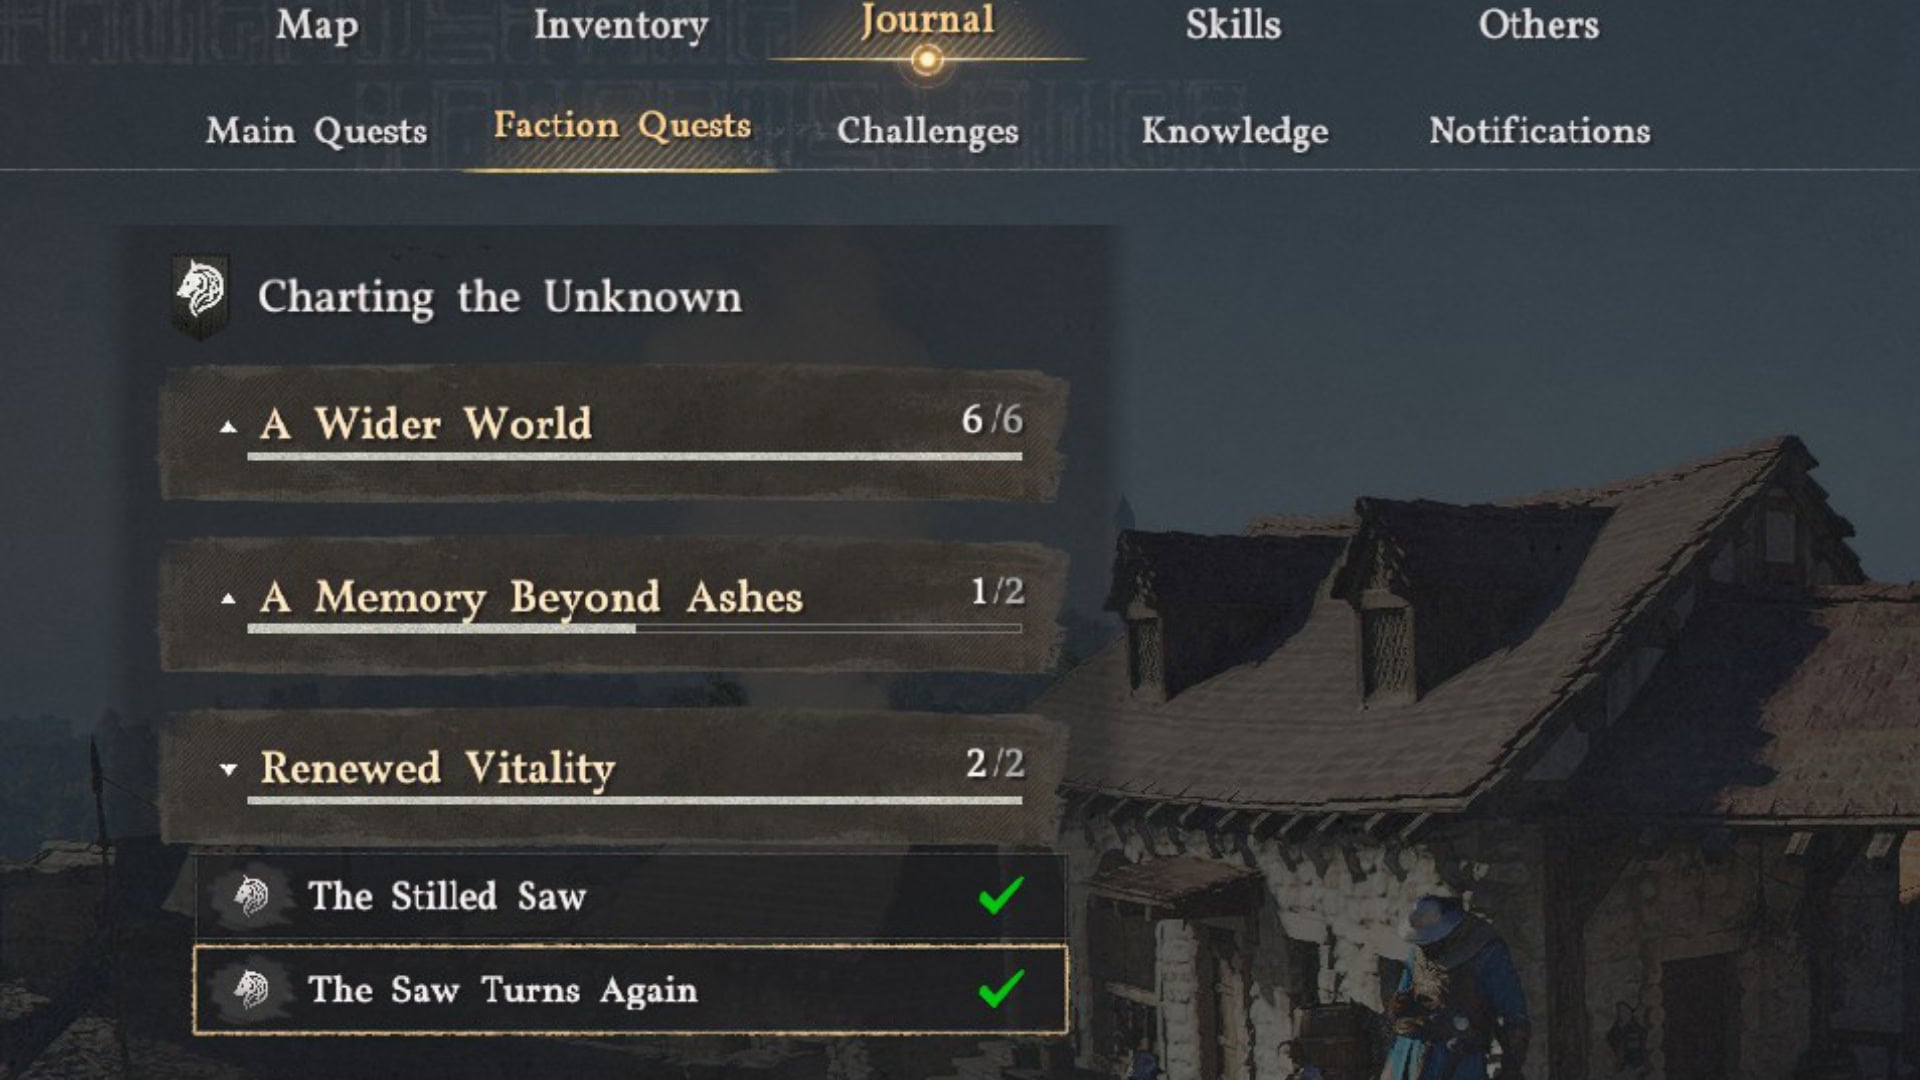
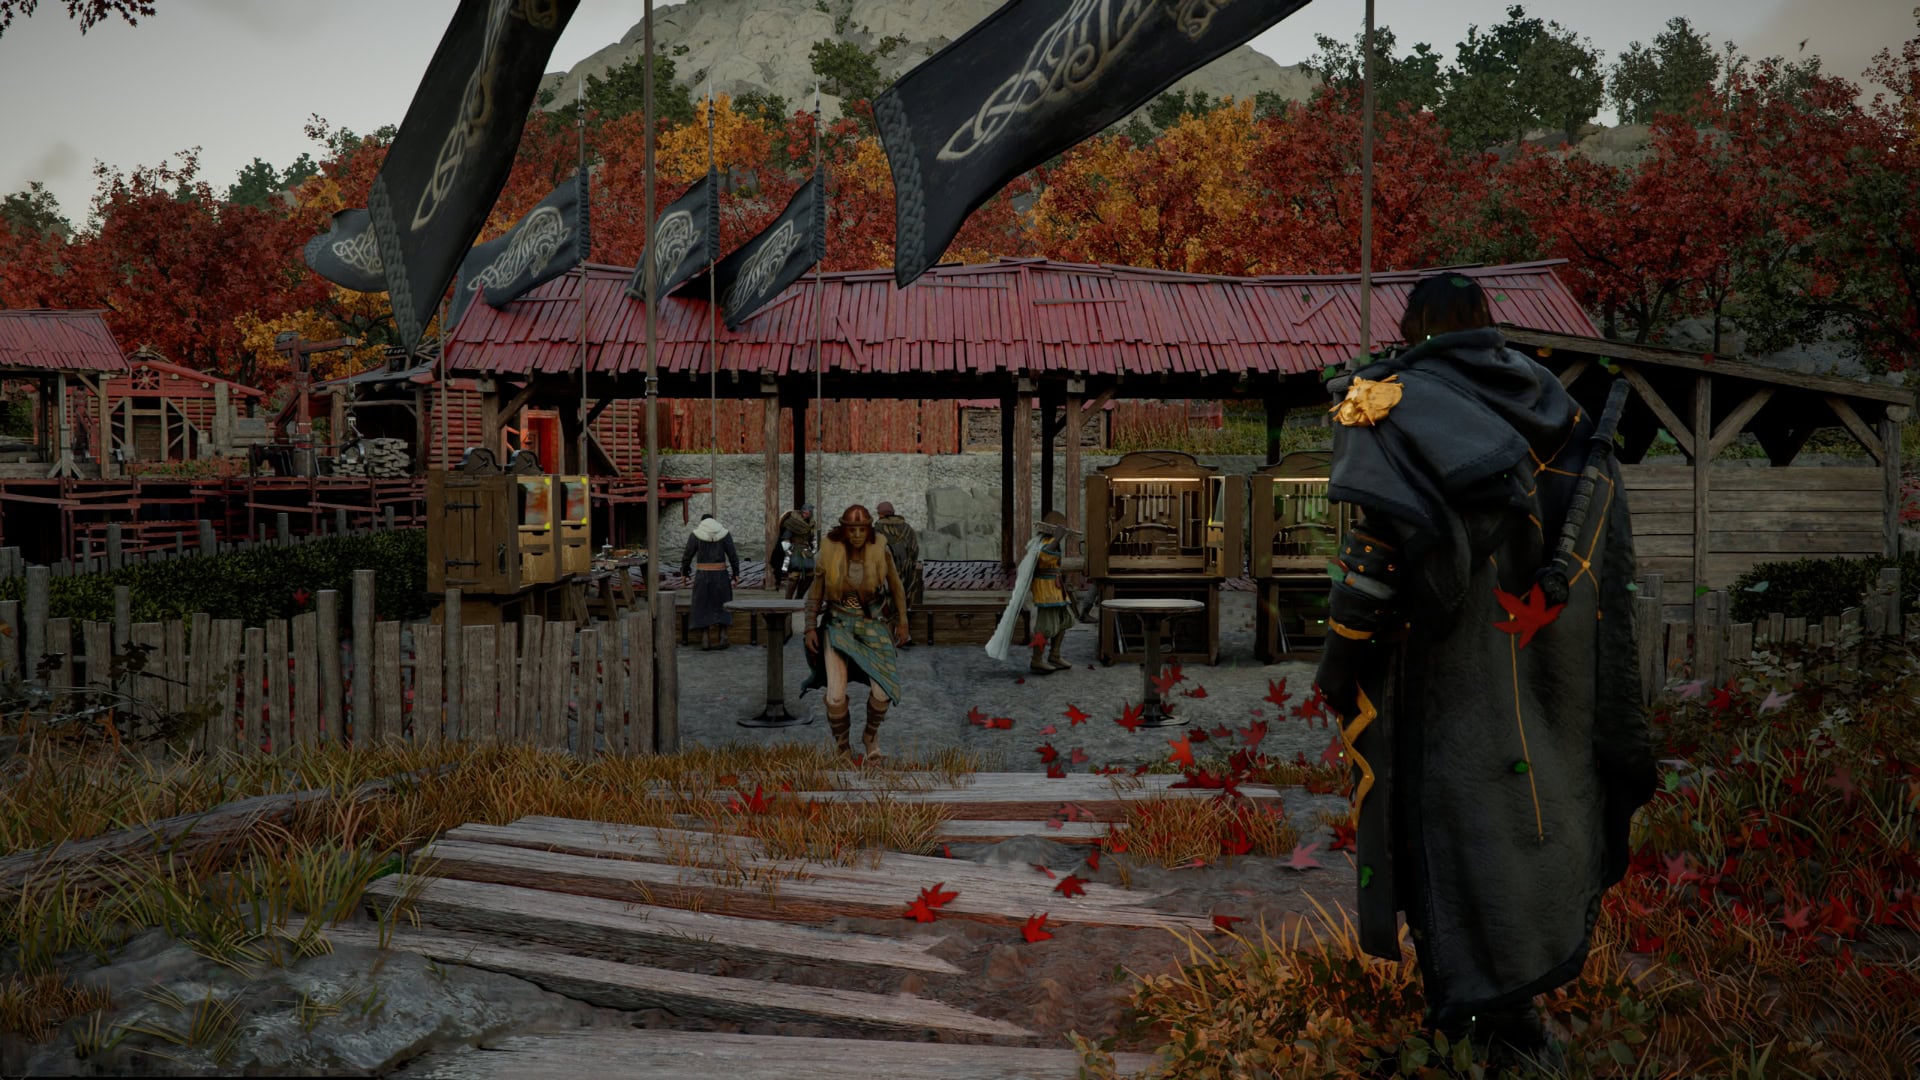
Renewed Vitality works as a tutorial for managing a facility. Once you complete it, you’ll be able to lease and manage other facilities on the map.
How to Lease a Facility
The first step to start raking in the big bucks is to lease a facility. To do so, open your map on the Facilities Tab. Facilities available for leasing show a small currency sign on the lower right corner of their grey icon. Facilities already under your management will have a golden color.
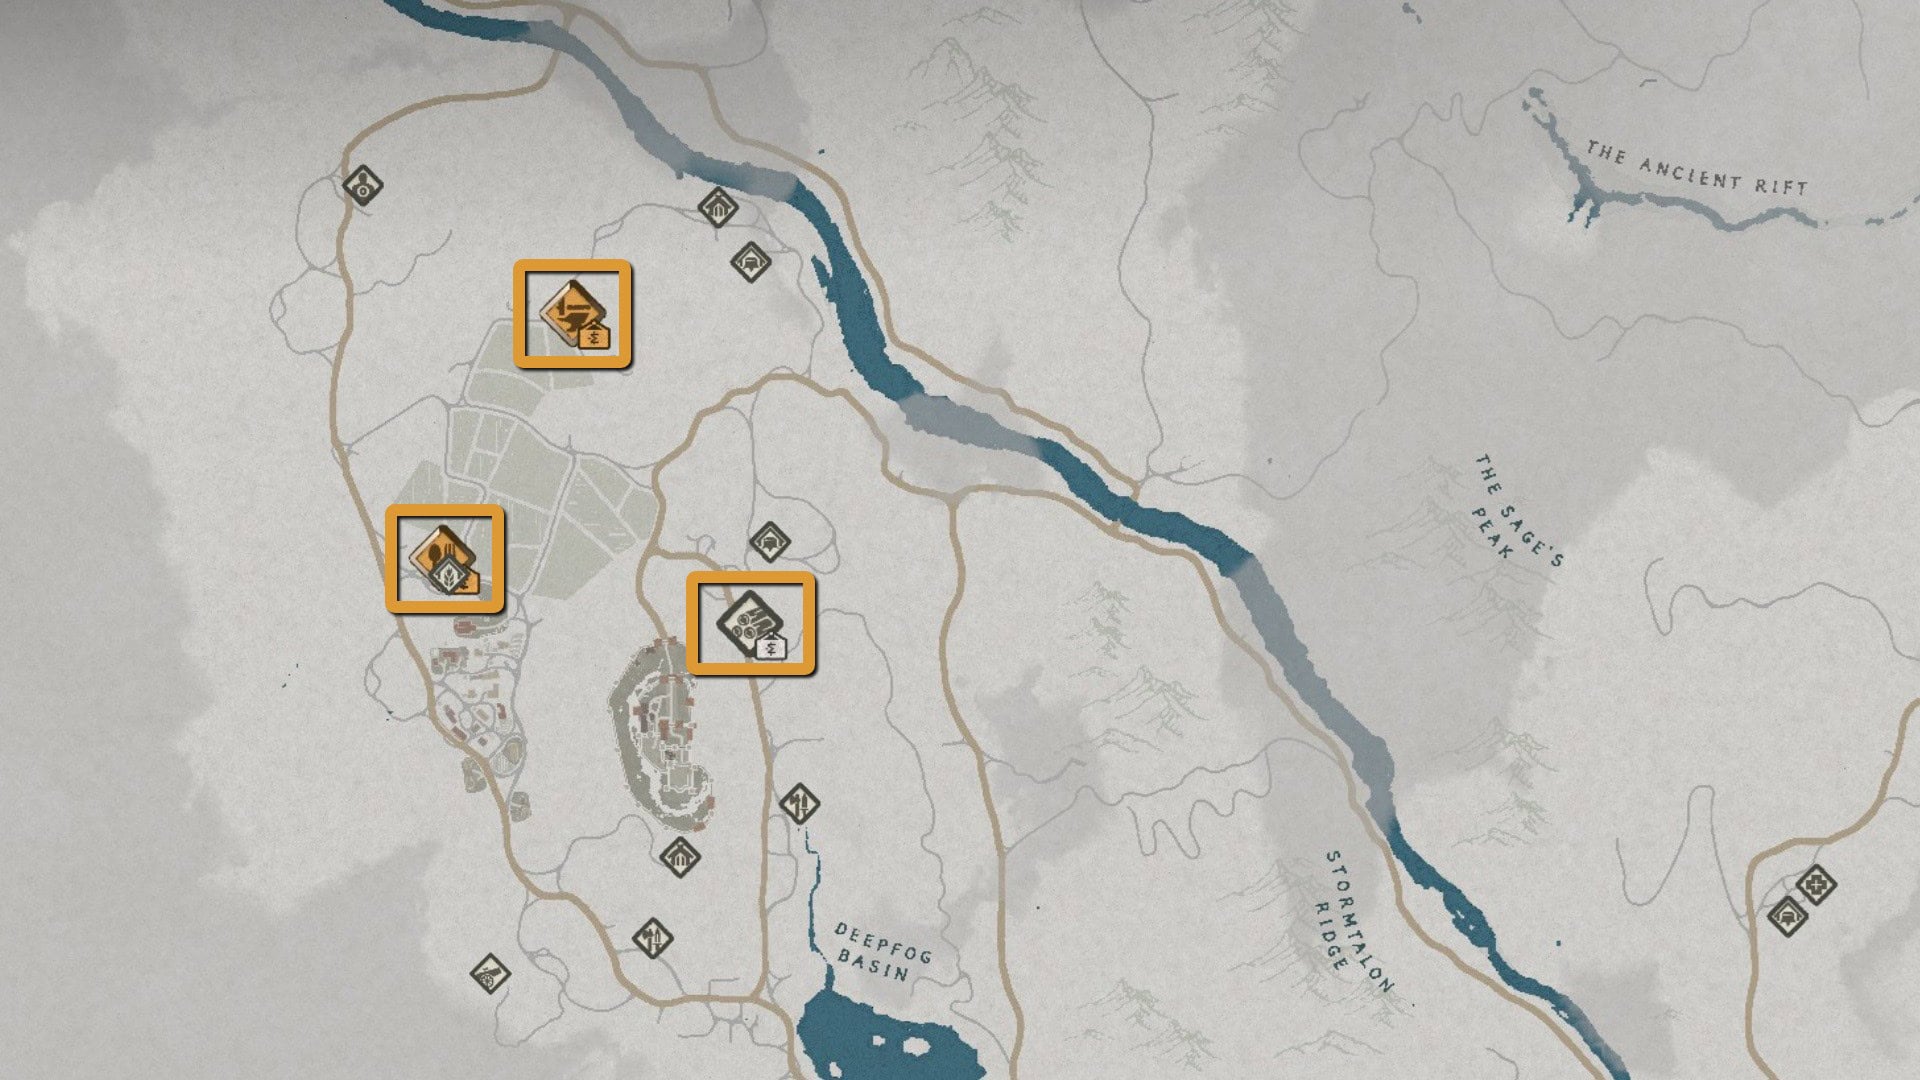
To lease a facility:
- Hover over the grey icon. A command will show on the bottom right side of your screen with the button you need to press.
- Press the button. A confirmation will pop up with the leasing price.
- Confirm to lease the facility
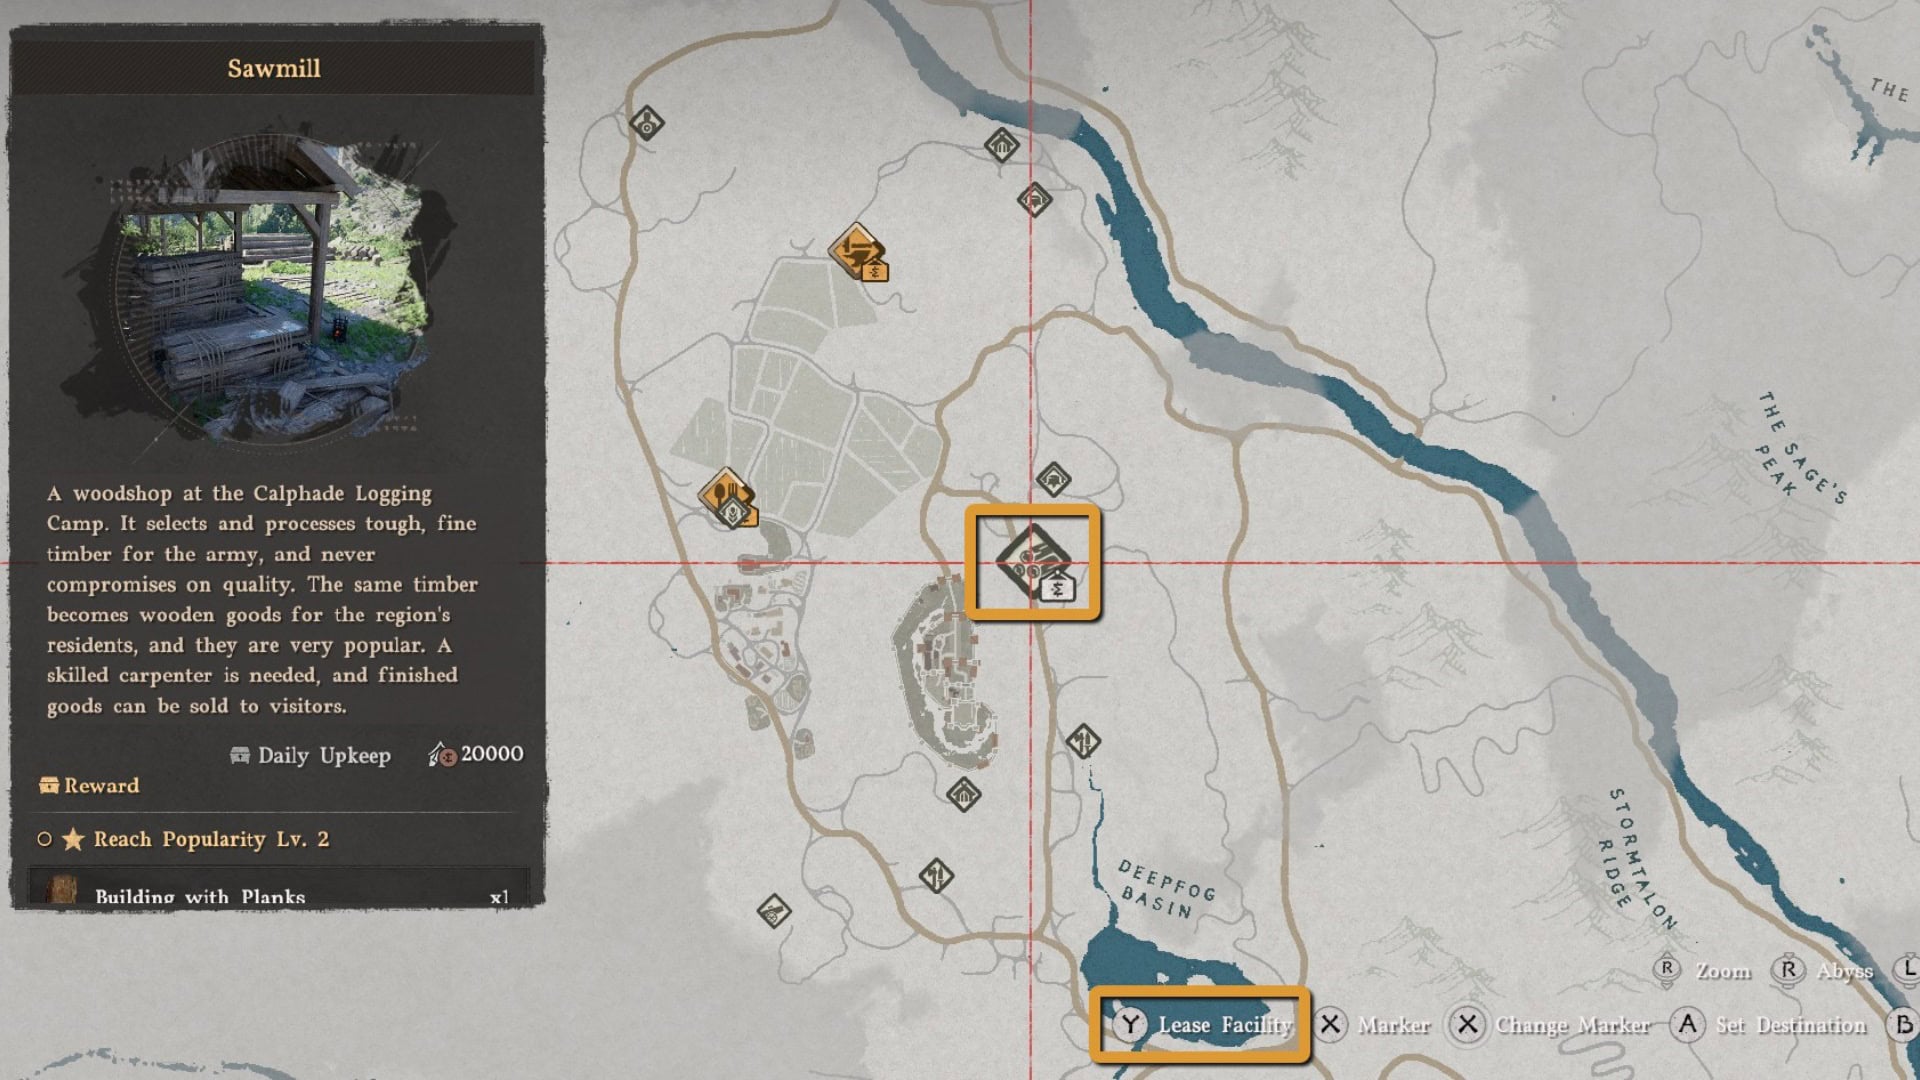
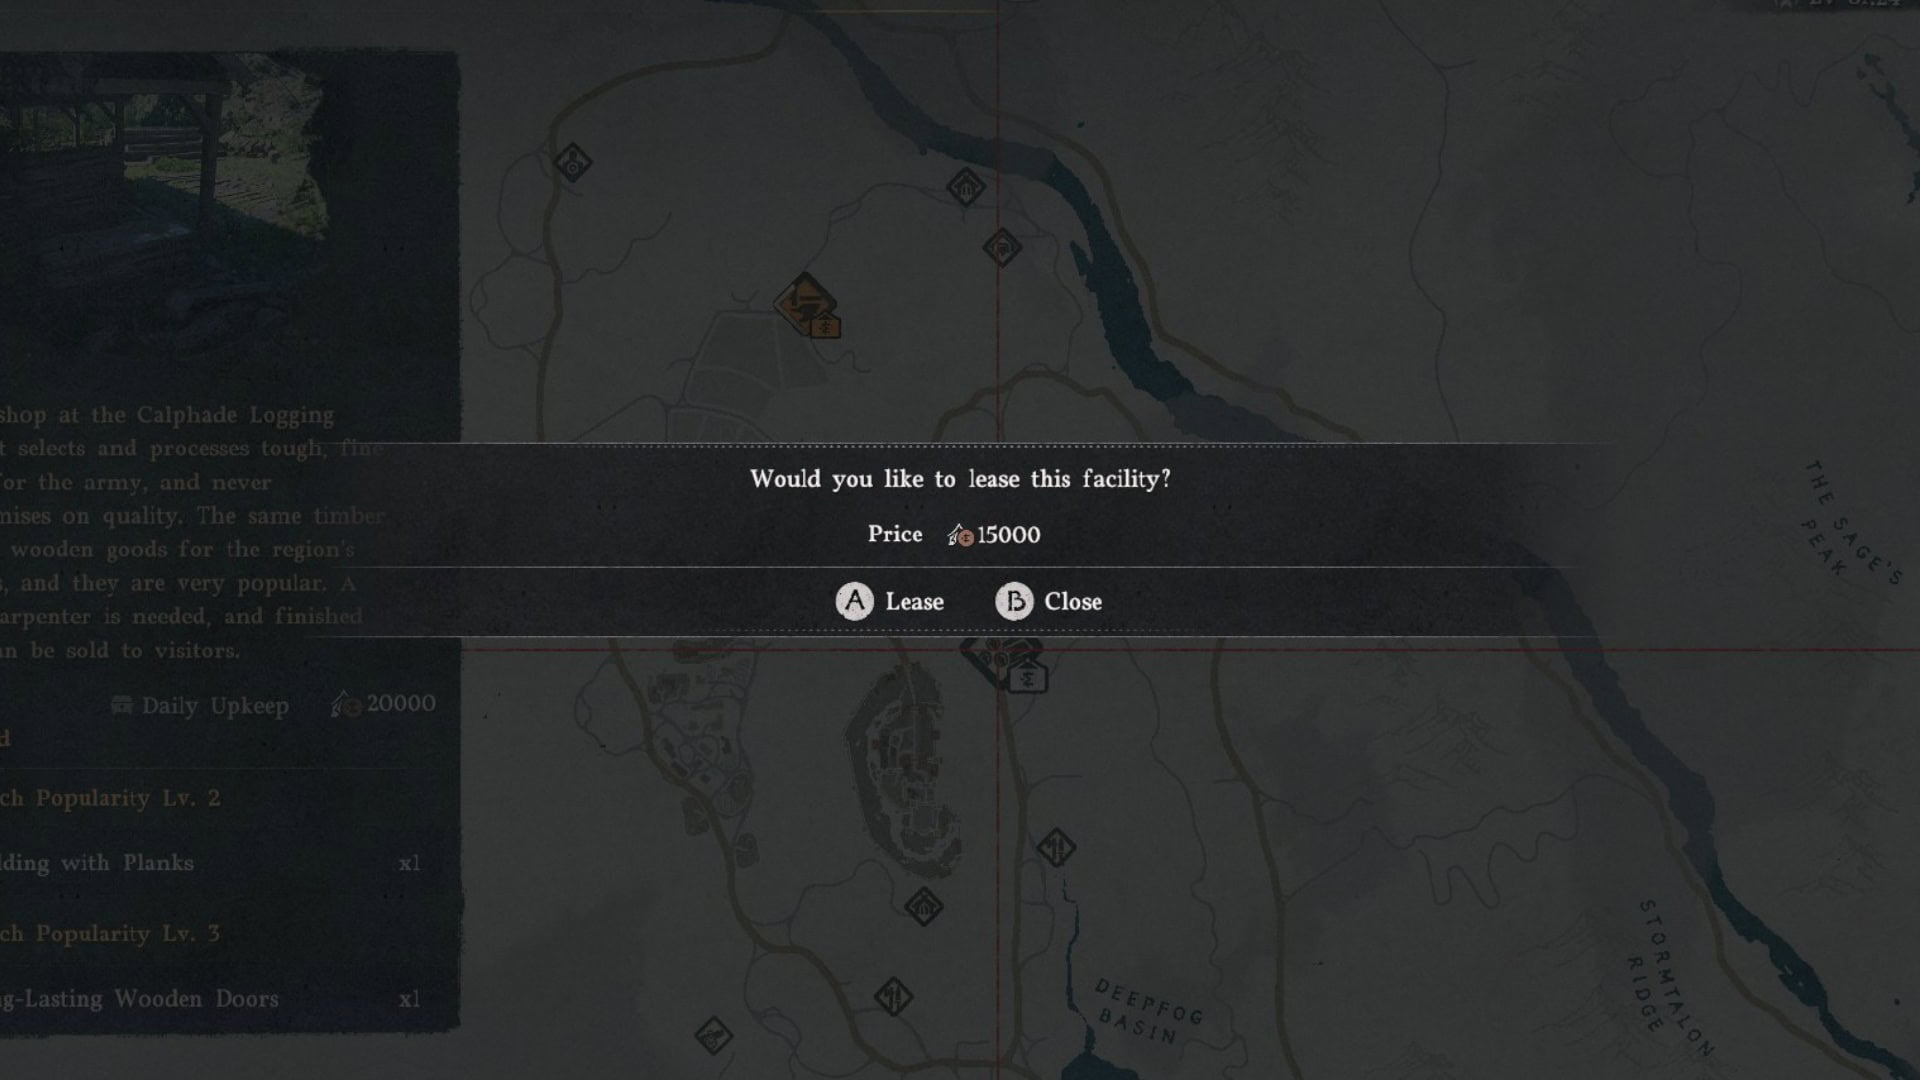
All facilities cost 15,000 Copper to lease (camp funds, not your personal savings). You won’t have to pay again until you open the shop and start paying a Daily Upkeep and Daily Wages.
There are four types of facilities you can lease:
- Sawmill
- Restaurant
- Smithy
- Tailor’s Shop
In the grand scheme of things all of these work the same. The difference lies in the items you’ll need to install to upgrade them and the skills your hired workers need.
Placing a bellows in a Tailor’s Shop won’t do anything to upgrade the facility, just as hiring an employee proficient in carpentry won’t make them anything more than an average cook or waiter at a Restaurant.
Facility Locations
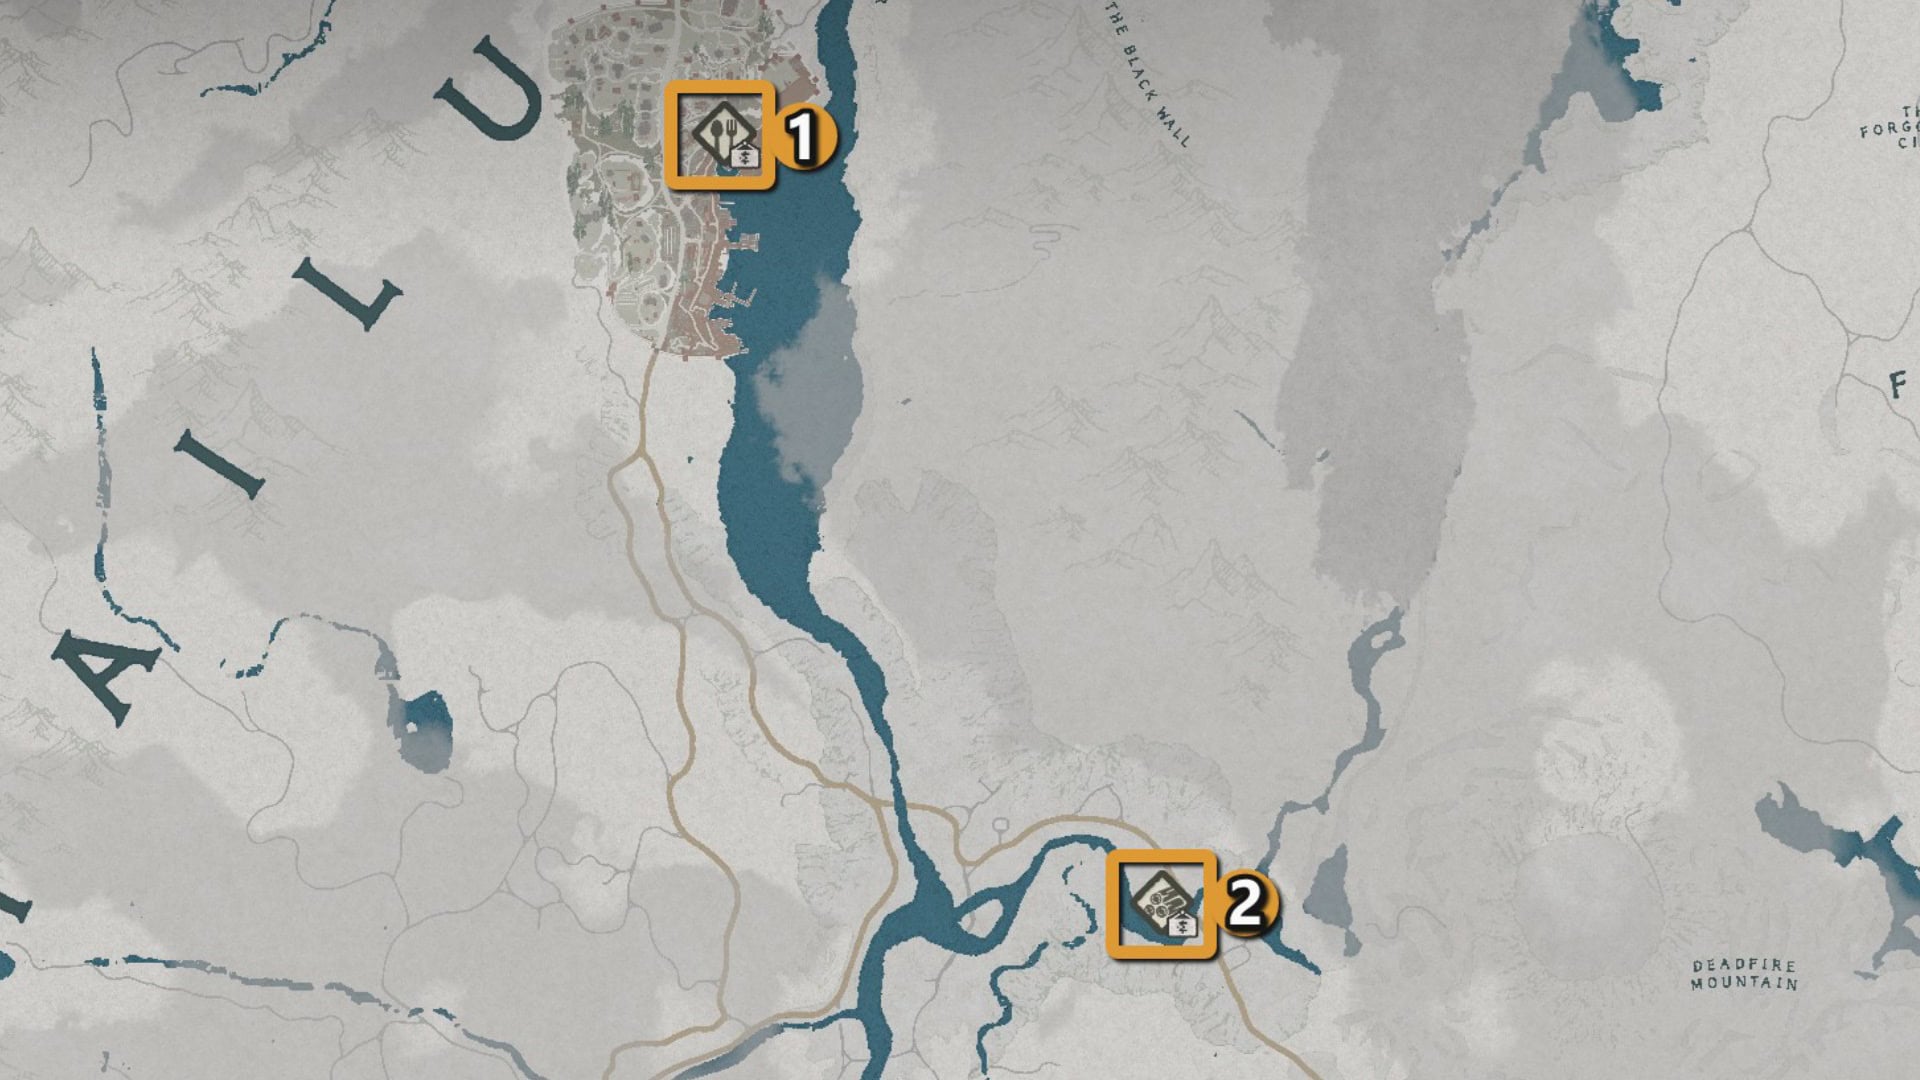
There are 18 facilities you can lease spread across Pywel. Here are their locations, divided by territory:
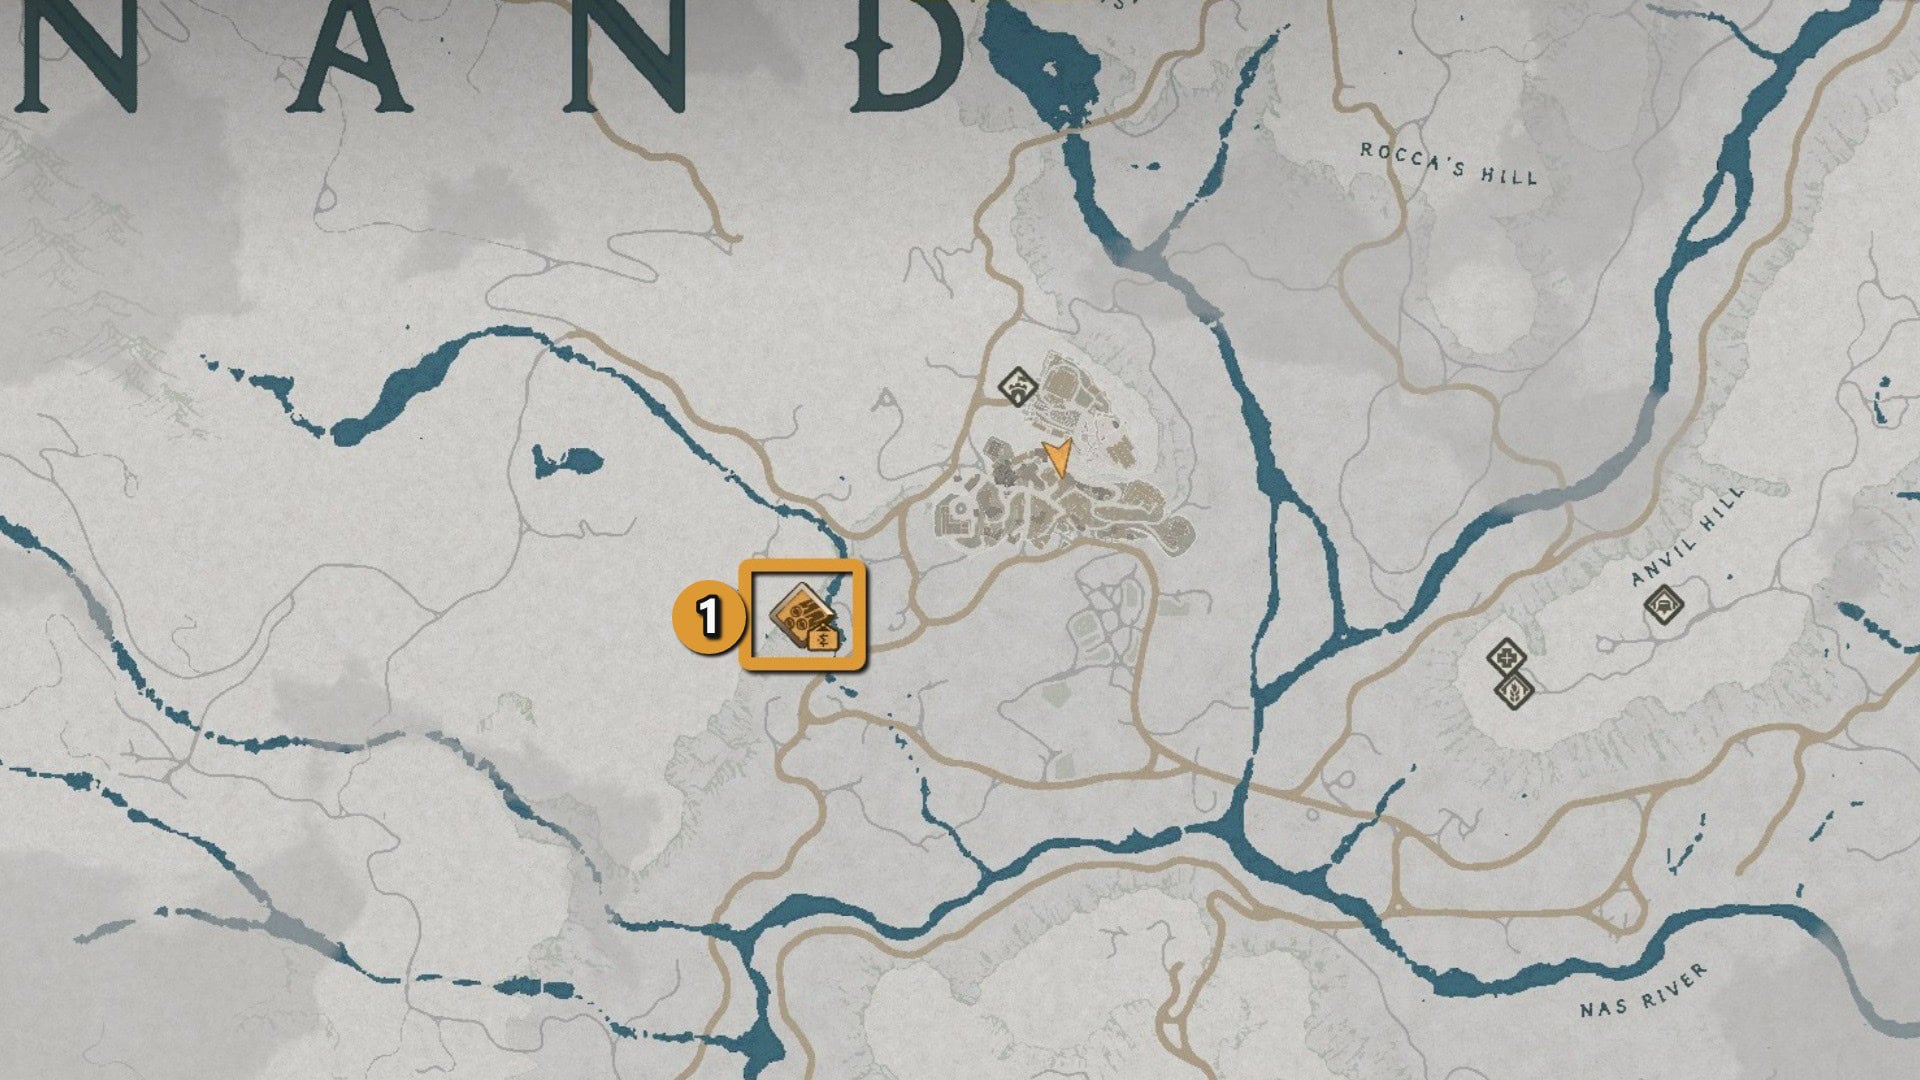
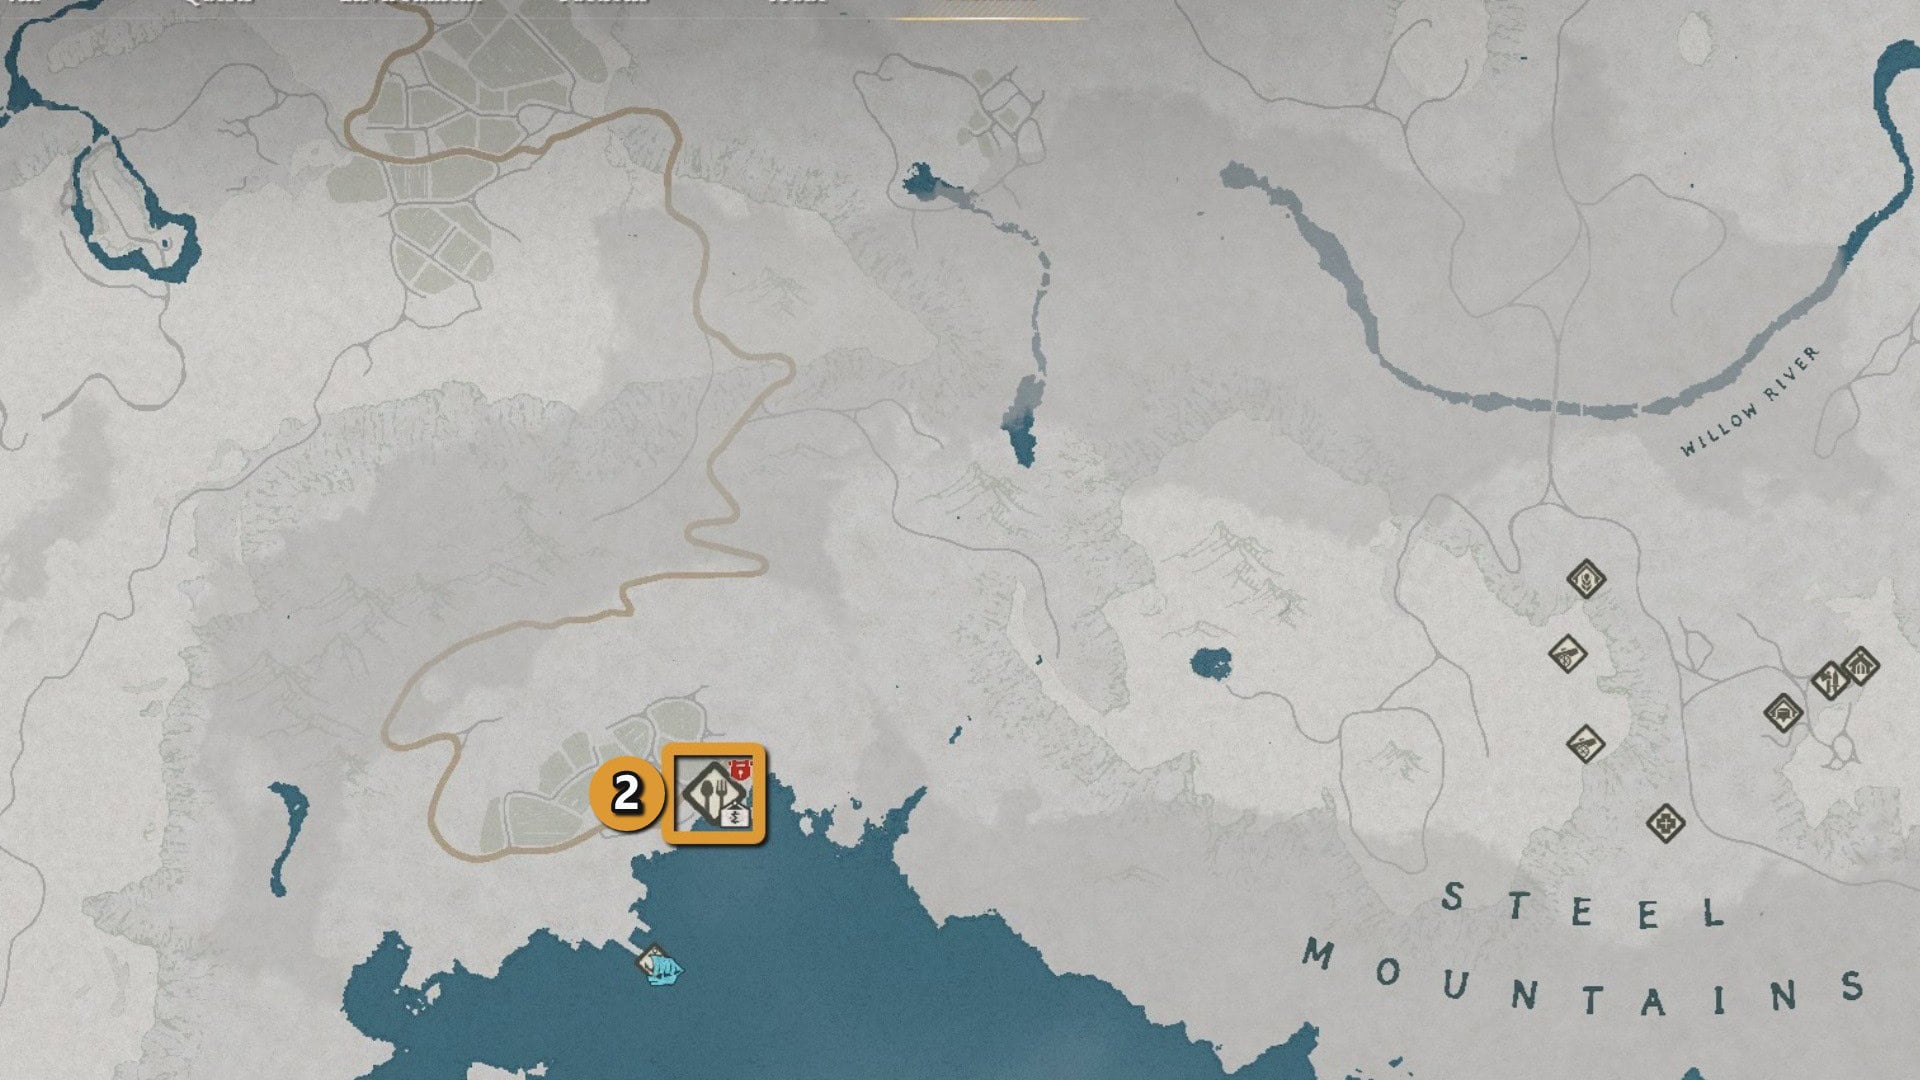
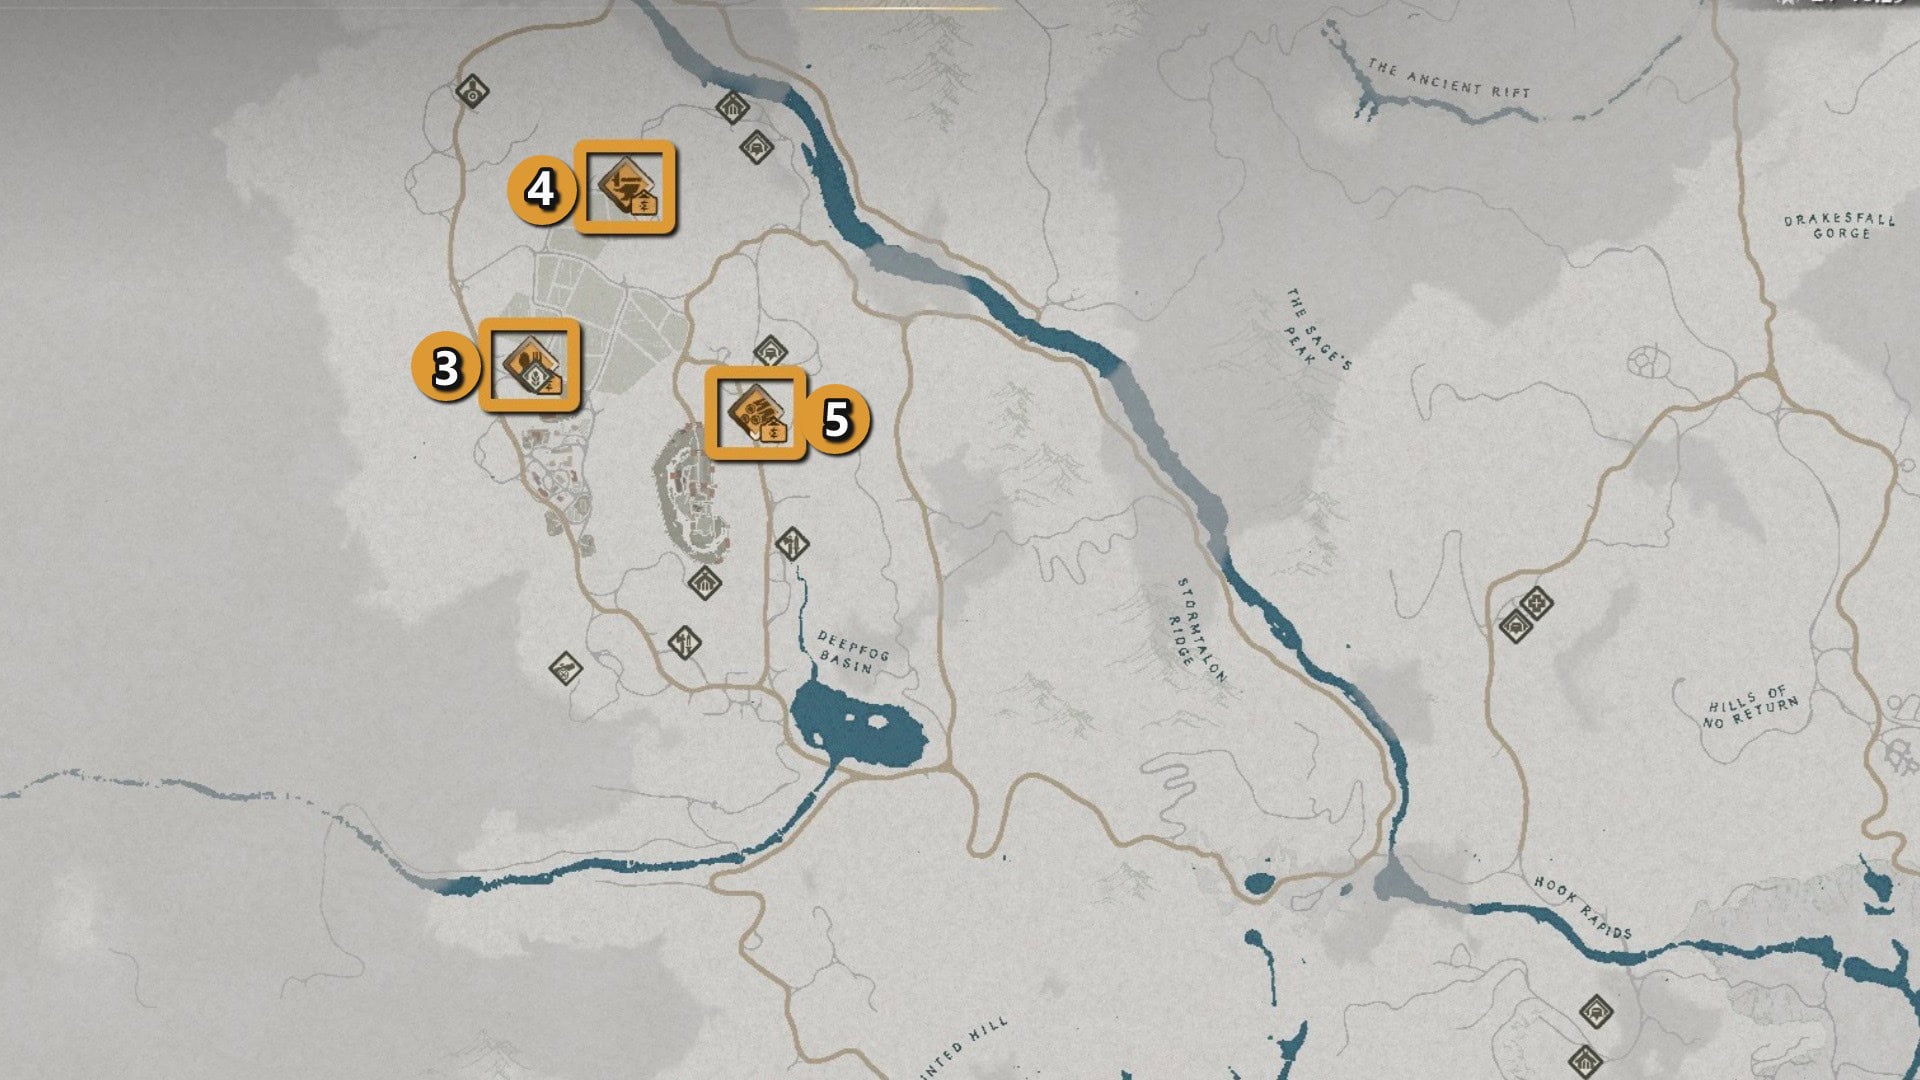
Hernand
- Timberham Sawmill: West of the city of Hernand, south of Lioncrest Watchtower.
- Vellua Restaurant: Eastern side of the seaside village of Vellua, west of the Steel Mountains.
- Calphade Farm Restaurant: West of Calphade Castle, north of the Church of Calphade.
- Calphade Farm Smithy: Northern side of Calphade, east of Calphade Farmhouse.
- Calphade Logging Camp Sawmill: East of Calphade Castle, north of the Calphade Gunpowder Mill.
Pailune
- Pailune Restaurant: At the very heart of the city of Pailune, in the same building as the Pailune Tavern.
- Beighen Sawmill: South of the Black Wall, right on the border between Pailune and Hernand.
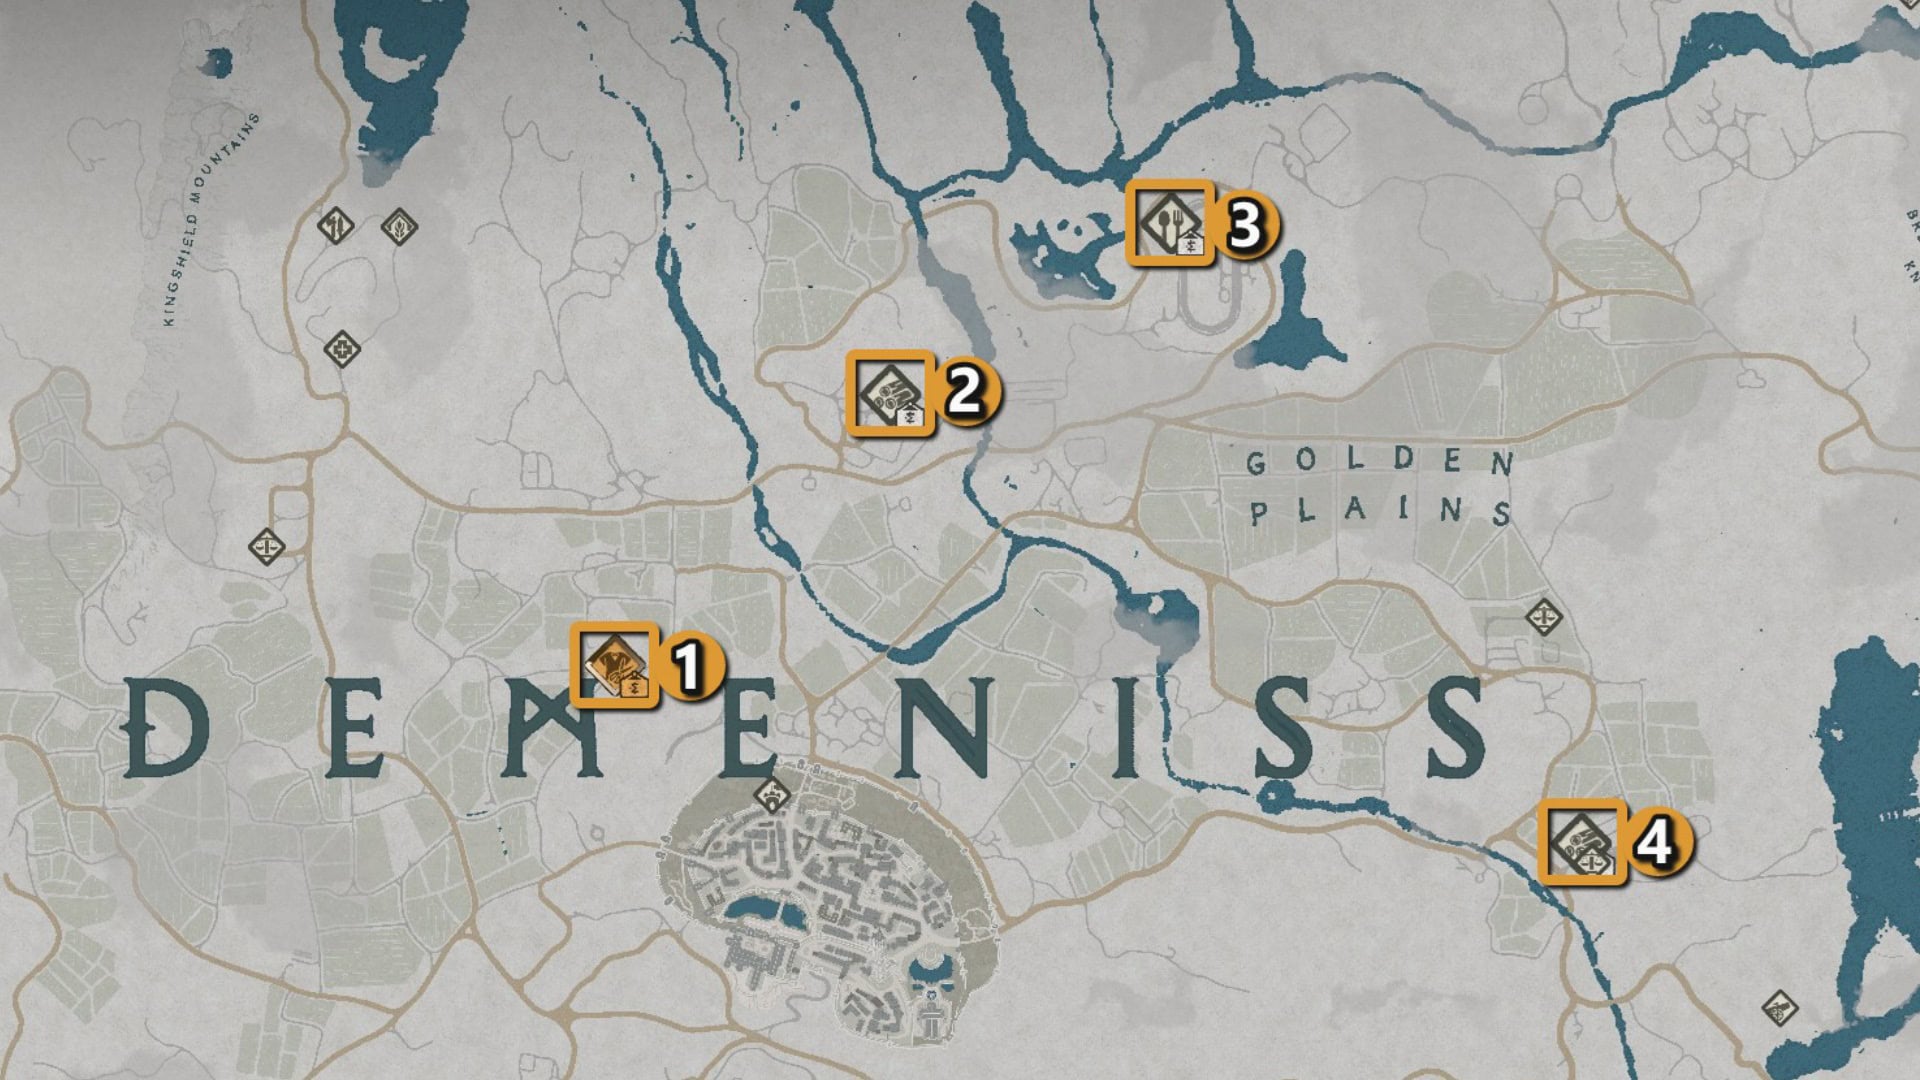
Demeniss
- The Marshell Tailor’s Shop: Northwest of the city of Demeniss, north of Sungrove Manor.
- Hidden Grove Ranch Sawmill: Northern Demeniss, directly north from the city and west from the Racecourse.
- Golden Gallop Racecourse Restaurant: Northern Demeniss in the Golden Gallop Racecourse, North of the Golden Plains.
- Elemore Estate Sawmill: Eastern Demeniss, close to the Volwork Armory. Near the border between Demeniss and Delesyia.
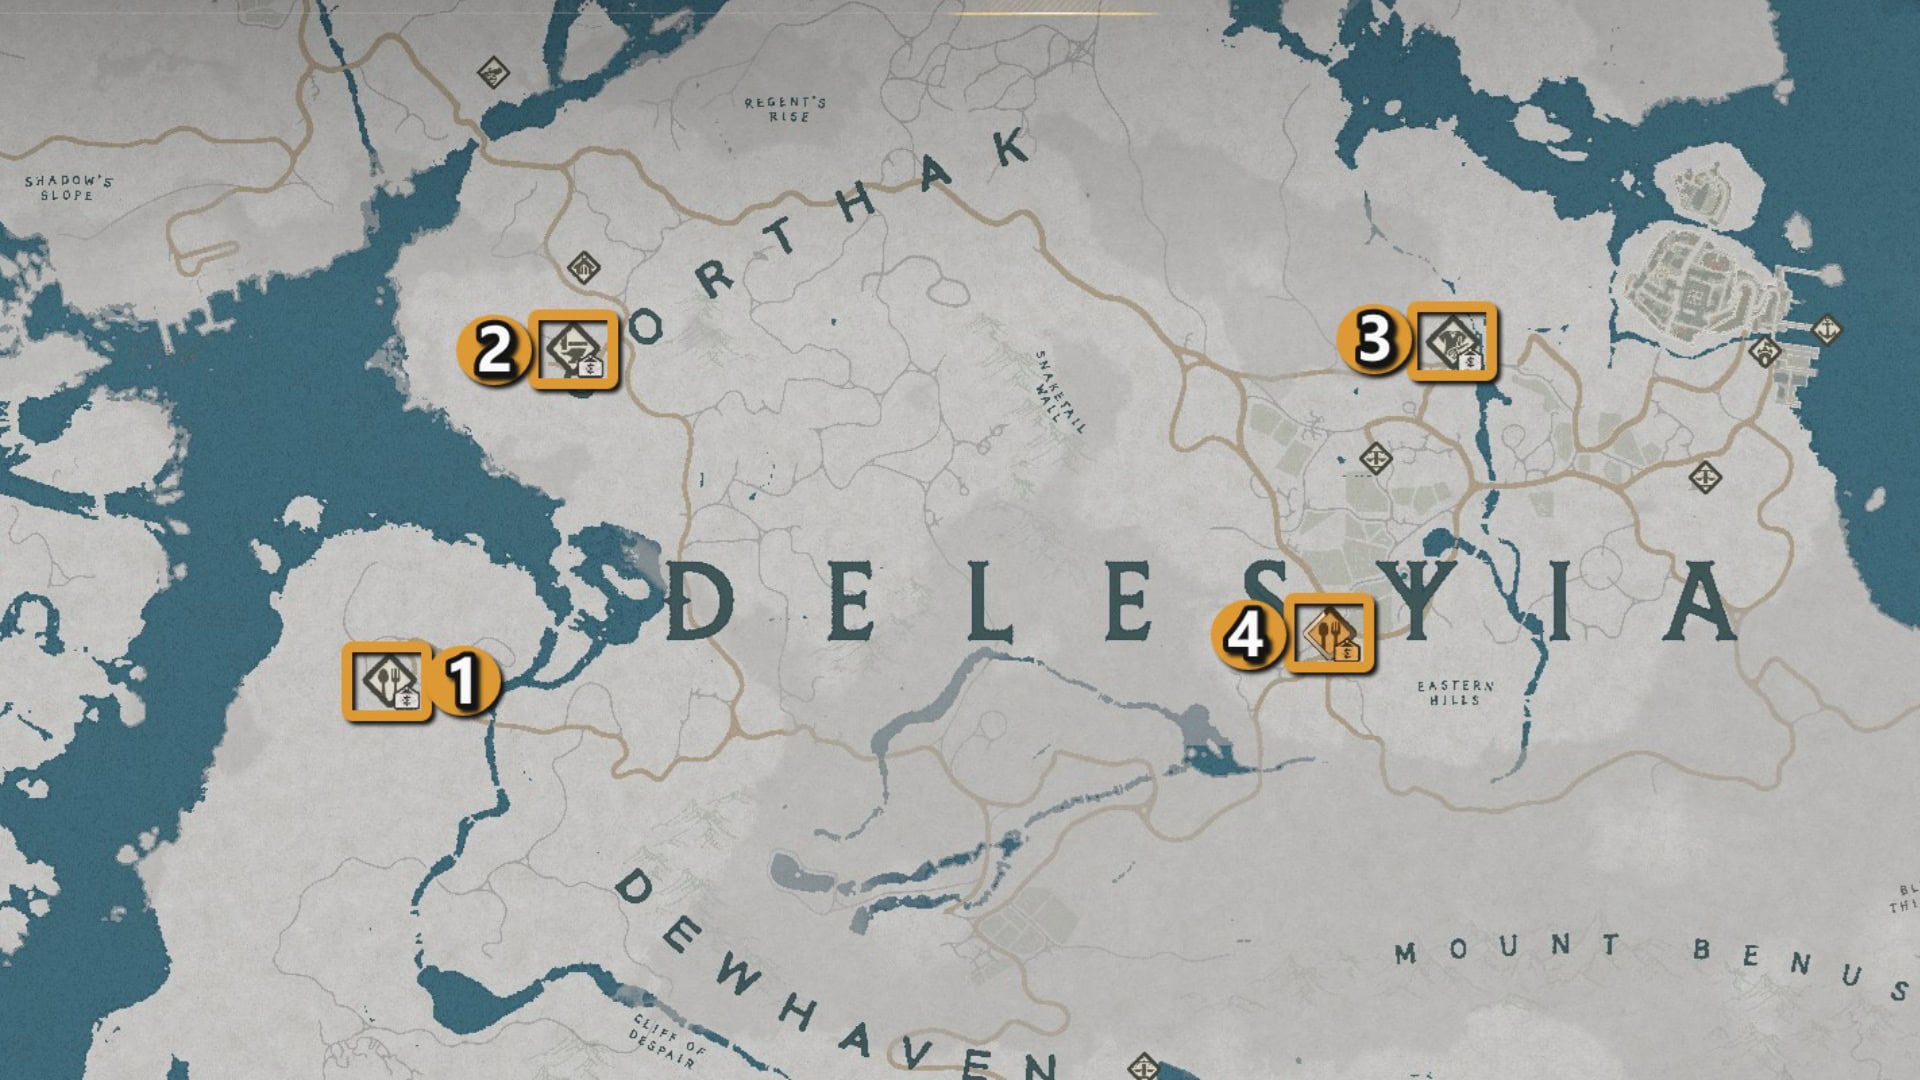
Delesyia
- Dewhaven Logging Camp Restaurant: Western Delesyia next to Dewhaven Logging Camp, northe of the Sanctum of Devotion.
- Zargan Tankworks Smithy: Western Delesyia close to Grunlore Outpost in Gorthak. Near the Gate of Peace.
- Delesya Dyehouse Tailor’s Shop: Outside the capital of Delesyia on the northern side of Tinkerton.
- Tinkerton Restaurant: Southernmost side of Tinkerton between the Tinkerton Dig Site and the Eastern Hills.
Crimson Desert
- Burhum Smithy: West of Tomasso in Burhum, between the Izvatu Fortress and the Forebearer’s Barrens. South of the Spire of the Sun
- Caledora Tailor’s Shop: Northwest on the outskirts of Tomasso in the village of Caledora.
- Tashkalp Restaurant: North of Tomasso, right outside the city.
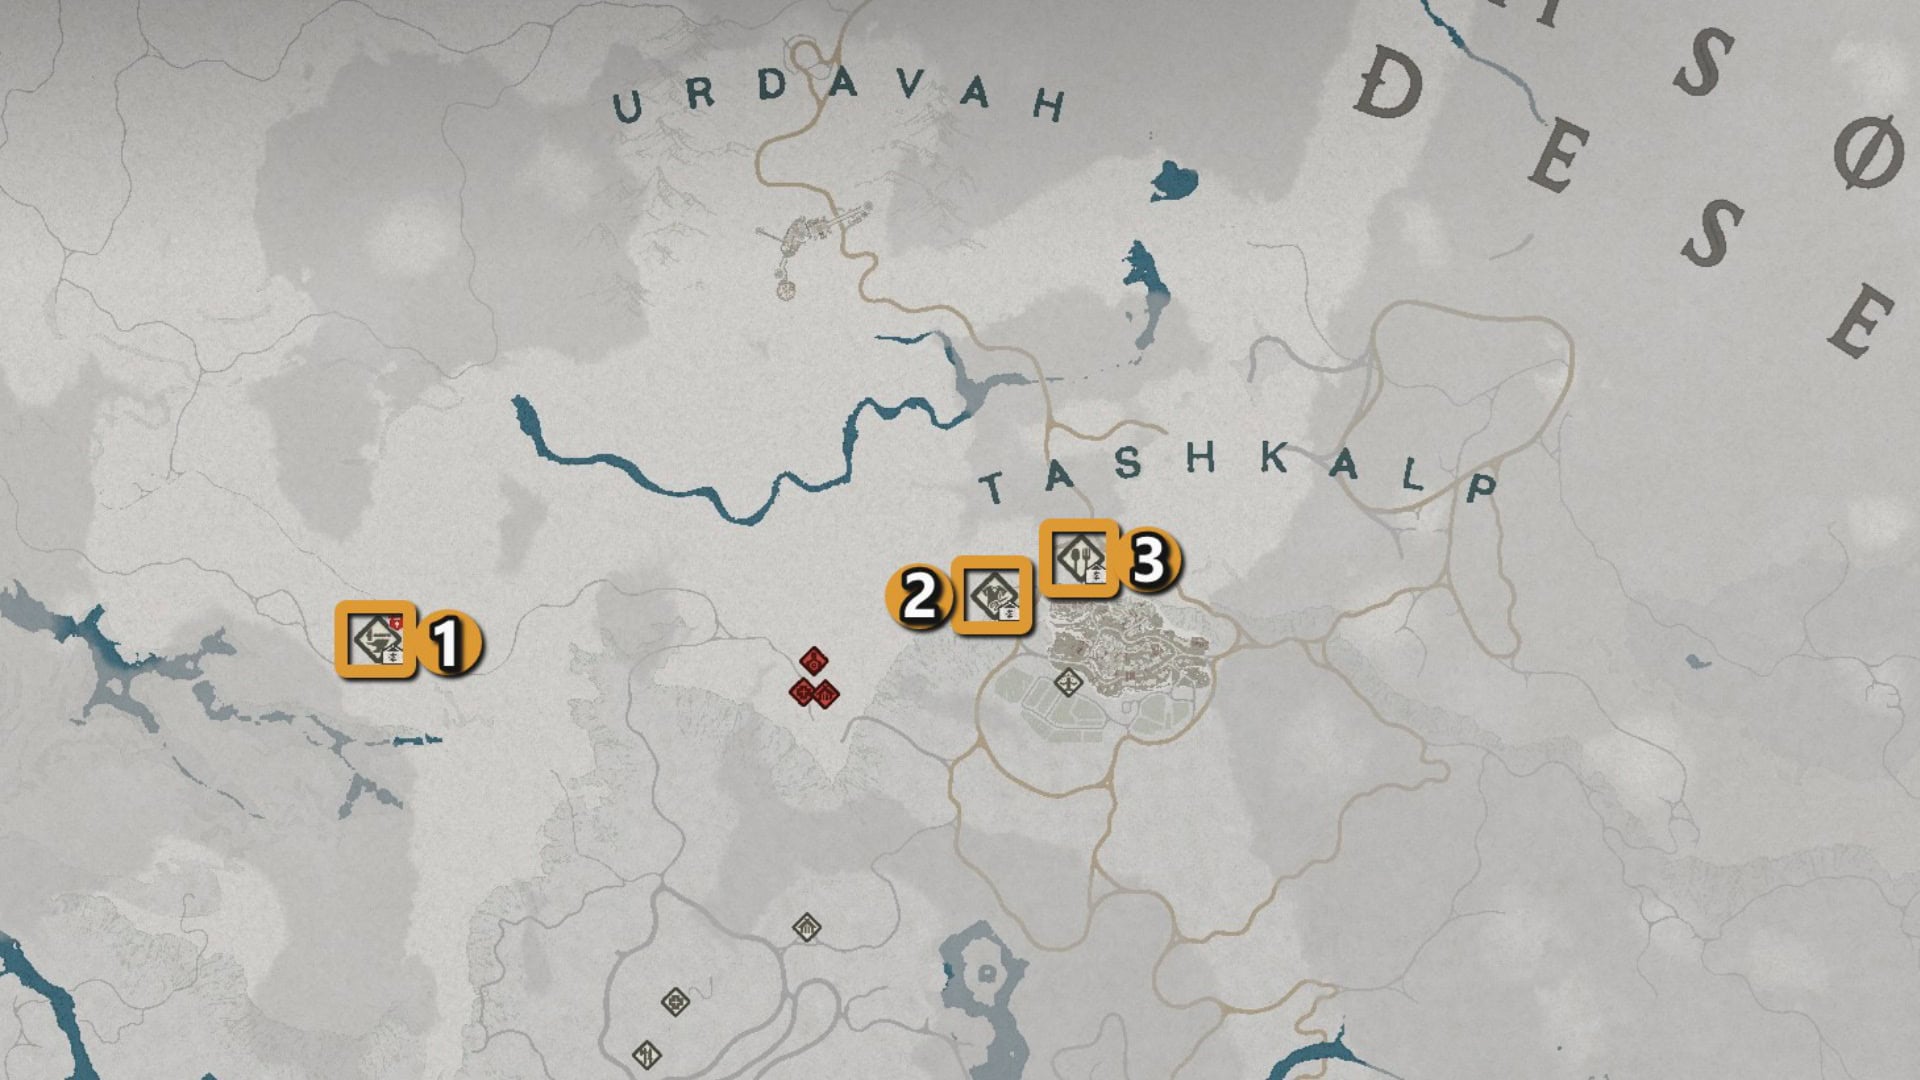
If a facility’s icon has a red lock, it’s temporarily unavailable because of hostilities in the area. To unlock it, you’ll need to either complete a related quest or liberate a nearby settlement.
Which Facility to Lease First
While each facility works in a similar way, they have different demands, especially for your workers. Check what skills your currently free comrades have and based on that, decide what type of facility to open up first.
Since the Sawmill is the tutorial Facility, you will unlock additional Installables for it first. Leasing other Sawmills would make the process a little bit faster and easier because you already have the knowledge and experience with this type.
Facility Management Menu Explained
Once you’ve leased a facility, visit it in person to customize and upgrade your shop. Through the management menu, you’ll be able to:
- Open your shop for business
- Manage the goods you have for sale
- Manage your staff by hiring or letting go of your comrades
- Place Installable items
- Change the name of your shop
- Read short guides on the basics of facility management
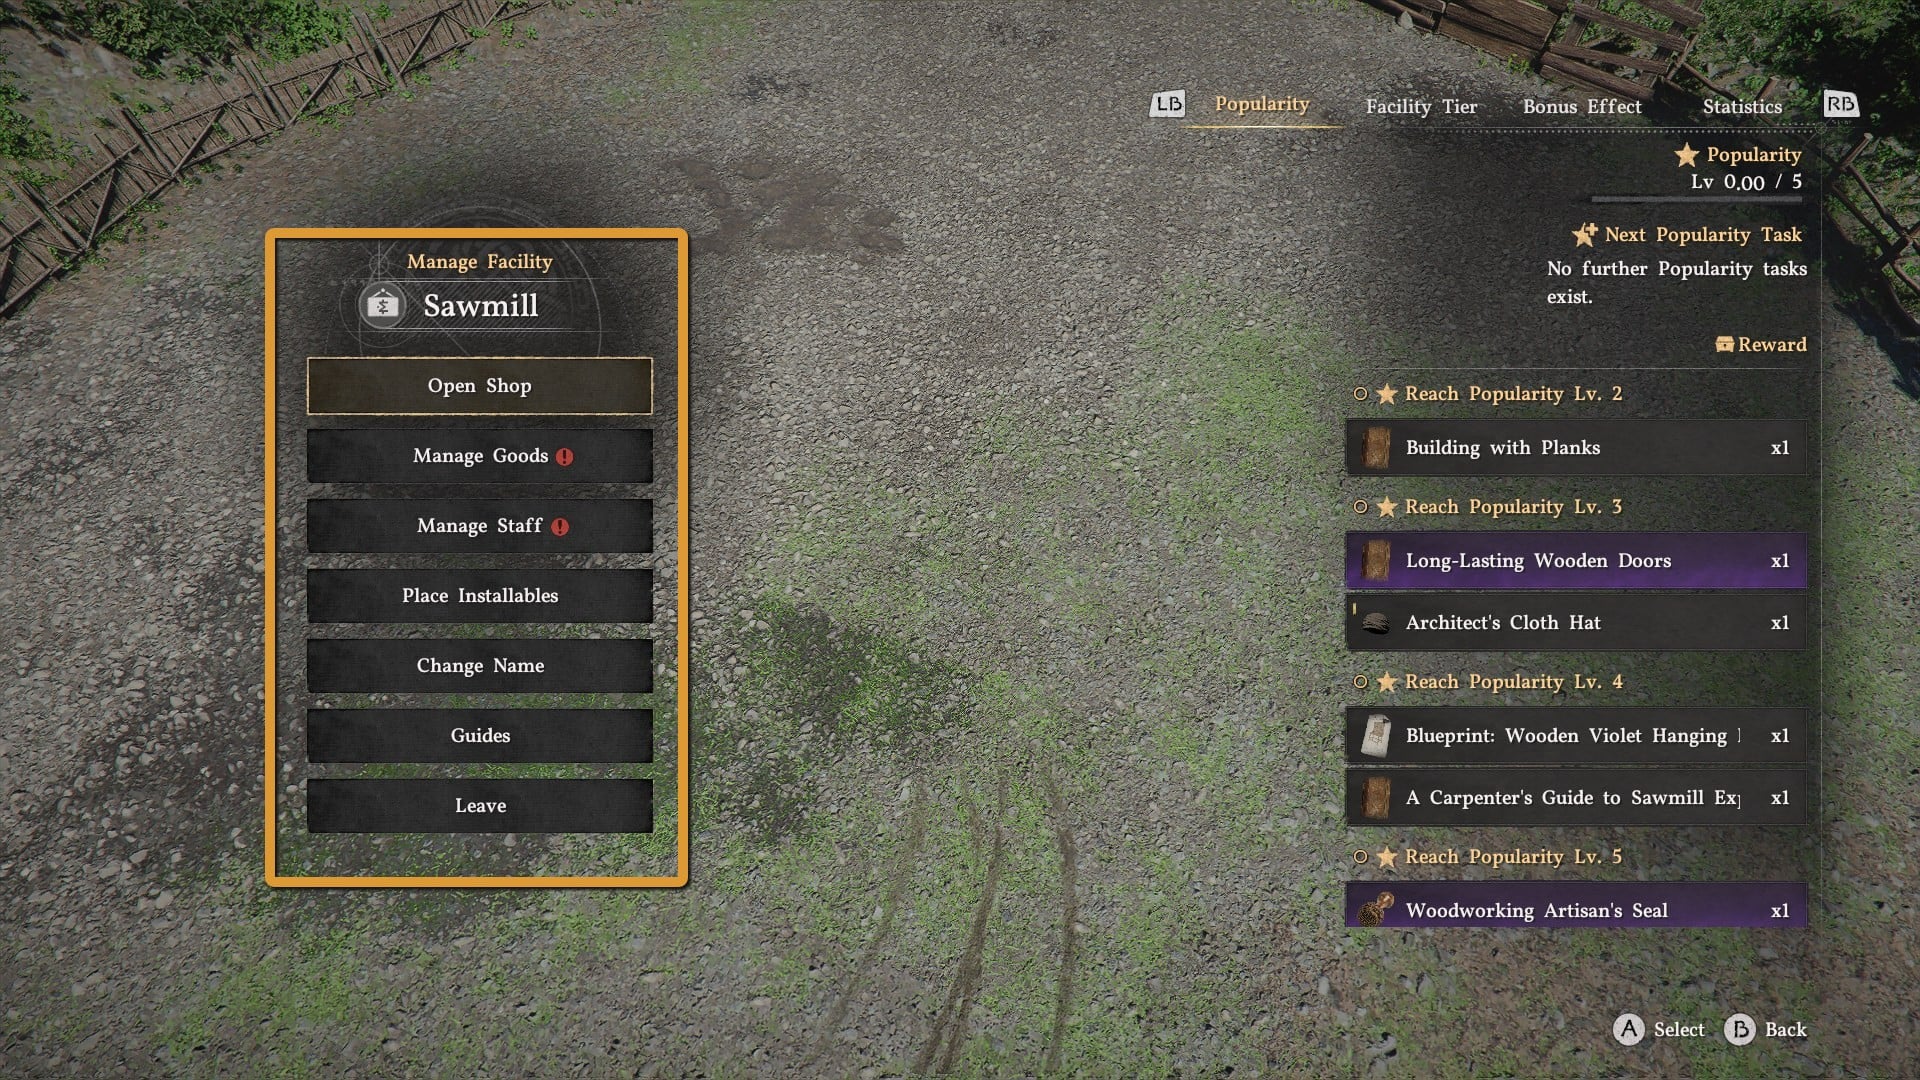
If there’s a red icon next to Manage Goods and/or Manage Staff it means you need to assign goods for sale and hire staff members before you can open your shop.
On the right side of the menu, you’ll also find four tabs:
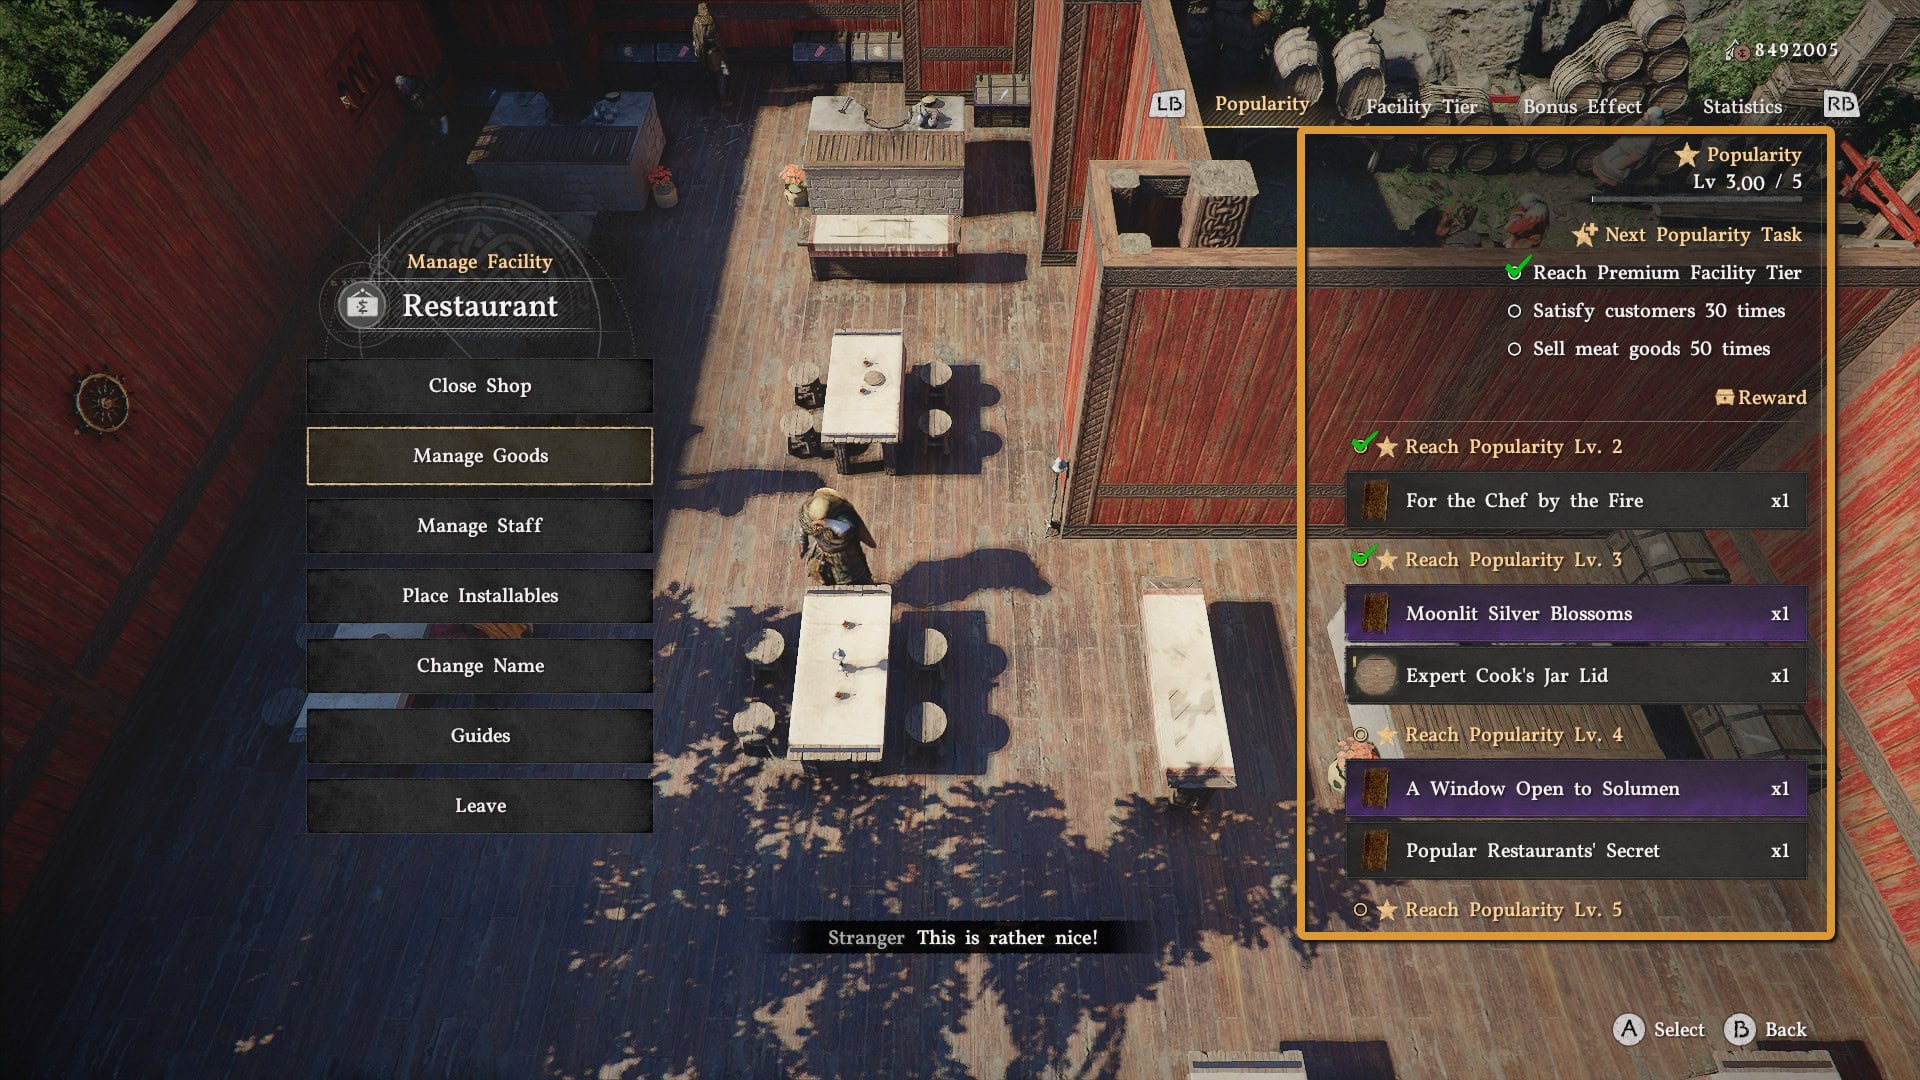
- Popularity: Here you’ll see your facility’s popularity level, the Tasks needed to grow it, and the rewards you unlock at each level.
- Facility Tier: Here you’ll see the current Facility Tier of your shop, Installable Pts., and the Comrade Skill Bonus.
- Bonus Effect: Here you’ll see your active Bonus Effects, which depend on the items you have for sale in your shop, you’ll also see a single Bonus Effect unique to the facility you’re currently managing.
- Statistics: This is a breakdown of how your shop is performing, mainly your income and expenses, total and daily.
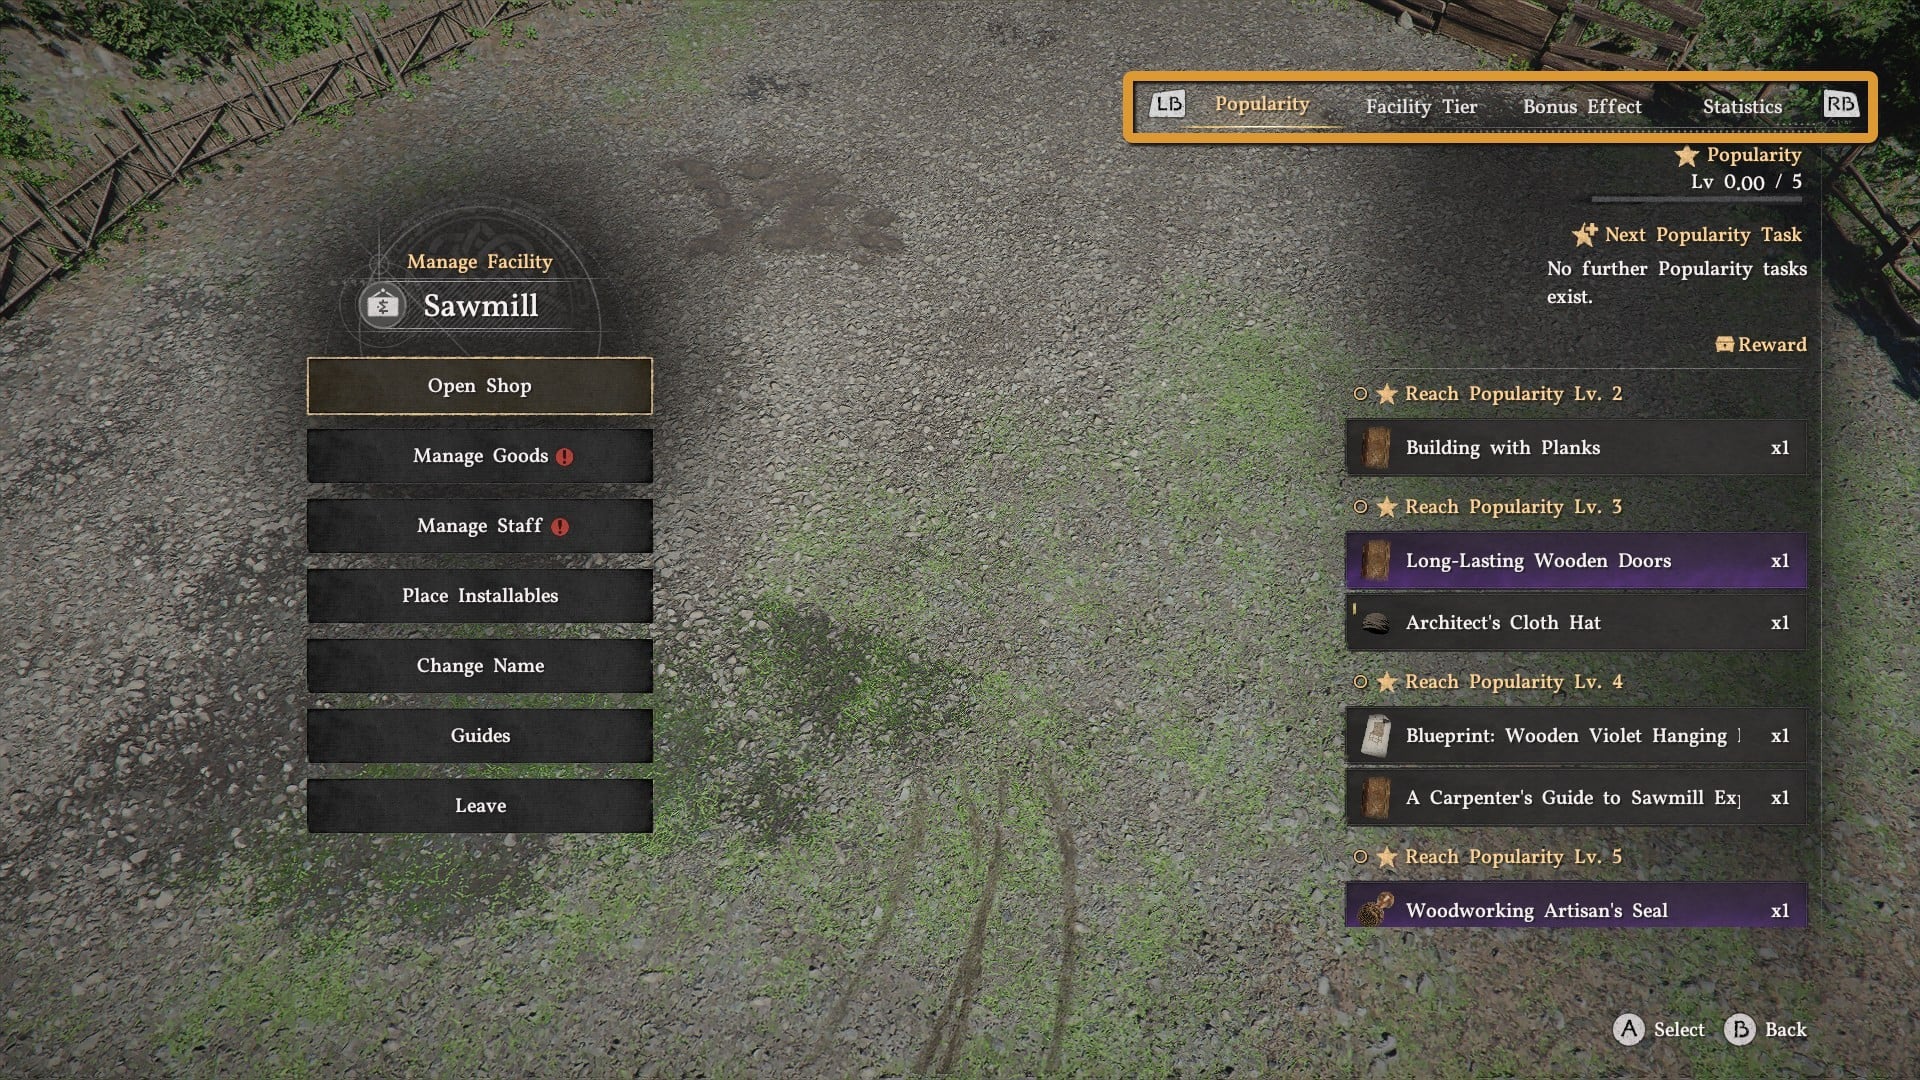
While leveling, make sure each stage’s requests are completed as soon as possible. You will find them in the Facility Tier tab. At Lv. Max popularity, you can stop worrying about that and focus on the Bonus Effect tab.
The Statistics tab is not something you have a lot of control over. It just shows you what you spend vs what you earn. The key values here are Earnings and Total Upkeep. The ratio is usually anywhere between 3:1 to 10:1, dependiong on hwo actively and carefully you manage your facility.
How to Improve Facility Tier
After leasing a new facility focus on growing its Facility Tier by accumulating Installable Pts. Depending on how many points you have, the facility will be in one of five tiers:
- Shabby: This is the starting and lowest tier.
- Modest: Requires 8 Installable Pts.
- Decent: Requires 40 Installable Pts.
- Premium: Requires 100 Installable Pts.
- Superior: The highest tier, it requires 220 Installable Pts.
Hiring skilled workers lowers the threshold for Facility Tiers. For example, if you have expert Craftsman and Logger at a Sawmill, you will reach Superior at ~110 Installable Pts. More on this later in the guide.
Having a high Facility Tier will allow you to charge more for the goods you’re selling and will make it so your clients are easier to satisfy.
Installable Pts. are affected by two variables:
- Installables
- Comrade Skill Bonus
Installables
You’ll find Installables in the Place Installables menu, which is divided into several tabs. The tabs change depending on the type of facility you’re managing and its location, an indoor Restaurant has different Installables from an outdoor one.
The rightmost tab, Special, is the most important. Here you’ll find items specific to your type of facility, the items you can put up for sale depend on which of these items you have placed.
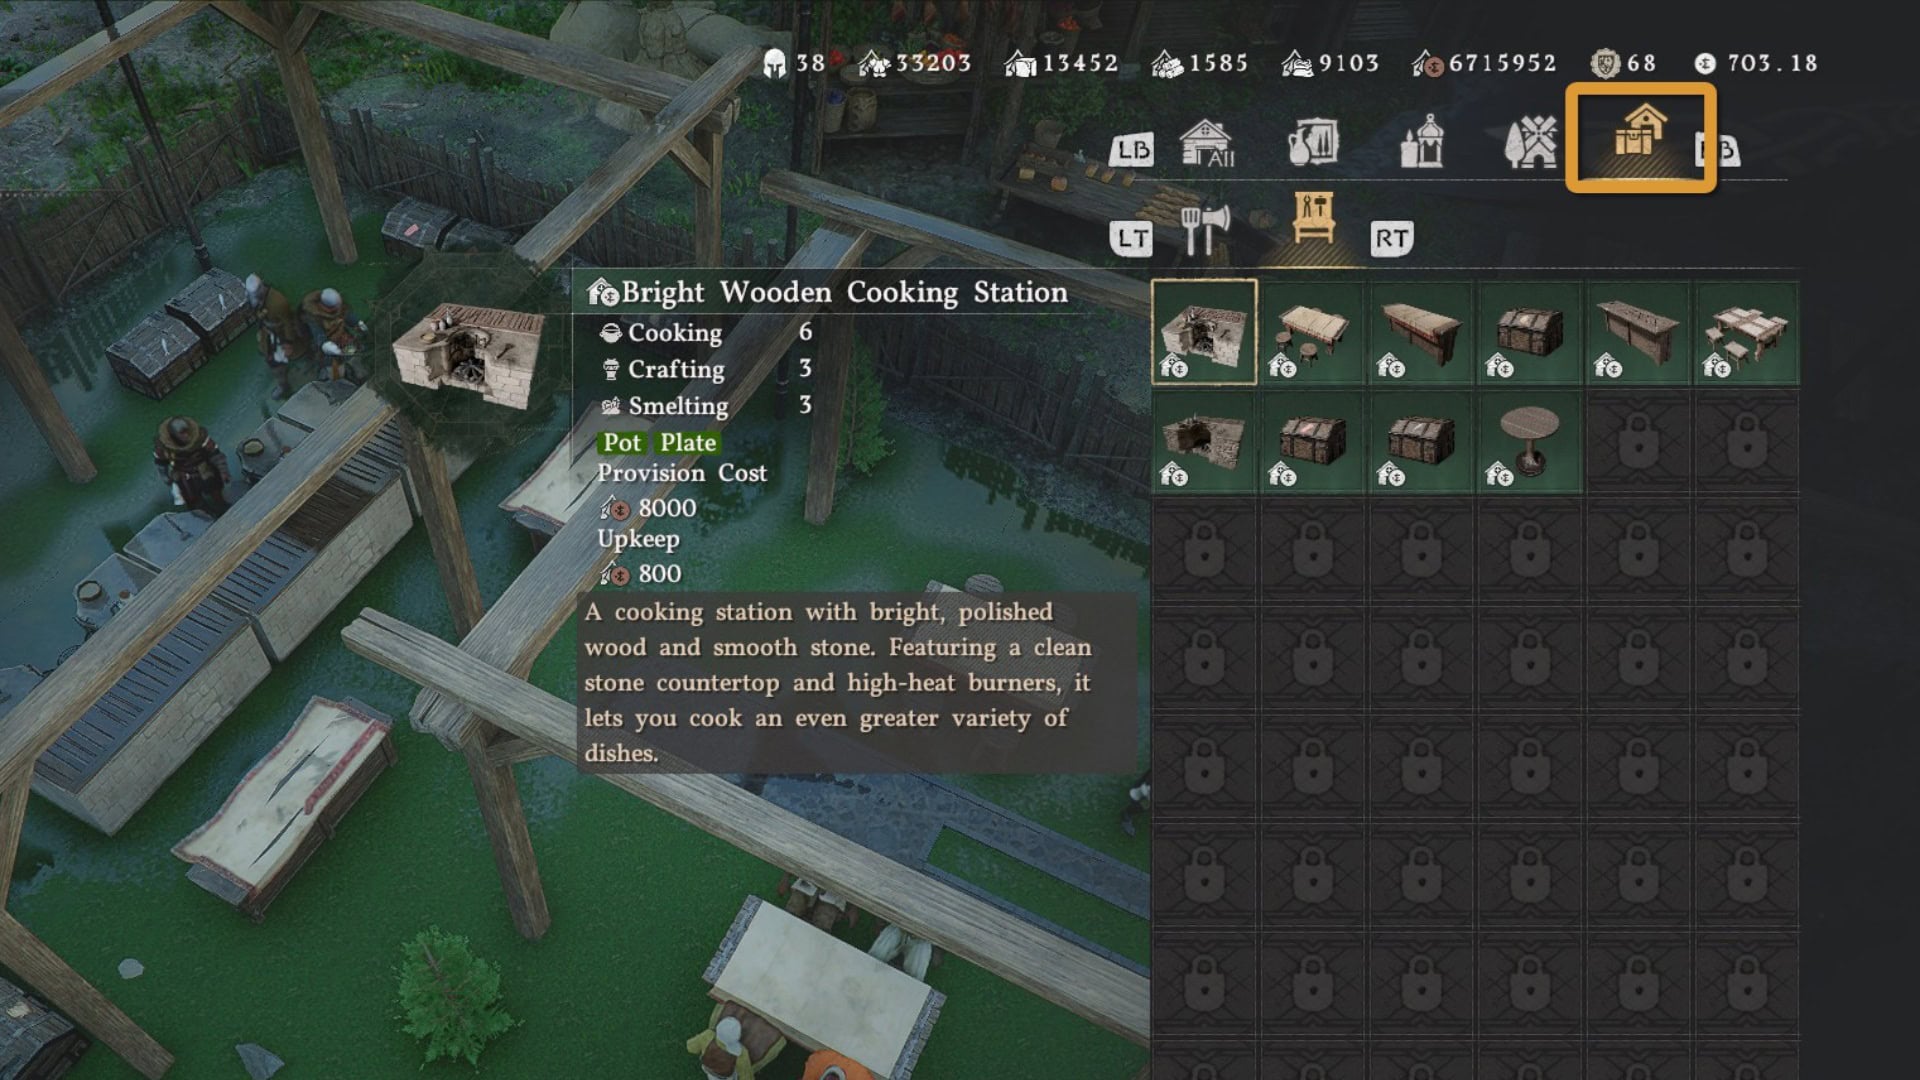
For example, to sell Fish Skewers in your Restaurant you’ll need to have Installables with the following tags:
- Serving Station
- Table
- Plate
- Seafood Box
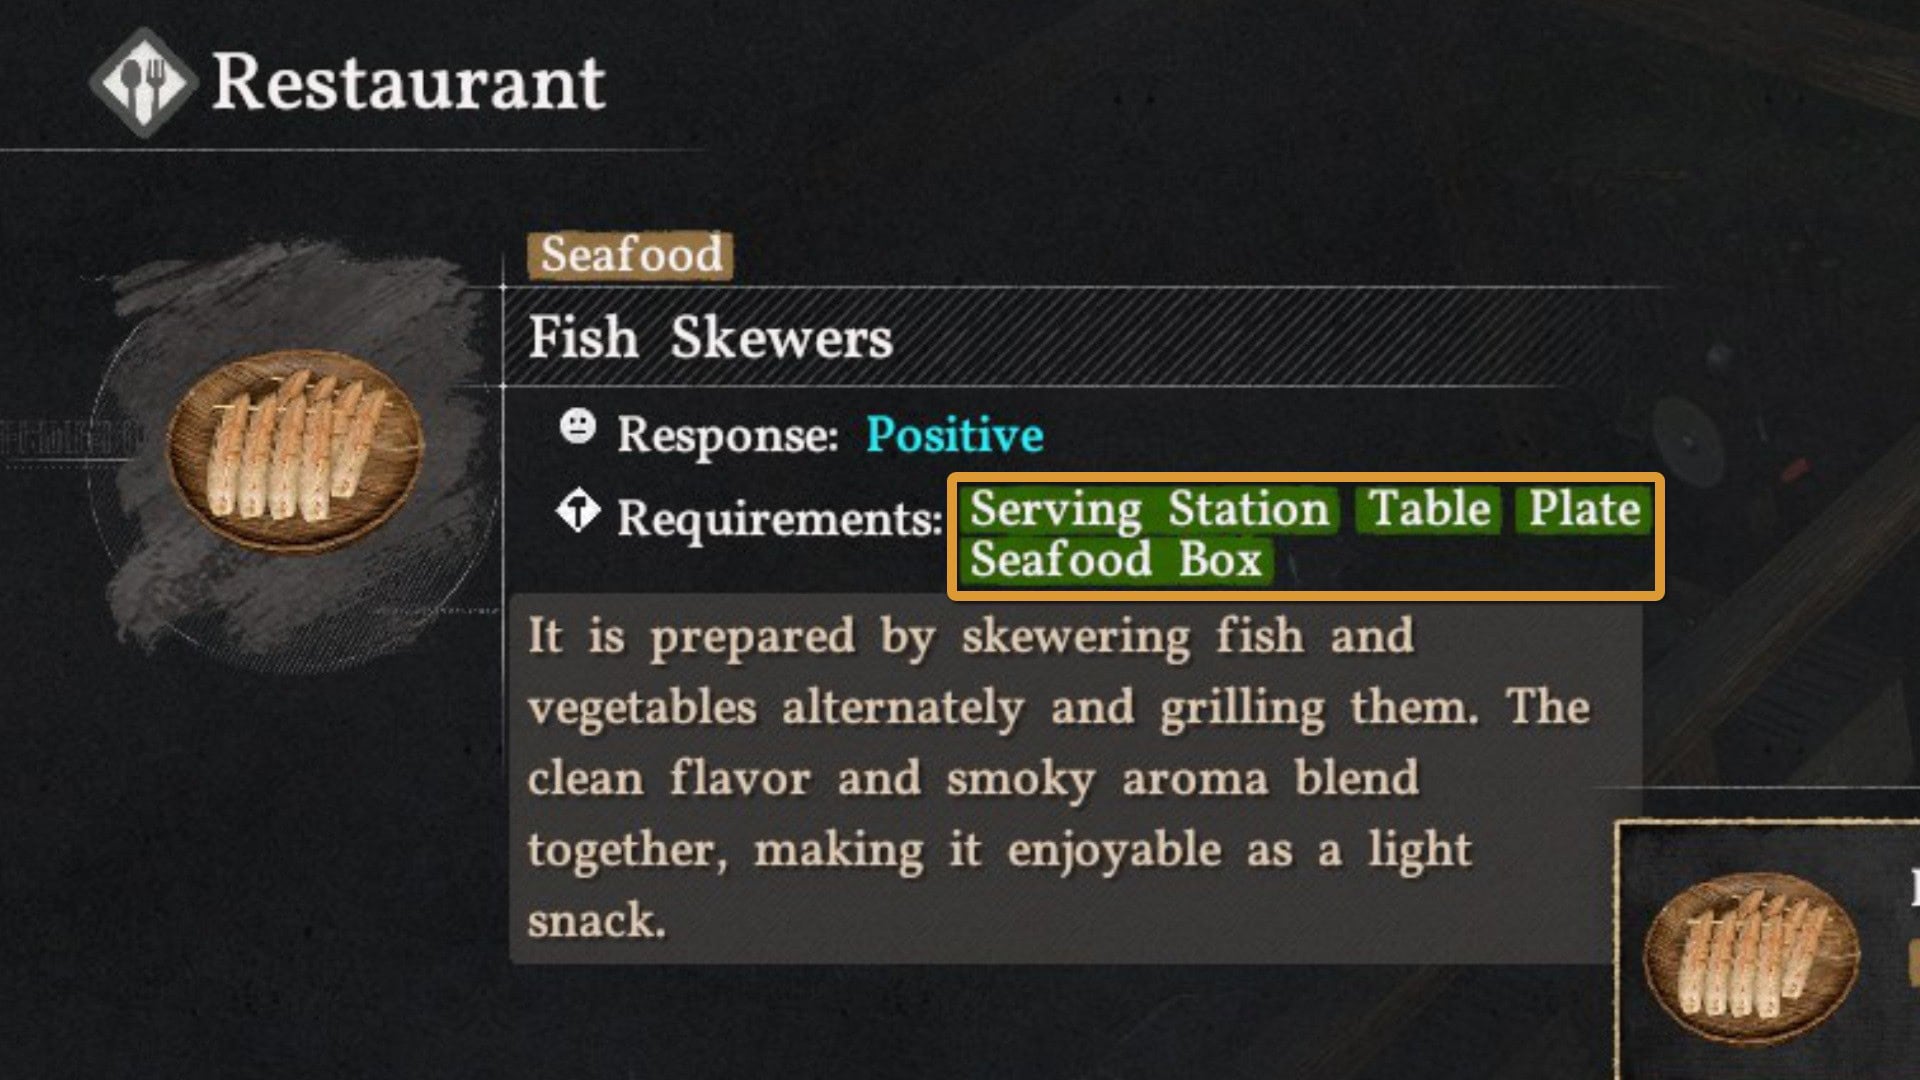
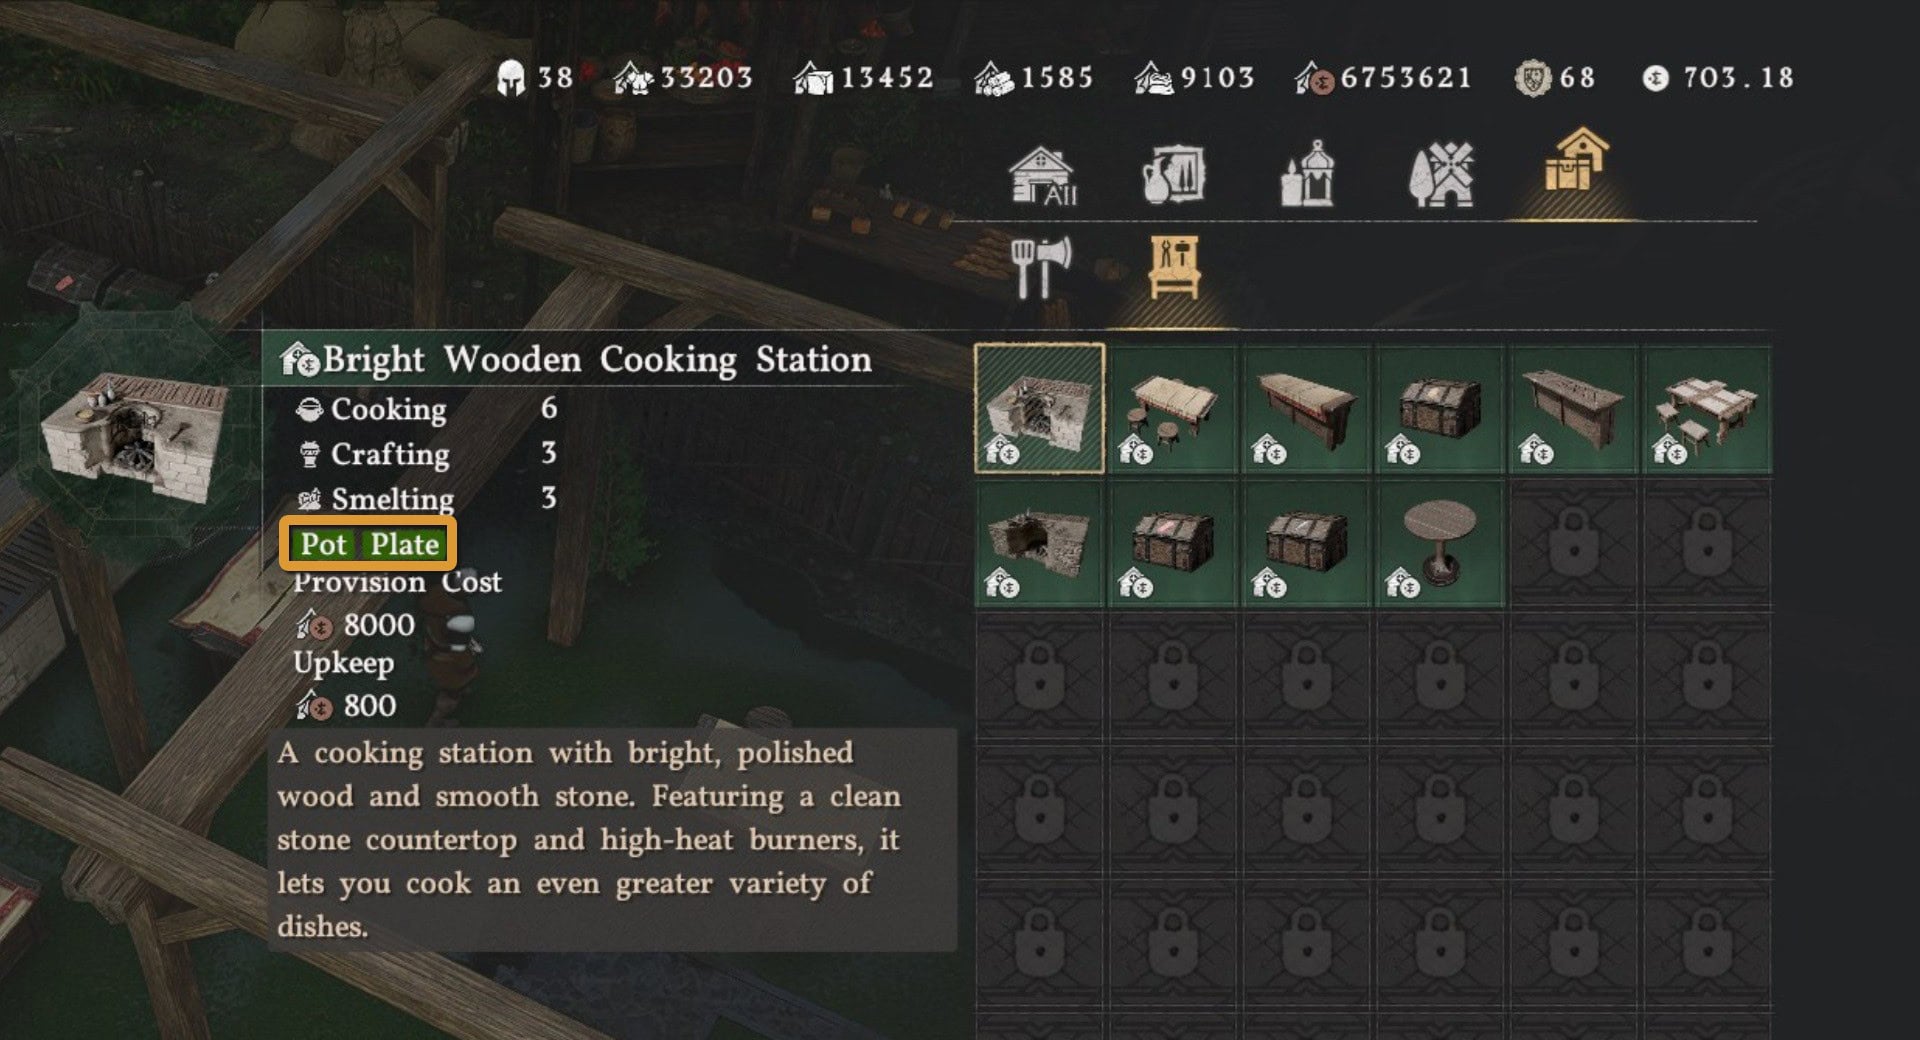
Each Installable has one or more categories, such as Cooking, Crafting, and Smelting, with a number next to them. This number is how many Installable Pts. the item adds to the facility.
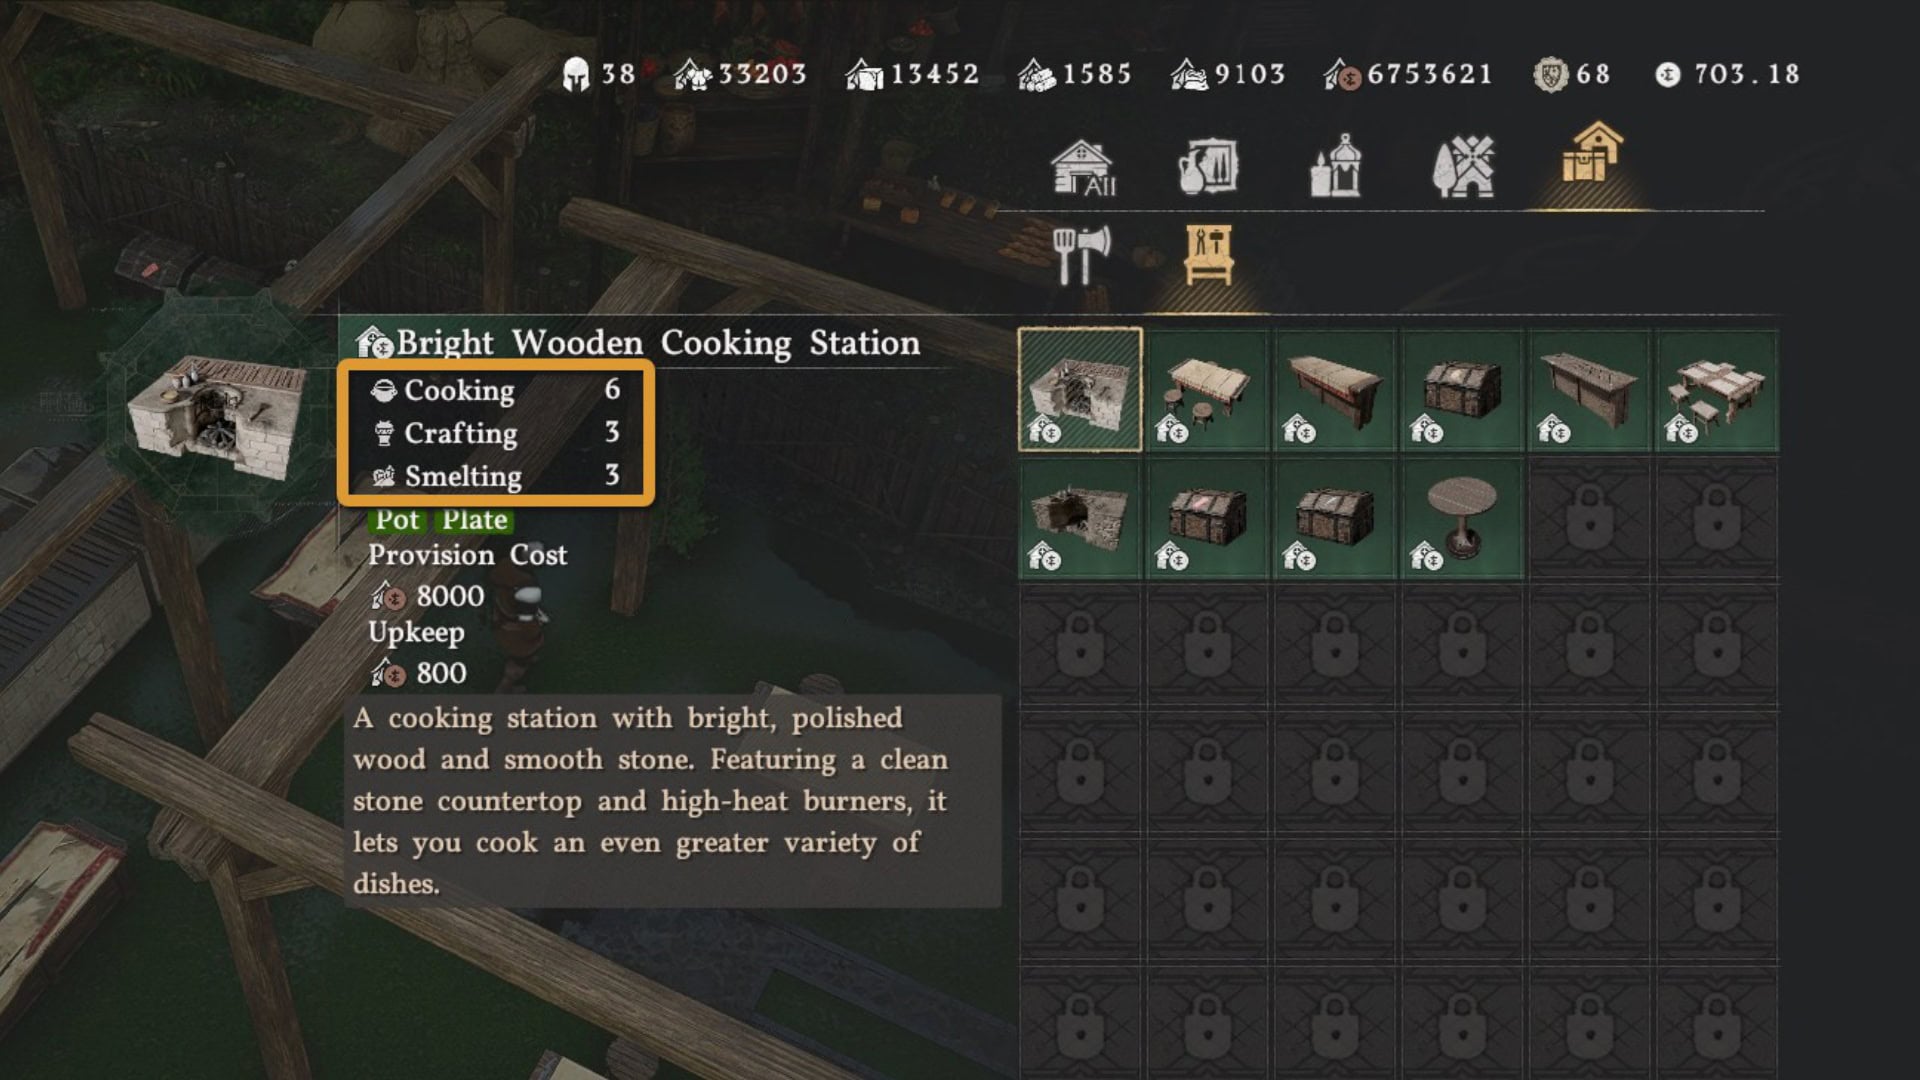
The points only count if the category aligns with the type of Facility you’re managing. Here’s which Installable categories count for each facility type:
- Sawmill: Crafting and Logging
- Restaurant: Cooking and Service
- Smithy: Smithing and Smelting
- Tailor’s Shop: Crafting and Weaving
Comrade Skill Bonus
The workers you can hire at your facilities are the same NPCs that you use for Mission Dispatch at your camp. Recruited NPCs from Festivals can work in a Facility, but they cannot sail on a ship.
Reaching Superior Facility Tier with Installables alone can be difficult, since you work with limited space within your facility. This is where the Comrade Skill Bonus comes in clutch.
It’s a bonus that activates when you hire comrades with skills relevant to the facility you’re managing. Depending on the comrade’s skill level, you’ll receive the following percentage bonus to your Installable Pts.:
- Level I: +10%
- Level II: +40%
- Level III: +100%
The percentage bonus only applies to Installables in the same category as the comrade’s skill.
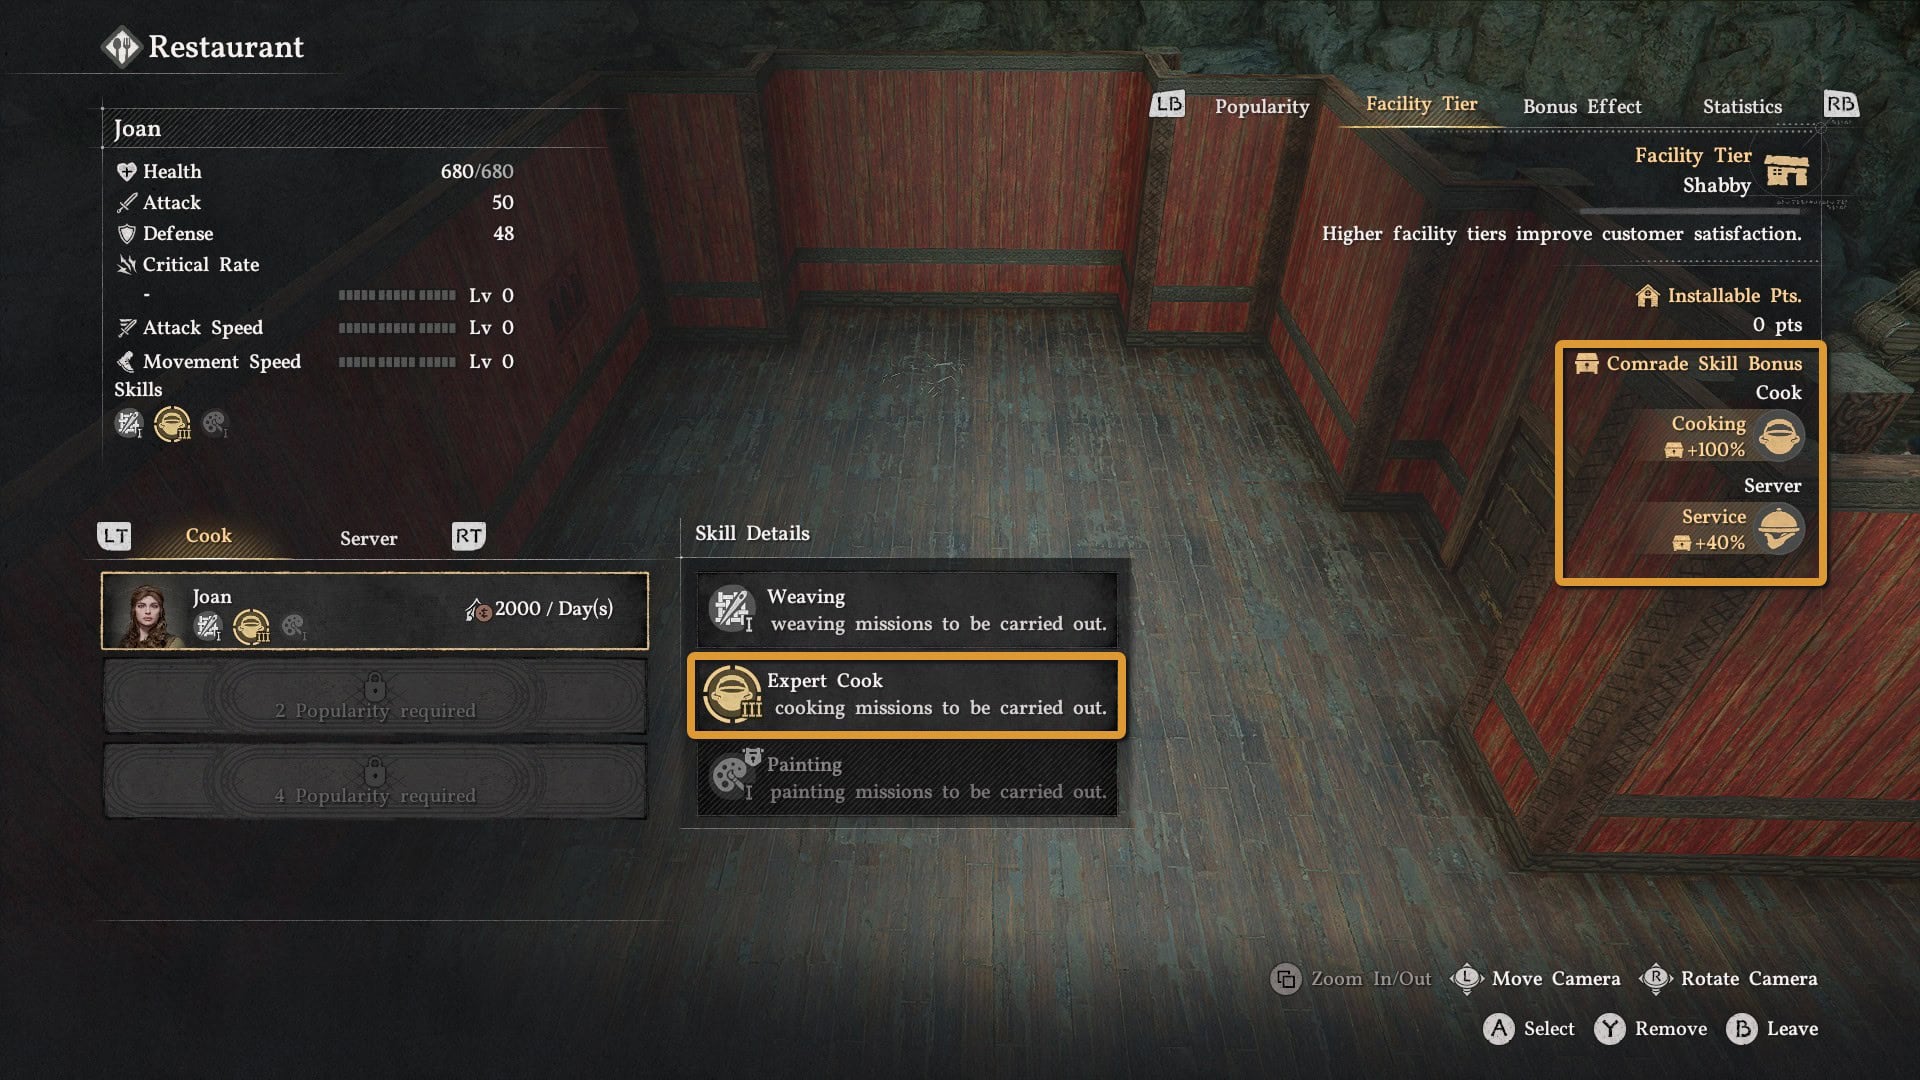
Let’s say you’re managing a Restaurant and you hire a Level III Cook and a Level II Server. An Installable with only the Cooking category will benefit from the +100% Comrade Skill Bonus. But an Installable with both the Cooking and Service categories will receive a +140% Comrade Skill Bonus.
This makes it possible to achieve the Superior Facility Tier with 110 Installable Pts. or even less instead of the original 220 Pts.
How Popularity Levels Work
Once your Facility is ready, the next step is to increase its Popularity. There are five Popularity levels, for each one you may:
- Receive Crafting Books and Blueprints
- Receive Gear and Key Items
- Increase the amount of goods you can sell
- Increase the amount of Comrades you can hire
- Increase the number of customers you receive
Every time a customer leaves satisfied, your Popularity level increases slightly. You’ll move on to the next level once you reach the required threshold and complete all the Popularity Tasks for it.
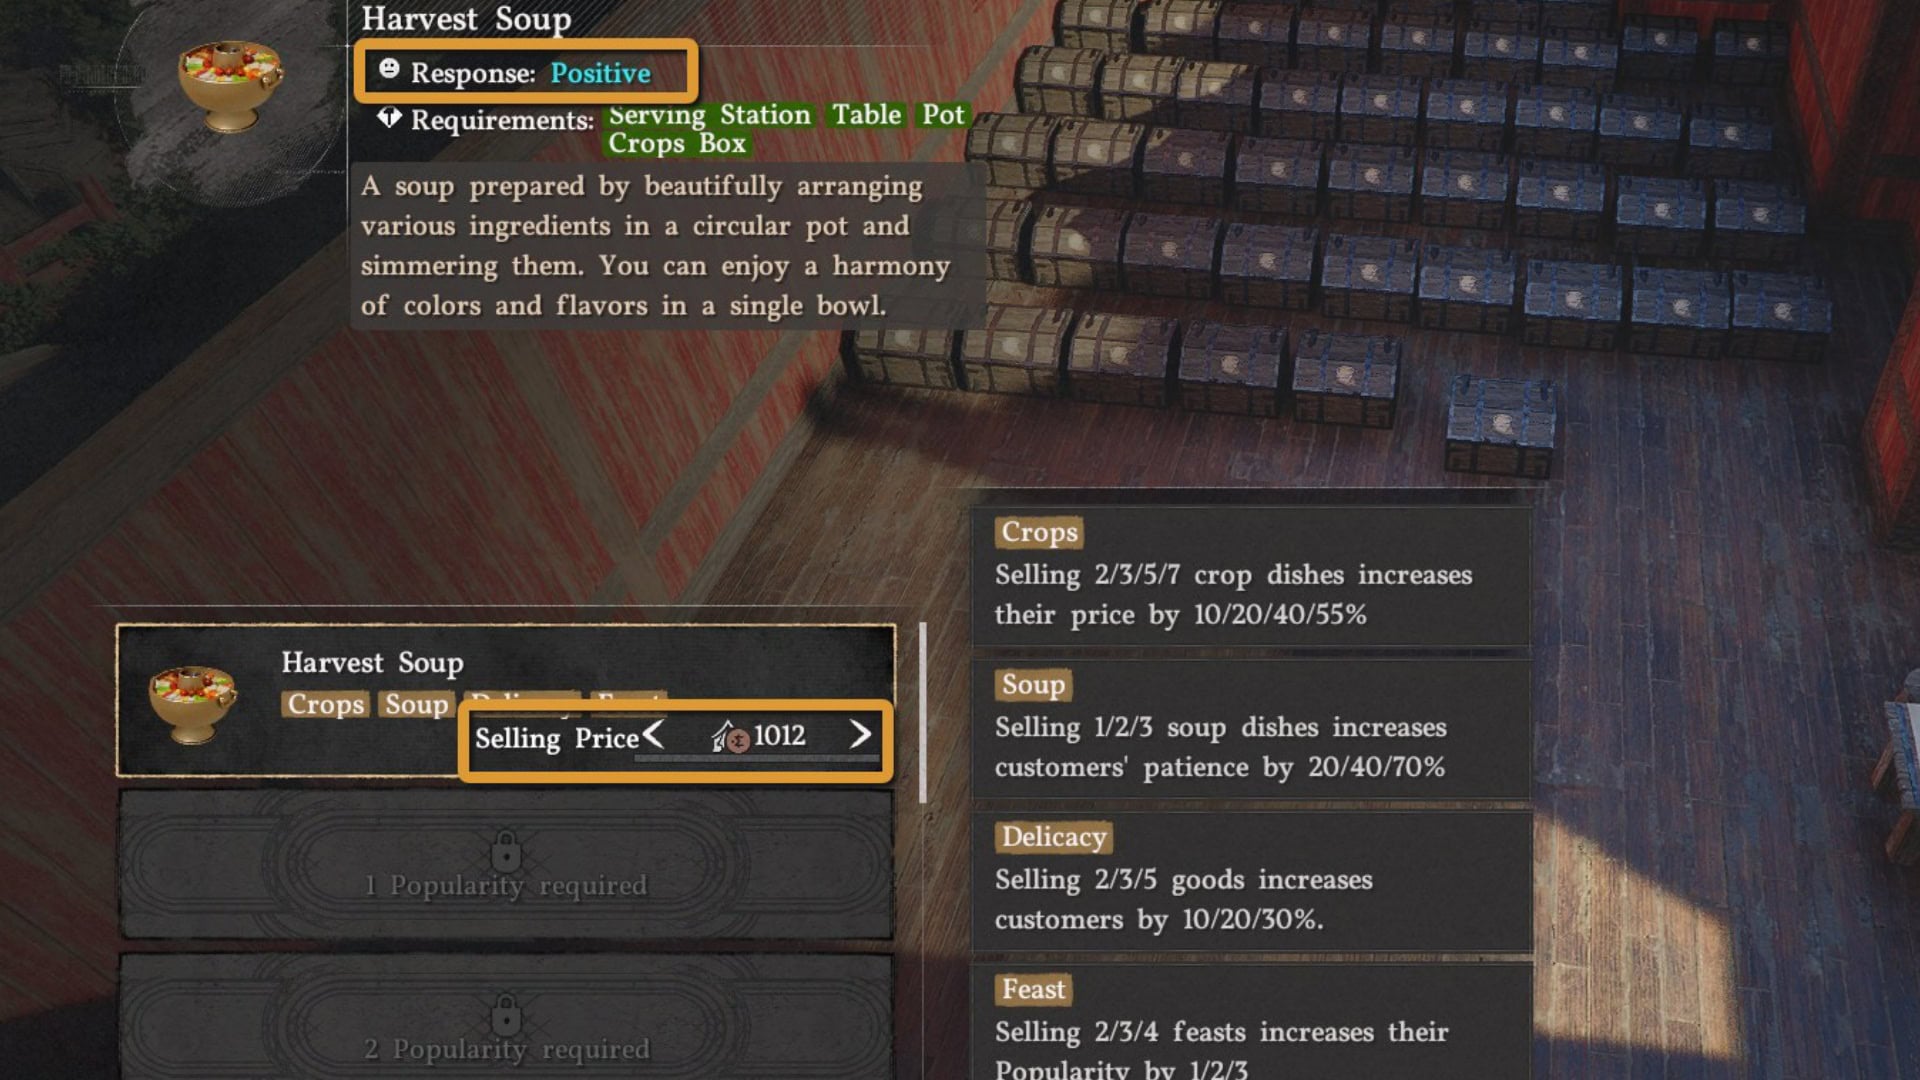
During the process of leveling up you want to prioritize customer satisfaction over profit. Through the Manage Goods menu, lower your goods’ selling prices until they have a Positive Response.
Customers can have five different responses to your Selling Prices:
- Positive – Blue
- Favorable – Green
- Mixed – Yellow
- Unsure – Orange
- Negative – Red
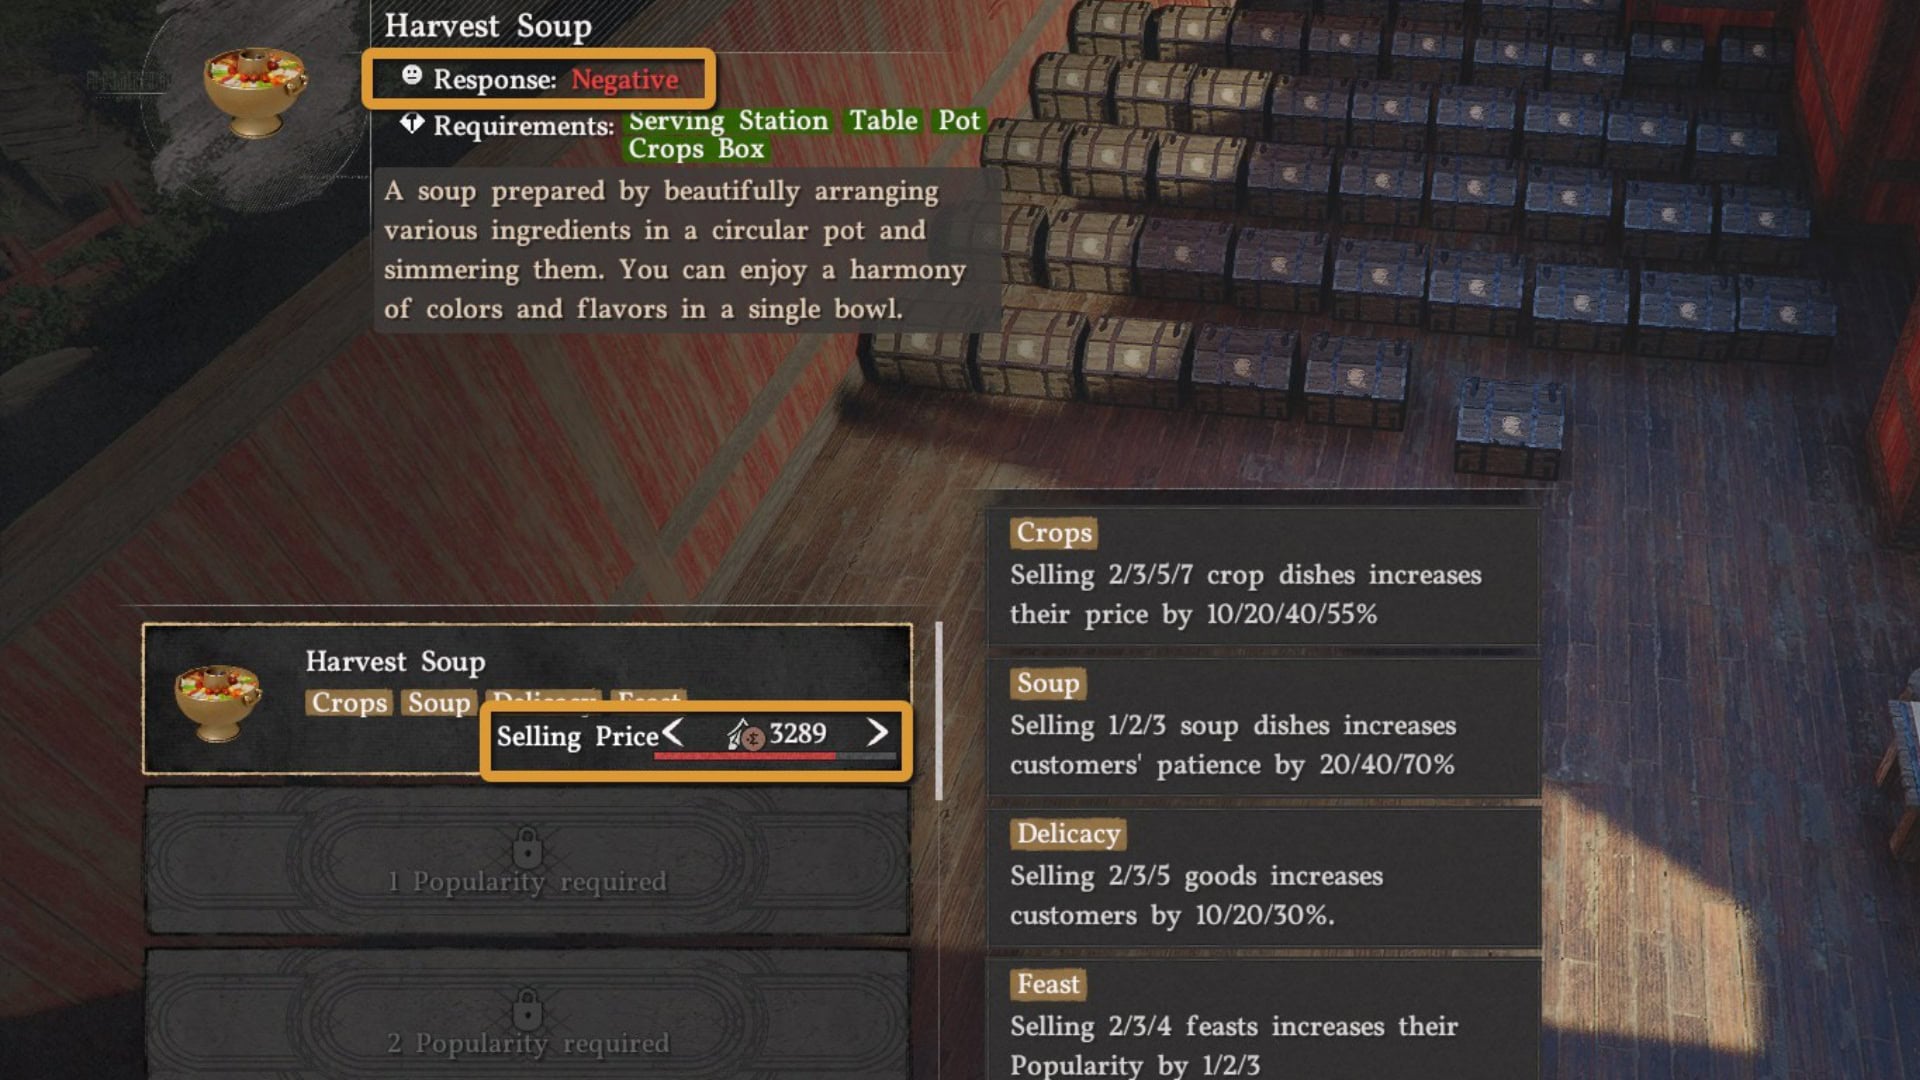
Each good you put up for sale will have a category. When you sell enough goods from the same category, you unlock that category’s Bonus Effect. The more goods from that category you’re selling, the bigger the bonus will be, up to a maximum.
For example, in a Restaurant goods of the Meat category have the next Bonus Effect: “Selling 2/3/5/7 meat dishes increases their price by 10/20/40/55%.”
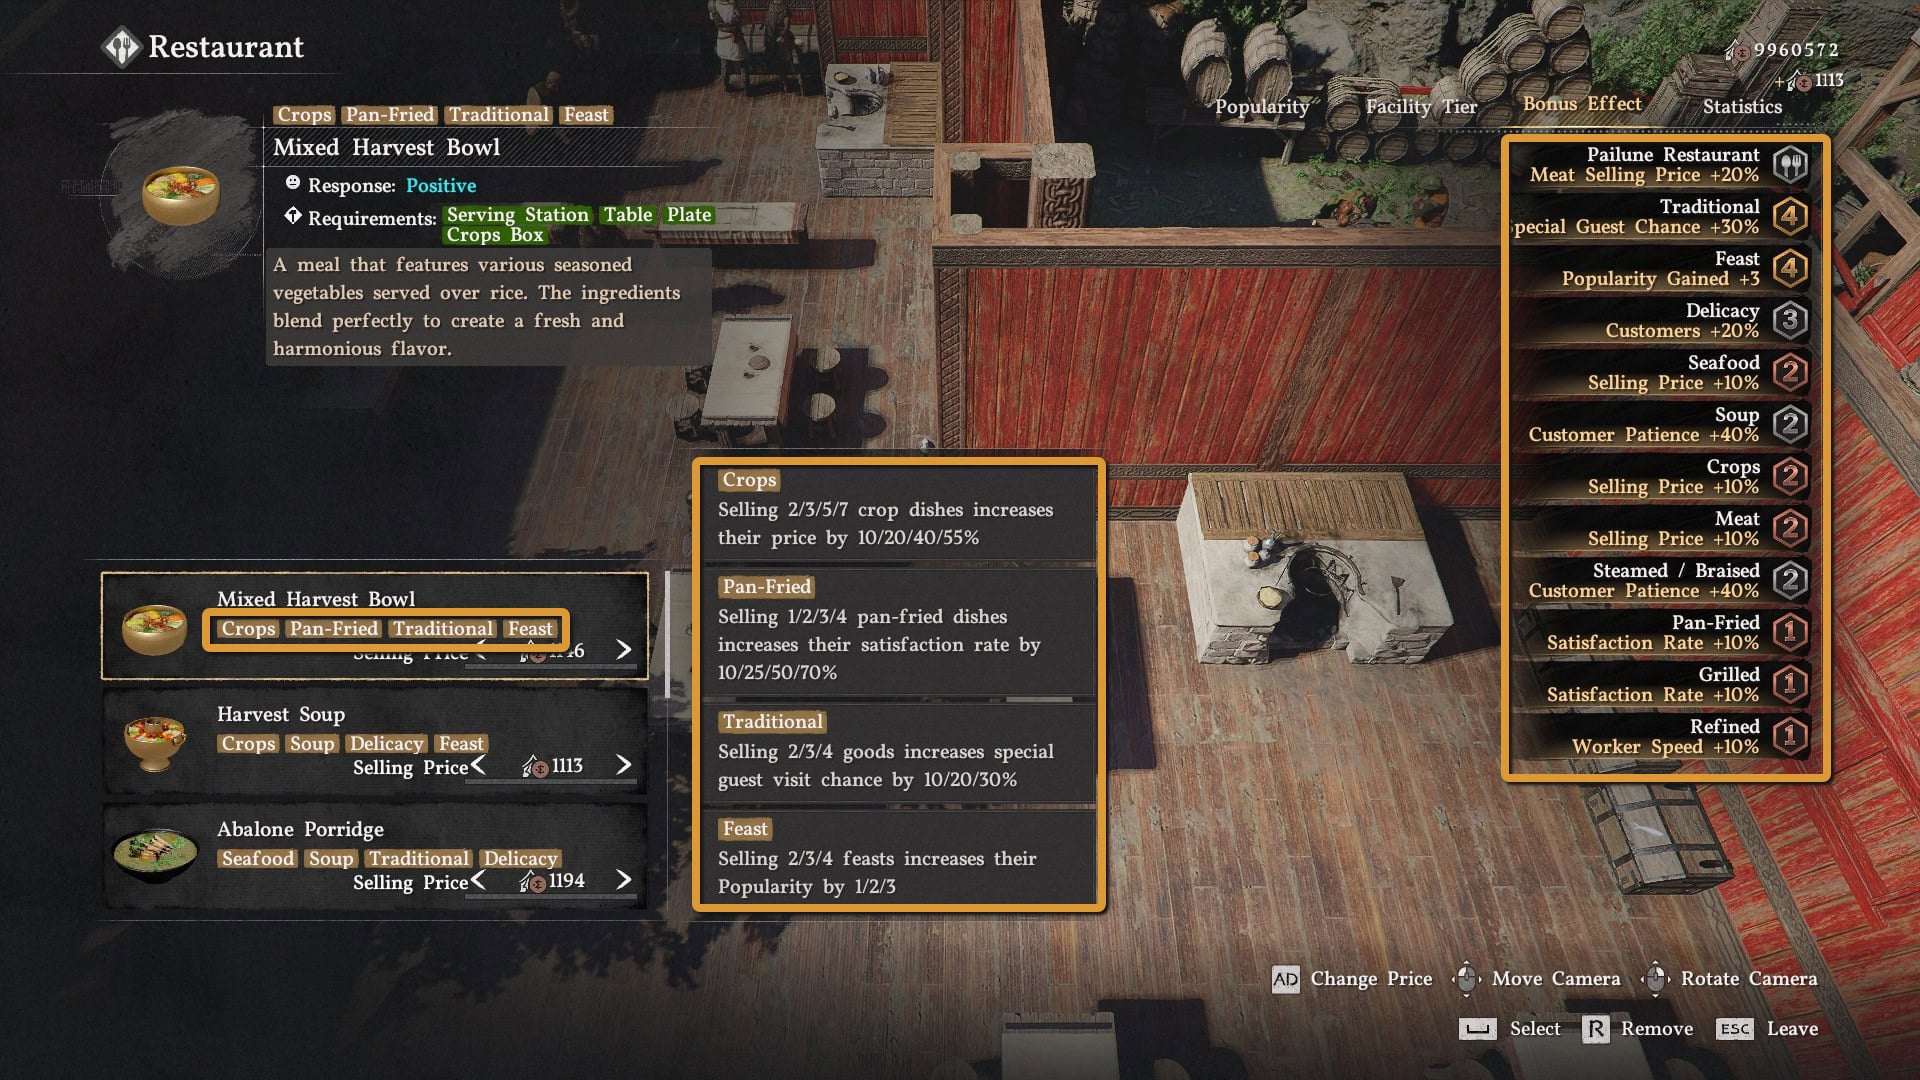
Some Popularity Tasks will ask you to activate a specific Bonus Effect, so manage your goods accordingly.
The last thing to keep in mind is that your Facility will occasionally receive a Special Guest. These are named NP’s you’ve met through the Main Story or other quests. They’re harder to please than other customers, but if they leave satisfied, you’ll receive a larger Popularity boost as well as some consumables.
How to Earn a lot of Camp Funds
Facilities Management is expensive, but in nearly every situation, it will turn profitable in a few in-game days. Unless you purposefully want a facility to fail, nearly anything you do, will result in profits for you.
In the individual Facility Type guides we will share specific tips for how to make the most out of each establishment, but here is the short list of things to do:
- Have a good layout that speeds up the work process between the two types of workers
- Sell items that align with the location’s demand.
- At Max tier sell items on “yellow” bar (Mixed).
- Sell items that increase customers, prices, and worker speed.
What Happens When you End Lease?
When you max out a facility, you will most likely want to free up workers for other locations. You can End the Lease at any point. Progress and rewards you have unlocked, will be remembered, but all Installables will be reset and the area will be returned to its previous state.
If you decide to lease the same facility later, you will have to rebuild the facility from scratch and raise its popularity from 0 again, as if you are opening a brand new shop.
Tips and Recommendations
The Facility Management system is very extensive. Here are a number of tips to keep in mind and apply to your own facilities:
- When you arrive at a newly leased facility, if you are uncertain where the official entrance is and where NPCs will come from, enter Management mode and then exit. You will be placed at the spot where all customers will come from.
- Place Standing Tables for waiting customers to have a place to stay or they may wander around the establishment, clashing with your workers and slowing them down.
- Leave enough room in your facility for your employees to navigate.
- Place installables in a logical path, so the workers spend less time walking around from station to station.
- Place the exact number of Installables as the number of workers you have for each type.
- If you prefer the passive management style, install all stations for the full set of workers and open up the shop. This will increase initial cost, but allow you to have a full build and layout ready from the start.
- Only one Comrade with a high Skill level is needed, fill the other roles with Comrades with no relevant Skill to keep your wages low.
- Use Recruited (from Festivals) NPCs as they cannot sail on ships, so Facilities and Mission Dispatch are a great opportunity for them.
- Once you reach Popularity lvl. 5, increase the Selling Price of your goods to Mixed or Unsure tier of Response to increase your profits.
- Set up your facility and let the workers do their job. It’s not necessary to stay close.
- Sleep whenever possible to pass time, you’ll receive the profits from the hours you rest.
- Focus on selling goods that align with your Facility’s Unique Bonus Effect (top line in the Bonus Effect tab).
- Do not waste selling slots. If your goods give you a Bonus Effect at 2/3/4/6 items sold, don’t sell 5. Find a better use for the 5th slot.
- If there is a Shop at the location where your facility is, the Shop will close until you stop leasing the facility (Pailune Tavern is an example of this).
Facility Management Rewards
Completing each location on the map is worth not just for making money, but to earn valuable rewards.
Every Level completed at every establishment gives you cool equipment and/or blueprints that unlock new decorations and building elements for the Free Construction mode.
Here is the full list for each of the 18 currently available establishments. Every book in our Database allows you to see the exact blueprints they unlock.
Restaurant Rewards
All Restaurants
Popularity Lv. 2: For the Chef by the Fire
Popularity Lv. 4: Popular Restaurants’ Secret
Popularity Lv. 5: Master’s Secret to Managing Ingredients
Calphade Farm Restaurant
Popularity Lv. 3: The Art of Plastering, Cook’s Leather Gloves
Popularity Lv. 4: Blueprint: Round Wide Mist-woven Carpet
Dewhaven Logging Camp Restaurant
Popularity Lv. 3: Child Sleeping Beneath the Clouds, Private: Expert Cook’s Kitchen Knife
Popularity Lv. 4: Gilded Vase
Golden Gallop Racecourse Restaurant
Popularity Lv. 3: A Welcoming Front Door, Private: Expert Cook’s Frying Pan
Popularity Lv. 4: Blueprint: Round Wide Moonlit Garden Carpet
Pailune Restaurant
Popularity Lv. 3: Moonlit Silver Blossoms, Private: Expert Cook’s Jar Lid
Popularity Lv. 4: A Window Open to Solumen
Tashkalp Restaurant
Popularity Lv. 3: Building a Maintenance-Free Chimney, Private: Expert Cook’s Frying Pan Lid
Popularity Lv. 4: Blueprint: Wide Dawndrop Garden Carpet
Tinkerton Restaurant
Popularity Lv. 3: Fixing Creaky Stairs, Private: Expert Cook’s Ladle
Popularity Lv. 4: Blueprint: Mist-woven Carpet
Vellua Restaurant
Popularity Lv. 3: A Window Open to Solumen, Cook’s Cloth Hat
Popularity Lv. 4: Blueprint: Octopus-legged Candlestick
Sawmill Rewards
All Sawmills
Popularity Lv. 2: Building with Planks
Popularity Lv. 4: A Carpenter’s Guide to Sawmill Expansion
Popularity Lv. 5: Woodworking Artisan’s Seal
Beighen Sawmill
Popularity Lv. 3: Wooden Windows of the South, Olvald’s Logging Axe
Popularity Lv. 4: Blueprint: Wooden Purple Gerbera Hanging Planter
Calphade Logging Camp Sawmill
Popularity Lv. 3: Long-Lasting Wooden Doors, Architect’s Cloth Hat
Popularity Lv. 4: Blueprint: Wooden Violet Hanging Planter
Elemore Estate Sawmill
Popularity Lv. 3: Why Craftsmen Seek Timberham, Demenissian Chainsaw
Popularity Lv. 4: Blueprint: Redtree Violet Hanging Planter
Hernand Sawmill
Popularity Lv. 1: The Courtesy of Waiting
Popularity Lv. 3: Dividing Spaces with Interior Doors, Architect’s Leather Gloves
Popularity Lv. 4: Blueprint: Wooden Gerbera Hanging Planter
Hidden Grove Ranch Sawmill
Popularity Lv. 3: One Axe for a Fence, Architect’s Leather Boots
Popularity Lv. 4: Blueprint: Wooden Florindale Hanging Planter
Smithy Rewards
All Smithies
Popularity Lv. 4: The Tireless Forge’s Secret
Popularity Lv. 5: Precision Forging Handbook
Burhum Smithy
Popularity Lv. 3: Building Brick Roofs, Bernor’s Pickaxe
Popularity Lv. 4: Blueprint: Quad-Base Crown of Thorns Brazier
Calphade Farm Smithy
Popularity Lv. 3: The Hundred-Year Wall, Miner’s Lantern Hat
Popularity Lv. 4: Blueprint: Hexagonal Brazier
Tailor’s Shop Rewards
All Tailor’s Shops
Popularity Lv. 2: Tricolor Fabric
Popularity Lv. 5: Golden Scissors Medal
Caledora Tailor’s Shop
Popularity Lv. 3: Pillars of Pywel, Blacksmith’s Leather Armor
Popularity Lv. 4: Blueprint: Sunset Plaid Carpet
Delesyia Dyehouse Tailor’s Shop
Popularity Lv. 3: The Art of Curves, Cook’s Cloth Uniform
Popularity Lv. 4: Blueprint: Large Moonlit Garden Carpet
Marshell Tailor’s Shop
Popularity Lv. 3: Good Windows, Better Homes, Architect’s Cloth Workwear
Popularity Lv. 4: Blueprint: Large Rosy Dragonscale Carpet
Frequently Asked Questions
First, unlock the Greymane Camp by finishing Chapter III of the Main Story. Next, complete the Expanding the Camp Faction Quest from the Gathered Will questline. Then complete the Renewed Vitality questline from Charting the Unknown.
Every facility costs 15,000 Copper to lease. After that, you only pay again once you open the shop and start covering Daily Upkeep and Daily Wages.
There are 18 facilities you can lease: 5 in Hernand, 2 in Pailune, 4 in Demeniss, 3 in Delesyia and 3 in the Crimson Desert.
There are four types: Sawmill, Restaurant, Smithy and Tailor’s Shop. They all work the same way. The difference is which Installables upgrade them and which skills your workers need.
A red lock means the facility isn’t available right now because of fighting in the area. To unlock it, complete a related quest or free a nearby settlement.
A red icon next to Manage Goods or Manage Staff means something is missing. You need to put goods up for sale and hire staff before the shop can open.
Earn Installable Pts. by placing Installables whose categories match your facility type. There are five tiers: Shabby, Modest (8 pts), Decent (40 pts), Premium (100 pts) and Superior (220 pts).
Hire comrades with skills that fit your facility. Their Comrade Skill Bonus adds up to +100% to matching Installables, so you can reach Superior with about 110 Installable Pts. instead of 220.
Focus on keeping customers happy, not on profit. Lower your selling prices until customers give a Positive response, and complete the Popularity Tasks for each level.
Once your facility reaches Popularity level 5. Then raise prices until customers give a Mixed or Unsure response, which brings in more profit.
No. Your workers run the shop while you’re away. You can also sleep to pass time, and you’ll still get the profits from the hours you rested.
Special Guests are named NPCs you’ve met in the Main Story or other quests. They’re harder to please than normal customers. If they leave happy, you get a bigger Popularity boost and some consumables.
Yes. Each token you use, adds 5% for Workstation, Loom, Smithy, or Cooking Station. The game still shows you default amount of materials or ingredients required, but when you craft an item, the reduction is applied and you end up spending les materials than it lists.